
user manual

Display control panel
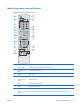
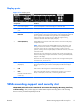
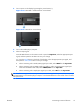
Figure 3-17 HP LD4201 and HP LD4210—Display control panel
1 2 3 4 5 6 7 8
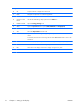
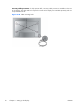
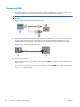
Figure 3-18 HP LD4710—Display control panel
1 2 3 4 5 6 7 8
Component Function
1 Power ON/OFF Press to turn the power ON. Press again to turn it OFF.
2 AUTO/SET When the OSD window is closed, the auto-adjustment feature to optimize the
screen image is activated.
When the OSD window is open, press to select a menu item or save changes.
3 OSD select/adjust button
UP
Selects an OSD menu icon or adjusts the settings in the OSD screen.
UP arrow ▲ adjusts up
4 OSD select/adjust button
DOWN
Selects an OSD menu icon or adjusts the settings in the OSD screen.
DOWN arrow ▼ adjusts down
5 OSD select/adjust button
LEFT
Selects an OSD menu icon or adjusts the settings in the OSD screen.
LEFT arrow ◄ adjusts left
6 OSD select/adjust button
RIGHT
Selects an OSD menu icon or adjusts the settings in the OSD screen.
RIGHT arrow ► adjusts right
7 MENU Opens or closes the OSD (On-Screen Display) menu screen.
8 INPUT Toggles between video inputs:
●
DisplayPort—Digital signal
●
HDMI/DVI—Digital signal
●
RGB—15-pin D-Sub analog signal (VGA)
16 Chapter 3 Setting up the display ENWW