
user manual


Manual sensor test 2 (special-mode test)
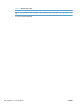
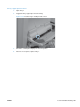
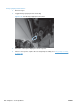
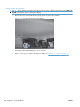
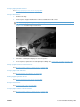
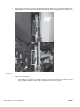
Use this test to test paper-path sensors and the paper-size switches manually. The following illustrations
and table show the locations of these sensors.
1. Press the Home button
.
2. Press the down arrow
to highlight the DIAGNOSTICS menu, and then press the OK button.
3. Press the down arrow
to highlight the MANUAL SENSOR TEST 2 option, and then press the
OK button.
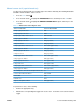
Table 3-5 Manual sensor test 2 diagnostic tests
Sensor or switch name Sensor or switch number
O Tray 1 paper present sensor SR8
P Tray 2 paper present sensor SR25
Q Tray 2 paper surface 1 and 2 sensors SR23 and SR24
R Tray 2 paper size switches SW4
S Tray 3 paper present sensor SR3 (paper feeder)
T Tray 3 feed sensor SR4 (paper feeder)
U Tray 3 paper surface 1 and 2 sensors SR1 and SR2 (paper feeder)
V Tray 3 paper size switches SW2 (paper feeder)
W Tray 4 paper present sensor SR6 (paper feeder)
X Tray 4 feed sensor SR7 (paper feeder)
Y Tray 4 paper surface 1 and 2 sensors SR5 and SR8 (paper feeder)
Z Tray 4 paper size switches SW3 (paper feeder)
a Tray 5 paper present sensor SR11 (paper feeder)
b Tray 5 feed sensor SR10 (paper feeder)
c Tray 5 paper surface 1 and 2 sensor SR9 and SR12 (paper feeder)
d Tray 5 paper size switches SW4 (paper feeder)
The following items cannot be tested using the manual sensor test.
5 V laser and 24 V interlock switches
SW1 and SW2
Power switch SW3
New ITB sensor SR10
Tray 3, 4, and 5 right door switch SW1 (paper feeder)
To perform these tests, do the following:
●
Remove the appropriate tray.
●
Watch for the corresponding bit to toggle from 1 to 0 or 0 to 1. It can take a few seconds for bits to
toggle.
ENWW Tools for troubleshooting 259