
user manual
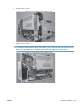


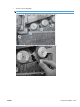

6. Slide the bottom of the assembly away from the product, tip the top of the assembly away from the
product, and then remove the assembly.
Figure 2-135 Remove the low-voltage power supply (5 of 6)
1
2
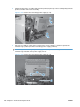
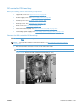
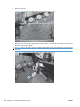
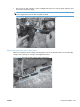
7. Place the assembly on a flat surface. Remove two screws (callout 1), and then separate the
formatter cage (callout 2) from the low-voltage power supply (callout 3).
NOTE: If you are removing the power supply for internal product access, you can leave the
formatter cage installed on the power supply chassis.
Figure 2-136 Remove the low-voltage power supply (6 of 6)
1
2
3
160 Chapter 2 Removal and replacement ENWW