HP 24wd LED Backlit Monitor User Guide
© 2012 Hewlett-Packard Development Company, L.P. Microsoft, Windows, and Windows Vista are either trademarks or registered trademarks of Microsoft Corporation in the United States and/or other countries. The only warranties for HP products and services are set forth in the express warranty statements accompanying such products and services. Nothing herein should be construed as constituting an additional warranty. HP shall not be liable for technical or editorial errors or omissions contained herein.
Chapter I. Introduction 1.1 Features Multilingual OSD adjustment Compatible with IBM VGA, extended VGA, VESA VGA, SVGA, XGA, and SXGA modes Wide range of applicable voltages (AC 100-240V 50/60Hz ) enables direct use without any setting. Plug-and-play VESA DDC1/ 2B Standard. Compatible with Windows 9x / 2000 / XP / 7 / Vista operation systems 1.
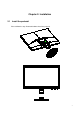
Chapter II. Installation 2.1 Install the pedestal Please follow the steps illustrated below to install the pedestal.
2.2 Connect your monitor to your computer 1. 2. 3. 4. Power off and unplug your computer. Connect the 15-Pin ends of the signal cable to the VGA port of your monitor and the VGA OUT jack on the back of your computer. Secure the screws on both ends of the signal cable. Connect the round end of power adapter to the monitor, then connect one end of the power cords to the power adapter and the other end to the nearest electrical outlet. Power on your computer and monitor.
2.3 Disconnect the pedestal for shipping Press the clip button on the pedestal and remove the pedestal from the stand.
Chapter III.
Chapter IV. 4.1 Operational Instruction Power ON/OFF Switch Press this button to power on/off your monitor. Note: The ON/OFF switch does not disconnect your monitor from the main voltage. To completely disconnect the main voltage, please remove the power plug from the socket. 4.2 Power indicator The power LED is blue when the monitor operates normally. If the monitor runs in power-saving mode, this indicator changes to amber. When the monitor is turned off, this indicator is unlit. 4.
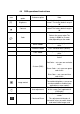
4.4 OSD operational instructions Icon Main menu option Submenu option Note To adjust the brightness level of the screen. The factory default range is 90. To adjust the contrast level of the screen.The factory default range is 80. Brightness Contrast Selects the screen color.The factory is 6500K or Custom color,depending on the mode. Color Warm- 5000K Changes color to slightly reddish white. Standard- 6500K Uses standard colors (default). Cool- 9300K Change color to slightly blueish white.
Horizontal position Vertical position Custom Scaling Sharppness Dynamic Contrast OSD Control OSD position Horizontal OSD Position Vertical OSD Position OSD Transparency OSD Timeout characters (only applicable to VGA input) To adjust the horizontal position of an image (only applicable to VGA input). To adjust the vertical position of an image (only applicable to VGA input). Selects the method on how displayed information on the monitor will be formatted.
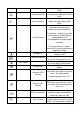
“30 seconds”. Management Power Saver To select the function of power management for your monitor. To enable the energy-saving function, Select On off The factory default setting is On. Restores power to the monitor following an unexpected removal of power. Select: Power-On Recall Mode Display Monitor Status DDC/CI support Bezel Power LED Sleep timer On Off The factory default is On. The resolution, refresh rate and frequency information will be displayed when the OSD main menu is accessed.
Set current time – to set the current time in hours and minutes. Set sleep time – to set the desired time when your monitor works under the sleeping mode. Set On time – to set the desired time when your monitor is awakened from the sleeping mode. Timer - Set “On’ or “Off” status for the Sleep Timer. The default setting is “Off”. Language Information Factory Reset Sleep Now – to activate the sleep mode for your monitor Selects the language in which the OSD menu is displayed.The factory default is English.
Chapter V. Technical Information 5.1 Factory preset display mode Criteria Resolution Horizontal frequency Vertical frequency 1 640X480 @60 Hz 31.469 59.94 2 720X400 @70 Hz 31.469 70.087 3 800X600 @60 Hz 37.879 60.317 4 1024X768 @60 Hz 48.363 60.004 5 1280X720 @60 Hz 45.00 60.00 6 1280X1024 @ 60 Hz 63.981 60.02 7 1440X900 @60 Hz 55.935 59.887 8 1600X900 @60 Hz 60.00 60.00 9 1680X1050@60 Hz 65.29 60.00 10 1920X1080@ 60Hz 67.50 60.
5.2 Product specifications Size 23.6" wide screen Max. resolution 1920 x 1080 @ 60 Hz Recommended resolution 1920 x 1080 @ 60 Hz Horizontal frequency 24-94 kHz Vertical frequency 50-76 Hz Viewable size 521.28x 293.
5.
PIN SIGNAL 1 TMDS Data 2 - 2 TMDS Data 2 + 3 TMDS Data 2 / 4 Shield 4 TMDS Data 4 - 5 TMDS Data 4 + 6 DDC Clock 7 DDC Data 8 No Connect 9 TMDS Data 1 - 10 TMDS Data 1 + 11 TMDS Data 1 / 3 Shield 12 TMDS Data 3 - 13 TMDS Data 3 + 14 +3.
A Safety and Maintenance Guidelines Important Safety Information A power cord is included with the monitor. If another cord is used, use only a power source and connection appropriate for this monitor. For information on the correct power cord set to use with the monitor, refer to the “Power Cord Set Requirements” section in Agency Regulatory Notices. Warning! To reduce the risk of electric shock or damage to the equipment: • Do not disable the power cord grounding feature.
Safety Precautions Use only a power source and connection compatible with this monitor, as indicated on the label/ back plate of the monitor. Be sure the total ampere rating of the products connected to the outlet does not exceed the current rating of the electrical outlet, and the total ampere rating of the products connected to the power cord does not exceed the rating of the power cord. Look on the power label to determine the ampere rating (Amps or A) for each device.
Maintenance Guidelines To enhance the performance and extend the life of your monitor: ● Do not open your monitor cabinet or attempt to service this product yourself. Adjust only those controls that are covered in the operating instructions. If your monitor is not operating properly or has been dropped or damaged, contact your HP authorized dealer, reseller, or service provider. ● Use only a power source and connection appropriate for this monitor, as indicated on the label/ back plate of the monitor.
B Agency Regulatory Notices Federal Communications Commission Notice European Union Regulatory Notice Korean Notice Japanese Notice Power Cord Set Requirements The monitor power supply is provided with Automatic Line Switching (ALS). This feature allows the monitor to operate on input voltages between 100–120V or 200–240V. The power cord set (flexible cord or wall plug) received with the monitor meets the requirements for use in the country where you purchased the equipment.
R Qualification ENERGY STAR○ R certification mark meet the requirements of the HP Displays marked with the ENERGY STAR○ R program. The EPA ENERGY U.S. Environmental Protection Agency (EPA) ENERGY STAR○ R certification mark does not imply endorsement by the EPA. As an ENERGY STAR○ R STAR○ R Partner, Hewlett Packard Company has determined that this product meets the ENERGY STAR○ program requirements for display energy efficiency.
HP Recycling Program HP encourages customers to recycle used electronic hardware, HP original print cartridges, and rechargeable batteries. For more information about recycling programs, go to http://www.hp.com/ recycle. Chemical Substances HP is committed to providing our customers with information about the chemical substances in our products as needed to comply with legal requirements such as REACH (Regulation EC No 1907/2006 of the European Parliament and Council).
Disposal of Waste Equipment by Users in Private Household in the European Union This symbol on the product or on its packaging indicates that this product must not be disposed of with your household waste. Instead, it is your responsibility to dispose of your waste equipment by handing it over to a designated collection point for the recycling or waste electrical and electronic equipment.
C Troubleshooting Solving common problems Shown below are possible problems, reasons, and recommended solutions: Problems The LED power indicator is not lit Solutions Ensure the Power button is switched on and the power cord is properly connected to the grounded power outlet and the monitor. Select Management in the OSD menu before selecting the power indicator on the panel. Check if the Panel Power Indicator is set as Off. If so, set it as On. Nothing displayed on the screen Connect the power cord.
Problems Solutions (Continued) Withering, flicker or moiré effect Keep the monitor away from electric devices that may cause possible electrical interference. Use the maximum refresh rate of the monitor under current resolution. The “Sleep Mode” is always enabled for the monitor (yellow LED). Make sure your monitor is powered on. The graphic card of your computer should be secured in the slot. Make sure the video cable of your monitor is correctly connected to your computer.