HP Designjet L65500 Printer Maintenance and troubleshooting guide (second edition)
Legal notices Trademarks © 2009 Hewlett-Packard Development Company, L.P. Microsoft® and Windows® are U.S. registered trademarks of Microsoft Corporation. The information contained herein is subject to change without notice. The only warranties for HP Products and services are set forth in the express warranty statement accompanying such products and services. Nothing herein should be construed as constituting an additional warranty.
Table of contents 1 Safety precautions General safety guidelines ..................................................................................................................... 1 Warnings and cautions ......................................................................................................................... 2 Warning labels ...................................................................................................................................... 2 Emergency stop buttons .....
Replace the printhead cleaning roll and aerosol filters ....................................................................... 24 Move the printer ................................................................................................................................. 27 Printer maintenance kits ..................................................................................................................... 28 Cleaning kit ........................................................................
10 Front-panel error messages 11 When you need help Documentation ................................................................................................................................... 48 HP Proactive Support ......................................................................................................................... 48 HP Customer Care .............................................................................................................................
vi ENWW
Safety precautions 1 Safety precautions General safety guidelines WARNING! Internal circuits use hazardous voltage capable of causing death or serious personal injury. No operator serviceable parts inside. Refer servicing to qualified service personnel. The disconnecting devices for servicing are two Branch Circuit Breakers located in the building's Power Distribution Unit (PDU).
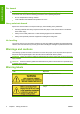
Safety precautions Fire hazard CAUTION: The drying and curing subsystems of the printer operate at high temperatures. To avoid the risk of fire, take the following precautions when operating the printer: ● Do not manipulate the heating modules. ● Load substrates that withstand temperatures of 125°C. Heavy substrate hazard Special care must be taken to avoid personal injury when handling heavy substrates. ● Handling substrate rolls always requires at least two people.
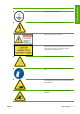
Safety precautions Label Explanation Identifies the main earth terminal Danger of electric shock. Do not touch. Danger of electric shock. Do not touch. Danger of electric shock. In case of operation of the fuse, parts of the printer that remain energized may represent a hazard during servicing. Therefore, ensure that the printer is completely turned off before servicing. Printer parts may sometimes become hot. Do not touch. Use protective gloves for handling printer parts, supplies or waste.
Safety precautions Label Explanation When the printer is printing, the printhead carriage travels back and forth across the substrate. Beware of this moving part. Emergency stop buttons There are four emergency stop buttons distributed around the printer. If an emergency occurs, simply push one of the emergency stop buttons to stop all printing processes. A system error message is displayed on the front panel, and the fans turn at maximum speed.
2 Printer status Printer status Check printer status You can check the current status of the printer in the following ways: ● The HP Internal Print Server displays the status of the printer, the loaded substrate and the ink system. The latest alerts are summarized at the bottom of the main window (see Printer alerts on page 5). ● The front panel displays the ink levels by default; otherwise, you can see the ink levels by selecting the the Ink System icon .
3 Printer calibration Align the printheads Precise alignment between printheads is essential for color accuracy, smooth color transitions and sharp edges in graphical elements. To align the printheads, go to the HP Internal Print Server and select Printer > Printhead alignment. You can select automatic or manual alignment; the HP Internal Print Server will recommend one or the other, but you can always choose.
Troubleshoot printhead alignment Automatic printhead alignment may fail occasionally. In some cases, you may see the front panel error message "Automatic Printhead Alignment is cancelled because of scanning errors". In other cases, there is no error message but the print quality is not satisfactory. Here are some possible explanations. ● There is some problem with substrate advance (see Substrate-advance compensation on page 7). After fixing any substrate-advance issue, retry automatic printhead alignment.
You can view and change the substrate-advance compensation of the currently loaded substrate at any time from the HP Internal Print Server by selecting the print job and then the Printing Adj. button, or by selecting Printer > Printing adjustments. If you prefer the print quality after changing the figure in the Advance field, press the Apply button, and thereafter your preferred substrate-advance compensation will always be used for that particular substrate type.
1. The Closed-Loop Color Calibration and Ink Restriction Test Chart is printed, which contains scales of patches of each ink used in your printer. 2. The test chart is scanned and color-measured using the HP Embedded Spectrophotometer. If the scan cannot be completed successfully, a message is displayed on the front panel; see Color calibration fails on page 43. 3.
Color calibration is based on the color measurement of printed color patches, using the HP Embedded Spectrophotometer. Some characterisitics of substrates, such as surface roughness or transparency, may make reflective color measurement of some substrate types very inaccurate. Color calibration of these substrates will fail or produce unacceptable printing results. The suitability of particular substrate types for color calibration can be found in the table of supported substrate types in the User's guide.
4 Hardware maintenance Maintain the ink cartridges During the normal lifetime of a cartridge, no specific maintenance is required. However, in order to maintain the best print quality, replace a cartridge when it reaches its expiration date. An alert notifies you when any cartridge reaches its expiration date. You can also check a cartridge's expiration date at any time: see Check printer status on page 5.
Check the printheads If you believe that one or more of the printheads is performing poorly: 1. Go to the HP Internal Print Server and select Printer > Printhead cleaning. 2. Press the Check button to perform routine cleaning. 3. If the problem persists, press the Print button in the same window to print the following display. Each color is printed by a single printhead and shows the performance of that printhead.
to the printheads, the carriage cover may need to be cleaned about once every two months, depending on your use of the printer. An alert is displayed when the cover needs to be cleaned. 1. Go to the front panel and select Clean carriage cover from the Preventive Maintenance menu . The carriage moves into the electrical compartment. 2. Open the printhead access door. 3. Press the OK key on the front panel. 4. Clean the carriage cover with a lint-free cloth. 5.
4. Standing at the front of the printer, clean the front rail using a lint-free cloth dampened with isopropyl alcohol. You can access the rail from above. NOTE: If you are in California, instead of isopropyl alcohol please use a VOC-certified cleaner such as a properly diluted 'Simple Green ® All-Purpose Cleaner'. Hardware maintenance 14 5. Standing at the rear of the printer, clean the rear rail in the same way. You can access the rail from below, through the gap between the platen and the pinches. 6.
9. Select Carriage beam position > Move to printing (normal) from the front panel's Substrate menu to lower the carriage beam into its normal position, close to the substrate. This process takes about two minutes to complete. 10. Replace the carriage oiler foams (see Replace the carriage oiler foams on page 21). While replacing the foams, also replace both of the oil wicks.
3. Clean the interior of each ink deposit with a cotton swab or cloth dampened with distilled water. If you cannot remove the dried ink this way, try using isopropyl alcohol instead of distilled water. 4. Also clean the area around the ink deposits; but do not try to clean the printhead area. 5. Close the printhead access door. Clean the line sensor and aerosol inlets In the course of normal use, the line sensor becomes gradually blinded by light deposits of dried ink.
Reach underneath the line sensor and clean it with the cotton swab as shown. 6. Use a brush to clean accumulated dust from the aerosol inlets. Do not use the brush on any other parts. 7. Look for condensation under the carriage, and remove it with a clean lint-free cloth if necessary. 8. Press the OK button on the front panel. The printer lowers the carriage beam to its normal position. WARNING! Do not insert your hands or anything else into the printer while the carriage is descending.
Clean the pinch wheels If the pinch wheels are dirty, they can be cleaned by advancing the substrate (less than a meter). Cleaning the wheels manually could damage them, and is not recommended. Clean the platen The platen should be cleaned whenever it is visibly dirty, or when you notice marks on the back of the substrate. Before cleaning the platen, locate the substrate-advance sensor and be careful to avoid scratching it (see Clean the substrate-advance sensor on page 18).
The sensor is located between the second and third group of three pinches, in the middle of the platen. TIP: You may need a ladder to reach the sensor. TIP: Cleaning is easily done by reaching over the carriage beam in its low position. If you try to do it by putting your arms below the beam in its high position, you will find it more difficult to access the sensor and to check that it is clean. 1. Unload the substrate. 2.
6. Use the swab to clean the lenses of both temperature sensors (drying and curing). 7. Check that the lenses are clean by looking directly at them from underneath the printer. Alternatively, continue cleaning until the cotton swab remains clean after cleaning. 8. Press OK at the front panel to tell the printer that the sensors have been cleaned. 9. Ensure that the emergency stop buttons are released, then restart the printer.
Replace the carriage oiler foams The printhead carriage contains two chunks of foam impregnated with oil that continuously lubricate the carriage rails. They may need to be replaced about every two or three months, depending on your use of the printer. Replacement foams are available in the Cleaning Kit. 1. Go to the front panel and select Replace oiler foam from the Preventive Maintenance menu ENWW 2. Open the printhead access door. 3. Slide off the cover of the left oiler foam. 4.
5. Open the carriage cover to access the right oiler foam. 6. Slide off the cover of the right oiler foam. 7. Remove the old foam.
8. Remove the screws and the oiler foam container, replace the foam, and reattach the container with the screws. 9. Close the carriage cover and the printhead access door. 10. Press the OK key when finished. Replace the line sensor box An alert is displayed when the line sensor box needs to be replaced. The printer moves the carriage to the right so that the box is easily accessible, and turns off power to the carriage. When you see the alert, follow this procedure to replace the box. 1.
4. Remove the line sensor box. 5. Connect the cable to the new line sensor box. 6. Place the new box into the printer and fix it in place with the screws. No tool is needed. 7. Press OK at the front panel. 8. The printer turns on power to the carriage and checks the sensor. Replace the printhead cleaning roll and aerosol filters The printhead cleaning roll is used to clean the printheads between printing passes. It must be replaced periodically in order to maintain print quality.
ENWW Grip the handle and pull the whole printhead cleaning roll assembly out through the door. 4. Slide both rolls off their axles and dispose of the roll with the used cleaning material according to the instructions provided with the new roll. Keep the empty core to use as a takeup core. 5. Slide the new roll onto the upper axle. It clicks into place. 6. Pull the black knob on the upper left and move the pinch system aside. 7.
9. Slide the takeup core onto the lower axle. It clicks into place. NOTE: If the cleaner roll has not been properly installed, you may see a message about clearing a printhead cleaning roll jam. Pull the whole assembly out, wind a little of the roll forward, then slide it back in again. The printer will check the roll again 10. Restore the pinch system by moving the black knob back into place. If you feel resistance because the cleaning roll is too tight, turn the roll slightly counter-clockwise. 11.
Lift up the right-hand side of the filter container; it pivots on the left. 4. Pull the old filter out of the bottom of its container and dispose of it according to the instructions provided with the new filter. 5. Unpack the new filters and ensure that the blue tabs at each end of each filter are at right angles to the filter. 6. Insert the new filter into the container. 7.
4. Raise the feet so that the wheels (A) touch the ground. To raise a foot: a. Use a 30 mm wrench to unlock the nut at the top of the foot. b. Rotate the nut manually down the bolt. Leave about 2 cm (0.8 in) clearance at the bottom between nut and foot. c. Use a 15 mm wrench to rotate the foot upwards. Use the flat faces at the bottom of the bolt to fit the wrench. d. Raise the foot as far as the bolt allows. e. Use the 30 mm wrench to relock the nut.
5 Software maintenance Maintain the HP Internal Print Server ENWW ● The user account should be a Standard account and not an Administrator account. ● No software should be installed on the computer except the software initially provided by HP. ● If an antivirus program is installed, it should not be allowed to check the file system constantly. ● In the Performance tab of the Task Manager, CPU usage should be below 5% (preferably below 3%).
Update the firmware The printer's various functions are controlled by software that resides in the printer, otherwise known as firmware. From time to time firmware updates will be available from Hewlett-Packard. These updates increase the printer's functionality and enhance its features. Firmware updates can be downloaded from the Internet and installed in your printer using the HP Internal Print Server: select Firmware update from the Main tab.
Substrate issues 6 Troubleshoot substrate issues The substrate cannot be loaded successfully ● A substrate cannot be loaded unless all printer subsystems (e.g. the ink system) are ready. ● If the printer is unaware of the carriage beam position (after a printer recovery or shutdown), go to the front panel and select the Substrate Management icon , then Carriage beam position > Carriage system recovery. ● Check that the spindle is correctly inflated.
Substrate issues 3. If feasible, manually move the carriage slowly and carefully to the side, away from the substrate. If this is not feasible because of the severity of the jam, try raising the carriage beam to its maximum height. 4. Remove all substrate and pieces of substrate from the printing zone and from any other parts of the printer into which they may have fallen. Check the curing zone in particular.
Substrate issues The substrate sticks to the platen When the substrate sticks to the platen, the most likely causes are excessive heat and excessive vacuum. Therefore, try decreasing the drying temperature or the vacuum. For information on how to adjust printer settings, see the User's guide. The ink is still wet when the substrate emerges 1. Reduce the ink limits. 2. Increase temperature settings for drying and curing. For information on how to adjust printer settings, see the User's guide.
7 Troubleshoot print-quality issues Print-quality issues General advice When you have any print-quality problem: ● To achieve the best performance from your printer, use only genuine HP supplies and accessories, whose reliability and performance have been thoroughly tested to give trouble-free performance and best-quality prints. For details of recommended substrates, see the User's guide.
If there are thin white lines across the width of the substrate: 1. 2. From the HP Internal Print Server, clean and check the printheads, and check for blocked nozzles. ● If there are blocked nozzles, increase the number of passes. ● If there is a substrate-advance problem, decrease the substrate-advance setting. If the problem persists, increase the number of passes. 1. Increase the substrate-advance setting in the HP Internal Print Server. 2.
If the back side of the substrate varies in color or shade (for instance, if something has been printed on it), you may see banding in parts of your print because the substrate-advance sensor has become confused. In this case, turn off the sensor (in the Loaded Substrate window in the HP Internal Print Server) and adjust the substrate advance manually.
1. Ensure that the substrate is not skewed. If there is any skew, reload the substrate to correct it. 2. Check the carriage beam position. If it is high and the substrate type doesn't require a high position, lower it. 3. If the problem persists, realign the printheads. 4. If the problem persists despite automatic printhead alignment, try manual printhead alignment. 5. If the misalignment appears at the sides of the substrate but not in the center, you have a problem of substrate expansion.
a. Increase the number of passes. b. Increase the drying temperature. c. Decrease the ink limit. For information on how to adjust printer settings, see the User's guide. The print is smudged Print-quality issues This indicates that the ink is not dry. The characteristics of the substrate may have changed. Recreate the substrate preset.
ENWW 1. Check that the substrate has been correctly loaded. 2. Check that the loaded substrate is the same as the substrate selected in the HP Internal Print Server. 3. Check that the ICC profile used by the RIP is correct for the loaded substrate.
8 Troubleshoot ink cartridge and printhead issues Cannot insert an ink cartridge Ink system issues 1. Use the correct procedure to change ink cartridges, through the front panel. See the User's guide. 2. Check that there is no obstruction in the ink cartridge connector. 3. Check that the ink cartridge is of the correct color. A connector will refuse to connect to a cartridge of the wrong color. 4. Check that the ink cartridge is correctly oriented (compare with the others).
Turn off the printer. b. Place a piece of paper underneath the carriage to collect any dirt that falls through. c. Use the brush from the Cleaning Kit to clean the electrical connections gently but thoroughly. d. Use the pneumatic air gun (provided for inflating the spindles) to dislodge any remaining dirt. You can use paper or cloth to prevent the spread of dirt. e. Remove any paper or cloth you have used to prevent the spread of dirt. f.
9 Troubleshoot other issues The printer does not print If all is in order (substrate loaded, all ink components installed and no file errors), there are still reasons why a file you have sent from your computer may not start printing when expected: ● You may have an electrical power problem. If there is no activity at all from the printer, and the front panel does not respond, check that the power cables are connected correctly and that there is power available at the source.
Upgrade the HP Internal Print Server TIP: When you have to upgrade the firmware and the HP Internal Print Server, first upgrade the firmware and then the HP Internal Print Server. To upgrade the HP Internal Print Server, proceed as follows. 1. First uninstall the current version through the Control Panel. Doing so will delete the current job in the queue, but not the RIP files. 2. Unzip the .ZIP 2 file (two files to be extracted: HPIPS.msi and setup.
10 Front-panel error messages Occasionally you may see one of the following messages appear on the front-panel display. If so, please follow the advice in the Recommendation column. If you see an error message that does not appear here, and you feel in doubt about the correct response, or if you have followed the recommendation but the problem persists, call your service representative. See HP Customer Care Centers on page 49.
Table 10-1 Text messages (continued) Recommendation Lower lever Lower the substrate pressure handles. See the User's guide. Maintenance #N advised. Please contact HP You are advised to contact your service representative. See HP Customer Care Centers on page 49. No substrate loaded Load substrate. Out of cleaner roll Replace the printhead cleaning roll. See Replace the printhead cleaning roll and aerosol filters on page 24.
Table 10-2 Numerical error codes (continued) Front-panel errors 46 Error code Recommendation 14.8 Emergency stop button pushed. Release all four emergency stop buttons. Turn circuit breaker ACB-1 off and then on. 14.9 Fuse error. Turn off the printer (see the User's guide). Open the FH11 fuse holders and check the fuses. Replace any fuse if necessary. 15.1 The printer is unable to warm up to its working temperature. Check that the tri-phase power supply is working.
Table 10-2 Numerical error codes (continued) Recommendation 65.04 Restart the printer. 68 This warning message indicates that the printer's internal counters are not functioning correctly. You are recommended to restart the printer in the near future. 78.1:04 The substrate preset is damaged or missing. Import or create a new preset for the loaded substrate. See the User's guide. 78.2:01 The substrate may have become detached from the rear spindle, or the core is slipping on the spindle.
11 When you need help Help Documentation The following documents are provided with your printer, and can also be downloaded from http://www.hp.com/go/L65500/manuals/. ● Site preparation guide ● Site preparation checklist ● User's guide ● Maintenance and troubleshooting guide ● Legal information HP Proactive Support HP Proactive Support helps reduce costly printer downtime by preemptively identifying, diagnosing and resolving printer issues before they become problems for you.
or call us on the telephone (see HP Customer Care Centers on page 49). To register your warranty: Help http://register.hp.com/ HP Customer Care Centers Help is available to you by telephone. What to do before you call: ● Review the troubleshooting suggestions in this guide. ● Review your RIP's documentation, if relevant.
Colombia: 571 602 9191 / 01 8000 51 4746 8368 Costa Rica: 0 800 011 0524 Help Dominican Republic: 1 800 711 2884 Guatemala: 1 800 999 5105 Honduras: 800 0 123 / 1 800 711 2884 Mexico: 52 55 5258-9922 Nicaragua: 1 800 0164 / 800 711 2884 Panama: 001 800 711 2884 Peru: 511 411 2443 / 0 800 10111 El Salvador: 800 6160 Venezuela: 58 212 278 8666 / 0 800 474 68368 CC LAR Nextel: (5255) 1088 0884; ID 52*20115*51 CC LAR e-Mail: carecenter.ipglf.lar@hp.
Preset creation flowchart Preset creation flowchart A ENWW 51
Index A aerosol filters maintenance 24 alerts errors 5 alerts, warnings 5 automatic tracking 7 B banding problems 7 C calibration color 8 carriage cover, cleaning 12 carriage oiler foams, replacing 15 carriage rails, cleaning 13 caution 2 clean the printer 15 cleaning kit 28 color calibration 8 color calibration cancelled 9 color profiles 10 colors inaccurate 39 colors washed out 38 Customer Care 48 D documentation 48 E electromagnetic disturbances 42 emergency stop buttons 4 error messages front panel 4
substrate edge holders cleaning 17 substrate-advance sensor cleaning 8 support services HP Customer Care 48 HP Proactive Support 48 T telephone support 7 temperature sensors cleaning 19 thunderstorm 42 W warning 2 warning labels 2 ENWW Index 53