
Instruction for Use


17
PLEASE PHONE US TO REGISTER YOUR APPLIANCE AND ACTIVATE YOUR PARTS GUARANTEE ON 08448 24 24 24
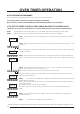
SETTING THE TIME OF DAY
Step 1 Make sure all oven controls are turned Off.
Step 2 Check the electricity supply to the cooker is turned on.
Step 3 When switched on the display will show 0.00 and the Auto symbol, flashing
intermittently.
Step 4 Press & hold in both the Cook Period & End Time buttons together.
Step 5 With the Cook Period & End Time buttons still held in, press either the „+” or „-” buttons
to set the correct time of day.
Step 6 Release all the buttons simultaneously. THE TIME OF DAY IS NOW SET.
To change the time of day repeat Steps 4, 5 & 6 above.
Note: You cannot adjust the time of day if the timer has been set for an Auto Cooking Programme.
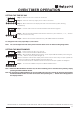
SETTING THE MINUTE MINDER
Step 1 Ensure the time of day is set correctly.
Step 2 Press and hold the Minute Minder button.
Step 3 With the Minute Minder button held in, set the required Minute Minder period using the
„+” and „-” buttons. A ‚bell’ symbol will light up.
Release all buttons and the timer display will revert back to the time of day. The ‚bell’ symbol will
remain lit to signify that a Minute Minder period has been set.
At the end of the set time an audible tone will be heard, and the ‚bell’ symbol will disappear.
Step 4 To cancel the audible tone press the Minute Minder button.
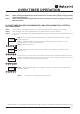
Note 1 When the Minute Minder has been set, the time remaining can be checked at any time by simply
pressing the Minute Minder button.
Note 2 If necessary the Minute Minder can be cancelled before the tone sounds by pressing and holding
the Minute Minder button and then at the same time pressing the „-” button until 0.00 appears in
the display window.
A
U
T
O
000
.
.
A
U
T
O
000
.
000
.
000
.
A
U
T
O
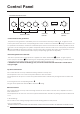
OVEN TIMER OPERATION