Instructions for installation and use WASHER-DRYER ! This symbol reminds you to read this instruction manual.
Installation GB ! This instruction manual should be kept in a safe place for future reference. If the Washerdryer is sold, given away or moved, please ensure the manual is kept with the machine, so that the new owner may benefit from the advice contained within it. ! Read these instructions carefully: they contain vital information relating to the safe installation and operation of the appliance.
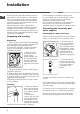
Connecting the drain hose 65 - 100 cm Connect the drain hose to drain duct piping or a wall drain located between 65 and 100 cm above the floor, making sure it is not bent at all. Alternatively, rest the drain hose on the side of a washbasin or bathtub, fastening the duct supplied to the tap (see figure). The free end of the hose should not be underwater.
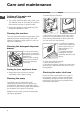
Care and maintenance GB Cutting off the water and electricity supplies • Turn off the water tap after every wash cycle. This will limit wear on the hydraulic system in the machine and help to prevent leaks. • Unplug the appliance when cleaning it and during all maintenance work. Cleaning the machine The outer parts and rubber components of the appliance can be cleaned using a soft cloth soaked in lukewarm soapy water. Do not use solvents or abrasives.
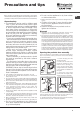
Precautions and tips ! The machine was designed and constructed in accordance with international safety regulations. The following information is provided for safety reasons and must therefore be read carefully. • Do not use the appliance to dry foam rubber or similar elastomers.
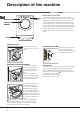
Description of the machine GB CONTROL PANEL PORTHOLE DOOR PORTHOLE DOOR HANDLE DIRECT INJECTION SYSTEM The washing machine features the innovative “Direct Injection” technology that quickly solubilises the detergent and efficiently activates all the various components. The system guarantees the complete use and dissolution of the detergent, which is mixed with water before reaching the garments.
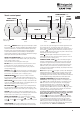
START/PAUSE button Touch control panel WASH CYCLE SELECTOR knob with indicator light SPIN button M2 M1 TEMPERATURE button ECO indicator light WASH CYCLE PHASE GB icons DISPLAY Button with ON/OFF indicator light DRYING OPTION button buttons CONTROL PANEL LOCK DELAYED START button with indicator light button LOCK indicator light Button with ON/OFF indicator light: press this briefly to switch the machine on or off. The green indicator light indicates that the machine is switched on.
How to run a wash cycle or a drying cycle GB WARNING: before you use the Washer-dryer for the first time, run a wash cycle with detergent and no laundry, using the 90° cottons cycle without pre-wash. 1. SWITCH THE MACHINE ON. Press the button. All the indicator lights will illuminate for 1 second and the text AQUALTIS will appear on the display; the indicator light corresponding to the button will then remain lit in a constant manner and the START/PAUSE indicator light will flash. 2. SELECT THE PROGRAMME.
Wash cycles and options 60°/40° Prewash Wash Fabric softener Maximum load for washing (Kg) 7 11 5 5 4,5 - 9 Multi Colour 20° 1600 Coloureds Intensive 40° 1600 7 9 Darks 30° 800 3 - 6 Steam Refresh - - - - - - - 2 Drying Cottons - - 7 - - - - Drying Synthetics - - 5 - - - - Drying Wool - - 2,5 - - - - Rinse - 1600 7 - - 11 Spin and Pump out - 1600 7 - - - 11 Pump out
Detergents and laundry GB Detergent The type and quantity of detergent required depend on the type of fabric you are washing (cotton, wool, silk, etc.), as well as its colour, the washing temperature, the level of soiling and the hardness of the water in the area. Measuring out the detergent carefully will avoid wastage and help to protect the environment: although they are biodegradable, detergents still contain ingredients which alter the balance of nature.
Trouble shooting Your Washer-dryer could occasionally fail to work. Before contacting the Technical Assistance Centre (see “Assistance”), make sure that the problem cannot be not solved easily using the following list. Problem: Possible causes / Solutions: The Washer-dryer does not switch on. • The appliance is not plugged into the socket fully, or not enough to make contact. • There is no power in the house. The wash cycle does not start. • • • • GB The door is not closed properly.
Assistance GB Before calling for Assistance: • Check whether you can solve the problem by yourself (see “Trouble shooting”); • Restart the wash cycle to check whether the problem has been solved; • If it has not, contact the Authorised Technical Assistance Service. ! If the Washer-dryer has been installed or used incorrectly, you will have to pay for the call-out service. ! Always request the assistance of authorised technicians.
Istruzioni per l’installazione e l’uso LAVASCIUGA ! Questo simbolo ti ricorda di leggere questo libretto istruzioni.
Installazione IT ! E’ importante conservare questo libretto per poterlo consultare in ogni momento. In caso di vendita, di cessione o di trasloco, assicurarsi che resti insieme alla lavasciuga. ! Leggere attentamente le istruzioni: ci sono importanti informazioni sull’installazione, sull’uso e sulla sicurezza. ! Nella busta contenente questo libretto troverete, oltre alla garanzia, dei particolari che serviranno per l’installazione.
Collegamento del tubo di scarico 65 - 100 cm Collegare il tubo di scarico a una conduttura di scarico o a uno scarico a muro posti tra 65 e 100 cm da terra evitando assolutamente di piegarlo. In alternativa, appoggiare il tubo di scarico al bordo di un lavandino o di una vasca, legando la guida in dotazione al rubinetto (vedi figura). L’estremità libera del tubo di scarico non deve rimanere immersa nell’acqua.
Manutenzione e cura IT Escludere acqua e corrente elettrica • Chiudere il rubinetto dell’acqua dopo ogni lavaggio. Si limita così l’usura dell’impianto idraulico della macchina e si elimina il pericolo di perdite. • Staccare la spina della corrente quando si pulisce la macchina e durante i lavori di manutenzione. Pulire la macchina La parte esterna e le parti in gomma possono essere puliti con un panno imbevuto di acqua tiepida e sapone. Non usare solventi o abrasivi.
Precauzioni e consigli ! La macchina è stata progettata e costruita in conformità alle norme internazionali di sicurezza. Queste avvertenze sono fornite per ragioni di sicurezza e devono essere lette attentamente. Sicurezza generale • Questo apparecchio è stato concepito esclusivamente per un uso di tipo domestico.
Descrizione della macchina IT PANNELLO COMANDI TOUCH CONTROL PORTA OBLÒ MANIGLIA PORTA OBLÒ SISTEMA DIRECT INJECTION La lavabiancheria è dotata di una innovativa tecnologia “Direct Injection” che solubilizza rapidamente il detersivo attivandone nel miglior modo possibile tutte le varie componenti. Il sistema garantisce un completo utilizzo e scioglimento del detersivo grazie alla sua miscelazione con l’acqua prima di arrivare sui capi.
Pulsante con spia Pannello comandi touch control Pulsante START/PAUSE CENTRIFUGA Manopola PROGRAMMI M2 Pulsante M1 TEMPERATURA IT Icone FASI DI LAVAGGIO Spia ECO DISPLAY ON/OFF Pulsante ASCIUGATURA Pulsanti OPZIONI ON/OFF : premere brevemente il pulsante per accendere o spegnere la macchina. La spia verde indica che la macchina è accesa. Per spegnere la lavasciuga durante il lavaggio è necessario tenere premuto il pulsante più a lungo, circa 3 sec.
Come effettuare un ciclo di lavaggio o asciugatura IT NOTA: la prima volta che si utilizza la lavasciuga, effettuare un ciclo di lavaggio senza biancheria ma con detersivo impostando il programma cotone 90° senza prelavaggio. 1. ACCENDERE LA MACCHINA. Premere il pulsante . Tutte le spie si accenderanno per 1 secondo e sul display comparirà la scritta AQUALTIS; rimarrà poi accesa fissa la spia del pulsante e la spia START/PAUSE lampeggerà. 2. SCEGLIERE IL PROGRAMMA.
Programmi e opzioni 11 1000 5 5 1600 4,5 - 9 Colorati Intensivo 40° 1600 7 9 Scuri 30° 800 3 - 6 - - - - - - - 2 Asciugatura Cotone - - 7 - - - - Asciugatura Sintetici - - 5 - - - - Asciugatura Lana - - 2,5 - - - - Risciacquo - 1600 7 - - 11 Centrifuga e Scarico - 1600 7 - - - 11 Solo “Scarico” * - OFF - - - - - 11 Anti Allergy Plus 60° 1600 6 - 6 Ul
Detersivi e biancheria IT Detersivo La scelta e la quantità del detersivo dipendono dal tipo di tessuto (cotone, lana, seta...), dal colore, dalla temperatura di lavaggio, dal grado di sporco e dalla durezza dell’acqua. Dosare bene il detersivo evita sprechi e protegge l’ambiente: pur biodegradabili, i detersivi contengono elementi che alterano l’equilibrio della natura. Si consiglia di: • usare detersivi in polvere per capi in cotone bianchi e per il prelavaggio.
Anomalie e rimedi Può accadere che la macchina non funzioni. Prima di telefonare all’Assistenza (vedi “Assistenza”), controllare che non si tratti di un problema facilmente risolvibile aiutandosi con il seguente elenco. Anomalie: Possibili cause / Soluzione: La macchina non si accende. • La spina non è inserita nella presa della corrente, o non abbastanza da fare contatto. • In casa non c’è corrente. Il ciclo di lavaggio non inizia. • • • • La porta oblò non è ben chiusa.
Assistenza IT Prima di contattare l’Assistenza: • Verificare se l’anomalia può essere risolta autonomamente (vedi “Anomalie e Rimedi); • Riavviare il programma per controllare se l’inconveniente è stato ovviato; • In caso negativo, contattare il Servizio Assistenza Tecnico Autorizzato. ! In caso di errata installazione o uso non corretto potrete essere chiamati al pagamento dell’intervento. ! Non ricorrere mai a tecnici non autorizzati. Comunicare: • il tipo di anomalia; • il modello della macchina (Mod.
Installations- und Bedienungsanleitungen WASCHTROCKNER ! Dieses Symbol erinnert Sie daran, das vorliegende Handbuch zu lesen.
Aufstellung DE ! Es ist äußerst wichtig, diese Bedienungsanleitung sorgfältig aufzubewahren, um sie jederzeit zu Rate ziehen zu können. Sorgen Sie dafür, dass sie im Falle eines Umzugs oder Übergabe an einen anderen Benutzer das Gerät stets begleitet. ! Lesen Sie bitte folgende Hinweise aufmerksam durch: sie liefern wichtige Informationen hinsichtlich der Installation, des Gebrauchs und der Sicherheit.
Anschluss des Ablaufschlauches 65 - 100 cm Schließen Sie den Ablaufschlauch, ohne ihn dabei zu krümmen, an eine Ablaufleitung, oder an einen in der Wand (in einer Mindesthöhe von 65 – 100 cm) angelegten Ablauf an, oder hängen Sie ihn in ein Becken oder eine Wanne ein; befestigen Sie ihn in diesem Falle mittels der mitgelieferten Führung an dem Wasserhahn (siehe Abbildung). Das freie Ablaufschlauchende darf nicht unter Wasser bleiben.
Reinigung und Pflege DE Abstellen der Wasser- und Stromversorgung • Drehen Sie den Wasserhahn nach jedem Waschvorgang zu. Hierdurch wird der Verschleiß der Wasseranlage verringert und Wasseraustritte vermieden. • Ziehen Sie den Netzstecker aus der Steckdose, bevor Sie Ihr Gerät reinigen. Reinigung des Gerätes Die Gehäuseteile und die Teile aus Gummi können mit einem, mit warmer Spülmittellauge angefeuchteten Tuch gereinigt werden. Vermeiden Sie den Einsatz von Löse- und Scheuermitteln.
Vorsichtsmaßregeln und Hinweise ! Der Waschtrockner wurde nach den strengsten internationalen Sicherheitsvorschriften entworfen und gebaut. Nachstehende Hinweise werden aus Sicherheitsgründen genannt und sollten aufmerksam gelesen werden. Allgemeine Sicherheit • Dieses Gerät wurde ausschließlich für den Einsatz im privaten Haushalt konzipiert.
Beschreibung Ihres Gerätes DE BEDIENBLENDE GERÄTETÜR GRIFF SYSTEM DIRECT INJECTION Die Waschmaschine ist mit der innovativen Technologie „Direct Injection” ausgestattet, die das Waschmittel schnell auflöst und somit die darin enthaltenen Komponenten bestmöglich aktiviert. Durch die Vermischung des Waschmittels mit Wasser, bevor es auf die Wäsche gelangt, sichert das System sichert die komplette Nutzung und Auflösung des Waschmittels zu.
Taste mit Kontrollleuchte START/PAUSE Bedienblende “touch control” Wählschalter PROGRAMME M2 M1 Taste SCHLEUDERGANG Taste TEMPERATUR Kontrollleuchte ECO DE Symbole PROGRAMMABLAUF DISPLAY Taste mit Kontrollleuchte ON/OFF Taste TROCKNEN Tasten ZUSATZFUNKTIONEN Taste mit Kontrollleuchte ON/OFF: Drücken Sie kurz auf die Taste, um das Gerät ein- bzw. auszuschalten. Die grüne Kontrollleuchte zeigt an, dass das Gerät eingeschaltet ist.
Durchführung eines Wasch- oder Trockenzyklus DE ANMERKUNG: Lassen Sie vor erstmaligem Gebrauch des Waschtrockneren erst einen Waschgang ohne Wäsche, jedoch mit Waschmittel durchlaufen. Stellen Sie hierzu das 90°C-Waschprogramm ohne Vorwäsche ein. 1. EINSCHALTEN DES GERÄTES. Drücken Sie die Taste . Alle Kontrolllampen leuchten für 1 Sekunde auf, im Display erscheint der Schriftzug AQUALTIS; im Anschluss schaltet die Kontrollleuchte der Taste auf Dauerlicht und die Kontrollleuchte START/PAUSE auf Blinklicht.
Programme und Zusatzfunktionen 1600 1000 20° 1600 Buntwäsche Intensiv 40° 1600 Dunkel 30° 800 Steam Refresh - - Trocknen Baumwolle - - Trocknen Kunstfasern - - Trocknen Wolle - Spülen - Schleudern und Abpumpen - Nur Abpumpen * 7 5 4,5 7 3 1600 1600 - OFF Antiallergie Plus 60° 1600 6 - 6 Ultra Fein 30° 0 1 - 1 Wolle Platinum Care: wolle, Kaschmir usw.
Waschmittel und Wäsche DE Waschmittel Die Wahl des Waschmittels und der Waschmittelmenge hängt von der Gewebeart (Baumwolle, Wolle, Seide ...), der Farbe, der Waschtemperatur, der Stärke der Verschmutzung und der Wasserhärte ab. Dosieren Sie das Waschmittel gemäß Herstellerangaben exakt, um Verschwendung zu vermeiden und die Umwelt zu schonen: obwohl sie biologisch abbaubar sind, beinhalten Sie dennoch Stoffe, die die Umwelt belasten.
Störungen und Abhilfe Bei Funktionsstörung: Bevor Sie sich an den Technischen Kundendienst wenden (siehe „Kundendienst“), vergewissern Sie sich zuerst, ob es sich nicht um eine Kleinigkeit handelt, die Sie selbst beheben können. Ziehen Sie hierzu nachstehendes Verzeichnis zu Rate. Störungen: Mögliche Ursachen / Lösungen: Das Gerät schaltet sich nicht ein. • Der Stecker steckt nicht in der Steckdose, oder nicht so, dass der Kontakt hergestellt wird. • Der Strom ist ausgefallen.
Kundendienst 195134129.00 04/2015 - Xerox Fabriano DE Bevor Sie den Kundendienst anfordern: • Prüfen Sie, ob einige Kontrollen vorab selbst durchgeführt werden (siehe “Störungen und Abhilfe); • Starten Sie daraufhin das Programm erneut, um sicherzustellen, dass die Störung auch wirklich behoben wurde; • Ist dies nicht der Fall, wenden Sie sich bitte an den autorisierten Kundendienst.