
Instruction Manual
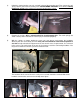
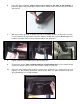
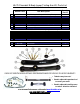

Table Of Contents
- UImproperly installed or installed by someone other than a qualified, licensed auto mechanic experienced in the installation and removal of suspension products;
- UImproperly serviced, misused, or modified, altered or subjected to abuse, negligence, accident or collision;
- UInstalled in any vehicle that has been modified;
- UInstalled on any vehicle that has carried loads in excess of automobile manufacturer suggested weight limits; or
- UInstalled on any vehicle that has been subject to abnormal or excessive use, including rallying, racing, or racing-type activities or off-road use.
- UDid you register the product at U0TUwww.hotchkis.netU0TU or via the mail-in warranty card within 30 days of purchase?
- UIs the product appropriate to your application?
- UDid you carefully and thoroughly read the instructions provided along with the product?
- UDo you have the original invoice or sales receipt?
- UIs the return date within 36 months from the purchase date?
- UAre you the original purchaser?
- UWas the product properly installed by a qualified, licensed auto mechanic?
- UHas the product been installed on the original vehicle on which it was installed at all times?
- UIs the product unmodified and clean?
- UIs the reason for return a legitimate product defect?

3) Unbolt the shock from the rear axle, and pull it clear of the mounting stud. Then remove the coil
spring retainer plate from the trailing arm. USE EXTREME CAUTION!
There will be nothing
holding the spring to the trailing arm except the weight of the vehicle.
4) Remove the springs. Only a trained technician should attempt this. The stock springs are
under a heavy stress load and can cause injury if removed improperly.
5) With the springs no longer loading the arms you may loosen and remove the hardware
attaching the arms to the body and axle. Only one arm should be removed and replaced at
one time to help maintain the alignment of the axle and for ease of replacement. Use a wrench
in the access hole at the front of the arm in the frame to reach the connecting hardware. You
may have to move the exhaust system to remove the bolt.
The hardware at the rear of the arm is easily accessed and should be removed. With all the
hardware removed the stock arm should drop out of place.