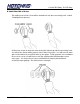
110 66-70 B-Body, 70-74 E-Body P/N : 1110 Tubular Upper A-Arm 1966-1970 Chrysler B-Body Charger, Super Bee, Road Runner, GTX 1970-1974 Chrysler E-Body Cuda, Challenger Thank you for your purchase from our new line of B & E-Body parts. Please call us at (877) 4NO - ROLL if you have any questions Regarding the service or installation of your Hotchkis products. Before You Start: Please read the entire manual before starting. Most pictures shown are of the driver side a-arm.
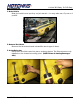
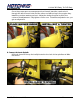
1110 66-70 B-Body, 70-74 E-Body 1. Raise Vehicle Raise the vehicle and put it up on jack stands. You may also use a 2-post or 4post lift. 2. Remove Stock Arms Remove the front wheels and uninstall the stock upper A-Arms. 3. A-Arm Relocater Place the A-Arm Relocator into place as shown below. The Relocators are only installed on the forward mounting point. (NOTE: Picture is showing Passenger side) Hotchkis Performance LLC.
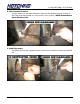
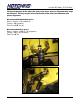
1110 66-70 B-Body, 70-74 E-Body 4. Check for Bolt Clearance In some instances, we seen clearance issues for the Relocator bolt. Check to see if the hole that is used to connect the A-Arm is clear. (NOTE: Pictures below shows the Driver side) 5. Grind if Necessary If anything is in the way, grind it down and recheck clearance. Repeat until bolt fits. Hotchkis Performance LLC.
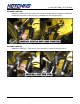
1110 66-70 B-Body, 70-74 E-Body 6. Install A-Arm Relocators Slide the stock camber bolt w/washer through the top hole of the A-Arm Relocator. The other end will end up inside the engine bay. Install the washer and nut snugly, but do not fully tighten. You will need to induce some preload to position the Relocator properly. You can do this by rotating the camber bolt clock wise until you feel resistance. The Relocator should position itself snugly onto the frame.
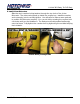
1110 66-70 B-Body, 70-74 E-Body 7. Install A-Arm Front Mount Use hardware kit 17101 and install the split lock washer & AN washer onto each ½” socket-head bolt. Included in you’re A-Arm kit will be an assortment of aluminum spacers with varying thicknesses. Grab one 0.185” spacer for each Relocator. NOTE: If your mount came pre-assembled by Hotchkis, please use the spacer that was installed on the mount.
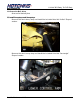
1110 66-70 B-Body, 70-74 E-Body 8. Install Other Side of A-Arm The trailing end of the A-Arm will be bolted into the stock mounting hole. Install 2 misalignment spacers. Position the A-Arm so that the other heim joint is lined up with the mounting hole. You will notice there will be gaps on each side of the joint. You will need to add spacers (included in your kit) to take up the gaps. These gaps are not consistent from car to car so you will have to use the appropriate thickness spacers on each gap.
1110 66-70 B-Body, 70-74 E-Body Once the proper spacer arrangement is achieved, insert the camber bolt through the stock mount hole and the other end will end up in the engine bay. Install the camber washer and nut. Adjust the bolt so that the bolt is in the center of its adjustment. Fully tighten nut for now. This will be adjusted once you get an alignment. 9. Connect A-Arm to Spindle Lift the A-Arm and lineup the ball joint stud to the hole in the spindle and slide the stud in. Hotchkis Performance LLC.
1110 66-70 B-Body, 70-74 E-Body 10. Install Castle Nut Install the castle nut to the other end of the ball joint stud and tighten until there is clearance for the cotter pin to be inserted into the ball joint stud. 11. Install Cotter Pin Install the cotter pin. Twist and cut as needed to ensure it stays in place. Hotchkis Performance LLC.
1110 66-70 B-Body, 70-74 E-Body 12. Grease the Ball Joints Grease all of the ball joints 13. Install Bumpstops and Droopstops Remove the stock droop stop and install the included Hotchkis “bullet” Shaped version. Remove the stock bump stop and install the included Hotchkis “Rectangle” Shaped version. Hotchkis Performance LLC.
1110 66-70 B-Body, 70-74 E-Body 14. Repeat the steps for the other side and you’re done! Have an alignment shop align the front end. This may require some disassembly of the heim joint mounts to gain proper alignment. Recommended Street/Sport specs: Static Camber = -1° (negative) Caster = +5° (positive) Total Toe= 1/8” Toe IN Recommended Race specs: Static Camber = -2.5° to -3° (negative) Caster = +5° to +7° (positive) Total Toe= 0 Toe Hotchkis Performance LLC.
10 66-70 B-Body, 70-74 E-Body Hotchkis Performance LLC Return Policy & Limited Warranty Effective December 1, 2010 all Hotchkis products must be registered to qualify for warranty at www.hotchkis.net or via the mail-in warranty card, included with the product, within 30 days of the original purchase date. IMPORTANT: This warranty supersedes all other warranties included with this product. Return Policy We want you to be completely satisfied with your Hotchkis Performance product.
1110 66-70 B-Body, 70-74 E-Body THERE ARE NO WARRANTIES, EXPRESSED OR IMPLIED, INCLUDING ANY IMPLIED WARRANTIES OF MERCHANTABILITY OR FITNESS FOR A PARTICULAR PURPOSE, WHICH EXTEND BEYOND THE DESCRIPTION ON THE FACE HEREOF. ANY IMPLIED WARRANTIES ARE DISCLAIMED TO THE FULLEST EXTENT PERMITTED BY LAW.
1110 66-70 B-Body, 70-74 E-Body Effective December 1, 2010. This return policy and limited warranty supersedes all previous policy and warranty statements. Policies and warranties are subject to change without notice. Hotchkis Performance is not responsible for printing errors. Hotchkis Performance LLC.