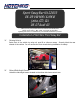
Sport Sway Bar Kit 22833 06-09 VW MKV & MKVI Jetta, GTI, GLI 06-07 Audi A3 Thank you for your purchase from our new line of Audi/VW parts. Please call us at 877 - 4NO - ROLL if you have any questions regarding the service or installation of your Hotchkis Performance products. Installation of Hotchkis Front Sway Bar 1F 2F Raising Vehicle Raise front of the vehicle by using a 4 post lift or drive-on ramps. Securely block the rear wheels of the vehicle.
3F Detach End Links 4F Unbolt Sway Bar Bushing Brackets 5F Loosen and remove the lower end link nuts from both sides, and push links aside. Unbolt the 4 bolts (2 per side) that secure the sway bar to the subframe.
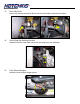
6F Disconnect Lower Engine Mount 7F Disconnect the Steering Rack From Subframe Locate and remove lower engine mount that attaches to the subframe. Loosen and remove the bolt that attaches the mount to the engine. Loosen and remove the 4 steering rack bolts.
8F Drop the Subframe Cradle Loosen and remove the 6 subframe cradle bolts. The cradle will not drop completely since it is still connected to the struts, so you do not have to worry about it falling out. However, be careful when it drops down.
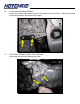
9F Remove the Front Sway Bar 10F Reinstall New Hotchkis Bar It’s a tight fit between the subframe and the body, so it will take some patience removing the sway bar. It also helps raising the front of the vehicle slightly to gain more clearance. The bar comes out towards the front of the car. Try to remember how the bar comes out, for this will be the same procedure getting the new Hotchkis bar in. Repeat steps 1F through 9F in reverse order. Your new Hotchkis bar uses new bushings and brackets.
Fitting points outboard. Straight fitting is show n in pictures for prototyping.
11F Double Check Hardware 12F Stiffness Adjustment Make sure all hardware is fully tightened before driving the vehicle. Let’s move to the rear sway bar. Your Hotchkis front bar has 3 adjustment holes, which allow the customer to change the sway bar stiffness harder or softer. The hole closets to the end is the softest setting, while the hole furthest from the end is the stiffest.
2R 3R Detach End Links Loosen and remove the lower end link nuts from both sides, and push links aside. Undo the Sway Bar Bushing Bracket Bolts Loosen and remove the sway bar bushing bracket bolts. There are 2 per bracket. Once the bolts are removed, the bar should be loose from the vehicle.
4R Reinstall New Hotchkis Bar Repeat steps 2R through 3R in reverse order. Your new Hotchkis bar uses new bushings and brackets. The rear bushing has a Ø1-1/16” hole. Use the supplied silicon grease to lube the inside surface of the bushings. Make sure to use thread lock compound on the subframe bushing bracket bolts and the end link nuts. There is some slop in the brackets provided, so you can raise the sway bar upward to clear the subframe edge under each bracket.
5R Double Check Hardware 6F Stiffness Adjustment Make sure all hardware is fully tightened before driving the vehicle. You are done with the installation. The vehicle does not require an alignment after this installation. Your Hotchkis front bar has 3 adjustment holes, which allow the customer to change the sway bar stiffness harder or softer. The hole closets to the end is the softest setting, while the hole furthest from the end is the stiffest.
Hotchkis Performance LLC Return Policy & Limited Warranty Effective December 1, 2010 all Hotchkis products must be registered to qualify for warranty at www.hotchkis.net or via the mail-in warranty card, included with the product, within 30 days of the original purchase date. IMPORTANT: This warranty supersedes all other warranties included with this product. Return Policy We want you to be completely satisfied with your Hotchkis Performance product.
DAMAGE TO THE VEHICLE OR COMPONENTS OF THE VEHICLE, ANY OTHER TYPE OF CONSEQUENTIAL DAMAGES, OR OTHER INCIDENTAL OR INDIRECT DAMAGES. HOTCHKIS’ MAXIMUM LIABILITY UNDER THIS WARRANTY SHALL IN NO EVENT EXCEED THE PURCHASE PRICE OF THE PRODUCT. Some states do not allow limitations on how long an implied warranty lasts or the exclusion or limitation of incidental or consequential damages and in such states the above limitations or exclusions may not apply.