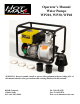
Operator’s Manual Water Pumps WP201, WP30, WP40 WARNING: Do not assemble, install or operate this equipment without reading ALL of this manual and the safety precautions and warning illustrated in this manual. KDAR Company 1 Mulch Lane St. Louis, MO 63044 Tel: 314-692-8555 Fax: 314-692-8578 Web: www.hotmaxtorches.
SAFETY PRECAUTIONS AND WARNINGS PLEASE READ BEFORE USING EQUIPMENT DANGER DANGER indicates a potentially hazardous situation which, if not avoided, WILL, result in death or serious injury. WARNING WARNING indicates a potentially hazardous situation which, if not avoided, could result in death or serious injury. CAUTION CAUTION indicates a potentially hazardous situation which, if not avoided, may result in minor or moderate personal injury, or property damage.
SAFETY PRECAUTIONS AND WARNINGS PLEASE READ BEFORE USING EQUIPMENT 12. Always store the water pump in a well ventilated area. Follow the instructions in this manual for preparing to store a water pump. Never store fuel near the water pump. 13. Never operate a water pump if any of the following conditions are present. a. Uncontrolled change in engine speed. b. Sparking. f. Engine misfire. g. Excessive vibration. h. Flame or smoke. i. An enclosed compartment. 14.
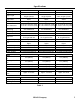
Specifications WP201 WP30 WP40 Engine Engine Type Engine Size Max. Torque Valve Clearance Spark Plug Spark Plug Gap Idle Speed Engine Oil Engine Oil Capacity Fuel Fuel Tank Capacity Fuel Consumption Cooling System Ignition System Pump Suction Port Diameter Discharge Port Diameter Total Head Suction Head Discharge Capacity Max.
Features/Package Contents Features WP201 All Aluminum Pump Housing w/Ceramic Seals 2” Suction & 2” Discharge Fittings 8700 GPM Max. Output 26’ Suction Head 85’ Total Head Max. Pressure 35.5 PSI 5.5 HP Engine @ 3600 RPM Low Oil Shut Off Spark Arrestor Muffler EPA Certified Engine Built in Fuel Gauge Recoil Start TCI Ignition 1 Gal Fuel Tank w/Input Fuel Filter Fuel Shutoff w/Internal Fuel Filter Noise Level of 67 DB @ 24 Feet Run Time—Approx.
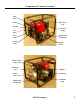
Component & Control Locations Fuel Tank Choke Fuel Tank Cap Throttle Fuel Level Gauge Air Filter Fuel Valve Oil Fill Cap & Dipstick Starter Grip ON/OFF Switch Primer Water Filler Cap Discharge Port Muffler Intake Port Carburetor Pump Water Drain Plug Oil Drain Plug KDAR Company 5
Set Up Engine Preparation Fuel and refuel in a well ventilated area with the engine stopped. Do not smoke or allow flames or sparks in the area where the engine is being refueled or where gasoline is stored. Do not over fill the tank (there should be no fuel in the filler neck). After refueling, make sure the tank cap is closed properly and securely. Be careful not to spill fuel when fueling or refueling. Spilled fuel or fuel vapor may ignite.
Operation Pre-Start Preparation Pump Placement WARNING Improperly maintaining this pump, or failing to correct a problem before operation, could cause a malfunction that may result in serious injury. Always perform a pre-operation inspection before each operation and correct any problem. NOTE: The following procedures are to be completed each time the water pump is started. General Condition 1. Look around and underneath the pump for signs of oil or gasoline leaks. 2.
Operation Suction Hose Installation Discharge Hose Installation Note: Use commercially available suction hose that is reinforced with non-collapsible wall or braided wire construction. Note: Use commercially available discharge hose. 1. Slide a hose coupler into the hose clamp ring. 2. Insert sealing washer into the hose clamp ring. 3. Securely thread the hose clamp ring onto intake port. (see diagram below) 4. Slide hose clamp over the hose. 5. Slide hose over the hose coupler. 6.
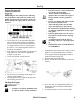
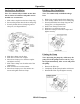
Operation Starting the Engine 1. Move the fuel valve lever to the on position. 5. Pull the starter grip lightly until you feel resistance, then pull briskly. Return the grip gen- Starter Grip 2. If the engine is cold at start, move the choke lever to the CLOSED position. Leave OPEN for warm start. WP20 & WP30 Slide left to close 6. If the choke lever has been moved to the CLOSED position, gradually move it to the OPEN position as the engine warms up.
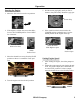
Operation 5. Remove filler cap from the pump and flush the pump chamber with clean water. Shutting Down the Pump Note: For emergency engine stop, simply turn the engine switch to OFF. 1. Move the throttle lever to the SLOW position. Filler Cap SLOW 2. Turn the engine switch to the OFF position. 6. Allow water to drain from the pump chamber and replace filler cap and drain plug. 3. Turn fuel valve to the off position. Note: When the pump is not in use the fuel valve should be in the OFF position. 4.
Maintenance Maintenance Schedule REGULAR SERVICE PERIOD(3) ITEM Perform at every indicated month or operating hour interval, whichever comes first.
Maintenance Engine Oil Change Spark Arrestor Cleaning 1. Change oil while engine is warm to assure complete and rapid draining. 2. The Water Pump should be on a level surface. 3. Remove oil filler cap. 4. Place pan under water pump to catch oil. 5. Remove oil drain plug. 6. Allow oil to drain completely. 7. Replace drain plug. 8. Refill with recommended oil (page 6). 9. Check oil level. 1. Engine must be cool and muffler safe to touch to remove the Spark Arrestor from the muffler. 2.
Maintenance Spark Plug Service Recommended Spark Plug: BPR6ES (NGK) W20EPR-U (DENSO) To insure proper engine operation, the spark plug must be properly gapped and free of deposits. WARNING If the engine has been running, the muffler will be very hot. Care must be taken not to touch the muffler when removing the spark plug. 1. Remove the spark plug cap. 2. Clean any dirt from around the spark plug base. 3. Use the wrench supplied with the water pump to remove the spark plug. 4.
Storage Note: Proper storage preparation is essential to keeping the pump trouble free. Following the steps below will keep the pump in good working order and easier to start when used next. Cleaning the Pump 1. Allow engine to cool at least a half hour before cleaning. 2. Wash the engine and pump. Note: It is best to wash the pump by hand (do not use a hose or power washer) in order to prevent water from getting into the air filter, muffler opening or other areas sensitive to water. 3.
Storage Internal Oiling Safety Features 1. Remove the spark plug. 2. Pour 1 tablespoon of clean engine oil into the cylinder. 3. Crank the engine several times by pulling on the starter rope. 4. Reinstall the spark plug. 5. Slowly pull the starter rope until resistance is felt. At this point the piston is coming up on its compression stroke and both the intake and exhaust valves are closed. Storing the engine in this position will help protect it from internal corrosion.
Trouble Shooting Engine Will Not Start NO Is the fuel valve on? YES Is the choke closed? Turn fuel valve on. NO Move choke to closed unless the engine is warm. NO Turn engine switch on. YES Is the engine switch on? YES NO Is there fuel in the tank? Refill the tank. YES NO Is there oil in the engine? Add the recommended oil. YES Is there a spark from the spark plug? YES NO Replace the spark plug. To Check: 1. Remove the spark plug cap and clean any dirt from around the spark plug. 2.
Trouble Shooting Engine Lacks Power Is the air filter element clogged? YES Clean or replace the air filter. YES Drain fuel from tank and carburetor and refill tank with fresh fuel. YES Clean or replace fuel filter. NO Is the fuel bad? Engine stored without treating the fuel or refueled with bad gasoline NO Is the fuel filter clogged? NO If the engine still lacks power take the water pump to a authorized KDAR ser vice center . No Pump Output Is the pump primed? NO Prime the pump.
Trouble Shooting Low Pump Output Is the suction hose collapsed, damaged, too long or too small a diameter? YES Replace the suction hose. NO Is there an air leak at the connector? Replace the sealing washer if it is missing or damaged. Tighten the hose connector clamp. YES NO Is the strainer clogged? YES Clean debris from the strainer. NO Is the discharge hose damaged, too long or too small a diameter? YES Replace the discharge hose.
Warranty KDAR Company, and its affiliates, warrants that the water pumps covered under this warranty are free from defects in material and workmanship for one year from the date of purchase. This warranty is extended to the original purchaser who uses the product in a consumer application (personal, residential or household usage). All water pumps covered under this limited warranty which are used in commercial applications (i.e.