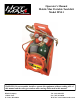
Operator’s Manual Mobile Max Portable Torch Kit Model MM-1 WARNING: Do not assemble, install or operate this equipment without reading ALL of this manual and the safety precautions and warnings illustrated in this manual. KDAR Company 1 Mulch Lane St. Louis, MO 63044 Tel: (314) 692-8555 Fax: (314) 692-8578 Web Site: www.hotmaxtorches.
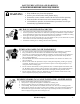
SAFETY PRECAUTIONS AND WARNINGS PLEASE READ BEFORE USING EQUIPMENT WARNING Keep children away from this equipment Protect your self and others from possible injury Pacemaker wearers should consult with their doctor before operating Read and follow all instructions in this manual before operating All installation, operation, and maintenance procedures are to be performed only by qualified individuals ARC RAYS CAN BURN SKIN AND EYES Gas welding and cutting produce intense ultraviolet
CYLINDERS CAN EXPLODE IF DAMAGED Gas cylinders contain gas under very high pressure. If damaged they can result in that cylinder exploding. Gas cylinders are a major part of metalworking and must be treated with care.
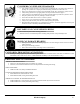
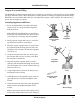
Installation & Setup Features, Benefits & Functions Features Brass & Stainless Construction Welds up to 1/4 Inch* Cuts up to 4 Inches* Welding Tip, #1 Size Cutting Tip, 1-3-101 Victor Style Twin Welding Hose, 10’ x 3/16” Oxygen Regulator Acetylene Regulator Goggles & Striker Torch Handle & Cutting Head Heavy Duty Molded Tote Carrier Refillable 20 Cubic Foot Oxygen Tank—CGA540 Refillable 10 Cubic Foot Acetylene Tank—CGA200 Built in Storage Unit with Clear Door *Larger Tip are
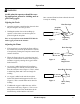
Installation & Setup Oxygen & Acetylene Filling The Mobile Max is shipped with the tanks empty. Therefore, you will have to take the tanks to a local welding gas supply distributor to have them filled prior to welding. Different welding gas suppliers handle tank filling differently; some will fill the tanks while you wait while others require a tank exchange. You will need to select the type of supplier you prefer. Attaching Regulators and Hoses 1.
Installation & Setup It is important that all fittings have been tightened with a wrench by this point. Insure the tank valves, regulators valves and torch handle valves are turned to the off position. Opening Valves 1. Attach the welding tip and tighten with a wrench. 2. Slowly open (clockwise) the oxygen cylinder valve to allow oxygen to flow to the regulator. Once the regulator begins to register pressure, open the valve an additional 1 to 1 1/2 turns.
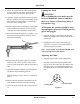
Operation WARNING At this point the operator should be wearing appropriate protective clothing such as gloves and goggles. Once a neutral flame has been achieved the torch is ready for welding. Lighting the Torch 1. Open the acetylene control knob on the torch handle just enough to let some gas flow. Heat Envelope Acetylene Feather 2. Holding the striker close to the welding tip squeeze it a few times to create the sparks required to light the acetylene.
Operation Shutting Down 1. Using the acetylene control knob turn off the flow of acetylene to the welding tip. This will allow oxygen to continue to flow and will insure any debris that may be in the orifice is blow out. 2. Turn off the oxygen using the oxygen control knob on the torch handle. 1. Remove the welding tip from the torch handle and attach the cutting head. Tighten with a wrench. 2. Insure that the both the acetylene and oxygen control knobs on the torch handle are closed (clockwise). 3.
Operation 8. Check all connections for leaks. Leaks can not be seen, therefore, use soapy water on all connection points to insure there are no leaks. 9. Open the oxygen control knob on the torch handle two full turns. No oxygen should flow at this time because the oxygen flow is controlled by the valve on the cutting head. 10. Insure oxygen flows by turning the control knob on the cutting head a quarter of turn. Quickly close the valve after confirming oxygen flow. 11.
Operation 3. Press the oxygen cutting lever briefly to insure oxygen is flowing through the cutting hole. 4. Further adjustment may now be needed to insure a neutral flame in the preheat holes. Generally a reduction in oxygen. 5. The torch is ready for cutting. Shutting Down 1. Using the acetylene control knob on the torch handle turn off the flow of acetylene to the welding tip. This will allow oxygen to continue to flow and will insure any debris that may be in the preheat holes is blow out.
Maintenance and Additional Products General Maintenance 1. Prior to EVERY use, inspect hoses for damage. Note: Never tr y to r epair damaged gas hoses. Damaged hoses should be replaced. 2. Prior to EVERY use, check all connections for leaks. 3. Clean splatter and slag off of the outside of welding and cutting tips as required. Hot Max Victor ® Style 3 Piece Torch Kits Model VH-1 - Medium Duty Model VHD-1 - Heavy Duty 4. Regularly clean tip holes with a welding tip cleaner (Hot Max # 22034).
Warranty KDAR Company, and its affiliates, warrants that all MM-1 Mobile Max torch kits covered under this warranty is free from defects in material and workmanship for one year from the date of purchase. KDAR also warrants that the hoses are free from defects in material and workmanship for 90 days from the date of purchase. This warranty is extended to the original purchaser who uses the product in a consumer application (personal, residential or household usage).