Operator’s Manual Portable Generator Model: HM8000 WARNING: Do not assemble, install or operate this equipment without reading ALL of this manual and the safety precautions and warning illustrated in this manual. KDAR Company 1 Mulch Lane St. Louis, MO 63044 Tel: 314-692-8555 Fax: 314-692-8578 Web: www.hotmaxtorches.
SAFETY PRECAUTIONS AND WARNINGS PLEASE READ BEFORE USING EQUIPMENT DANGER DANGER indicates a potentially hazardous situation which, if not avoided, WILL, result in death or serious injury. WARNING WARNING indicates a potentially hazardous situation which, if not avoided, could result in death or serious injury. CAUTION CAUTION indicates a potentially hazardous situation which, if not avoided, may result in minor or moderate personal injury, or property damage.
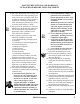
SAFETY PRECAUTIONS AND WARNINGS PLEASE READ BEFORE USING EQUIPMENT 12. Stay alert. Watch what you are doing and use common sense when operating a generator. Do not use a generator while tired or under the influence of drug, alcohol or medication. A moment of inattention while operating the generator may result in serious personal injury or death. 13. Always store the generator in a well ventilated area with the fuel tank empty. Follow the instructions in this manual for preparing to store a generator.
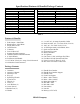
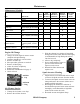
Specifications/Features & Benefits/Package Contents Generator Ratings Type Brush Single Phase Voltage Regulate AVR AC Rated Output 6.5kW/6500 Watts AC Maximum Output 8.0kW/8000 Watts AC Voltage 120V/240V AC Frequency 60 Hz 120 VAC Amperage Rated 54.3/Max 66.7 240 VAC Amperage Rated 27.1/Max 33.3 DC Voltage 12V Battery Charger Only DC Amperage 8.3 Amps Dimensions & Weight Dimensions (inches) 31.1 x 22.0 x 32.3 Weight 211.6 Lbs Engine OHV Single Cylinder 418cc 15/3600 1.16 Qt. (1.
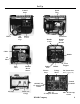
Set Up Control Panel Wheel Oil Filler Cap Spark Plug Wheel Battery Cover Carburetor Handle Pivot Bracket Handle Catch Choke Muffler Air Filter Fuel Valve Manual Recoil Starter Rubber Foot Electric Start Handle Voltage Meter 120/240V AC 27 Amp L14-30 Outlet Gas Cap Fuel Level Gauge 120V AC 27 Amp L5-30 Outlet KDAR Company Front Support DC Connection Battery Charge Only Ground Terminal 120V AC 20 Amp Outlet 4
Set Up Wheel & Handle Assembly Battery Connection Note: All fasteners can be tightened as each procedure is completed. There is no need to wait until assembly is complete to tighten the fasteners. 1. Using 2 M8x20 bolts and 2 M8 nuts, attach the 2 rubber feet to the front support. 2. Using 4 M8x20 bolts and 4 M8 nuts, attach the front support to the lower cross beam by lining up the 4 holes in the fronts support with the 4 holes in the cross beam.
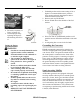
Set Up 1. Unleaded gasoline with a octane rating of 86 or higher is recommended because it produces fewer engine and spark plug deposits and extends the exhaust system life. 2. Remove tank cap and fill tank. 3. Do not fill tank above the shoulder of the fuel strainer. Oil Filler Cap Strainer Shoulder 4. Fill with 1.16 quarts (1.1 Liters) of motor oil. 5. Confirm proper fill by replacing the dip stick and checking the oil level. 4. Never use stale or contaminated gasoline or oil/ gasoline mixture.
Operation Pre-Start Preparation NOTE: The following procedures are to be completed each time the generator is started. 1. Before starting the generator, check to make sure there are no loose or missing parts. NOTE: The engine can be started manually in the case of a dead battery. 1. Follow steps 1 through 4 above. 2. Insert key and turn to the run position. 3. Pull starter rope with a fast steady pull.
Operation CAUTION CAUTION Do not exceed the maximum wattage rating for the generator when using one or more receptacles. Do not exceed the amperage rating of any one receptacle. Do not apply heavy electrical load for the first 2– 3 hours of operation (break-in period). Total Wattage Determination To insure the generator is not overloaded and damaged as a result, it is essential to know the total watts of the connected load. The following steps will help determine the intended load. 1.
Maintenance Maintenance Schedule Item Engine Oil Each Use X First Month or 20 Hours Every 3 Months or 50 Hours Every 6 Months or 100 Hours Sediment Cap What To Do Check Oil Level Change Check Clean or Replace Clean Spark Plug Check, adjust gap and clean X Spark Arrester Clean X Air Cleaner X X X X X Fuel Tank and Strainer Clean Fuel Filter (Attached to fuel Clean - Replace if necessary valve) X X Fuel Line Clean - Replace if necessary X Exhaust System Check for leakage.
Fuel Filter Cleaning 1. 2. 3. 4. Drain fuel from tank. Disconnect fuel line from fuel valve. Remove fuel valve from tank. Remove Fuel filter from the top of the fuel valve by unthreading (should be able to be removed with fingers. 5. Clean fuel filter with a nonflammable or high flashpoint solvent. 6. Reattach fuel filter to fuel valve and reattach fuel valve to tank and fuel line. Fuel Valve Cleaning 1. Remove the sediment cup and O-ring at the bottom of the fuel valve with a small wrench. 2.
Transporting/Storage Preparing for Transportation Drain Carburetor 1. Turn the engine switch and fuel valve to the off or stop position. 2. Let the engine cool before transporting. 3. Keep the generator level to prevent fuel spillage. 4. Take care not to drop or strike the generator when transporting. 5. Do not place heavy objects on the generator. Preparation for Storage WARNING 1. Be sure the storage area is free of excessive humidity and dust. 2.
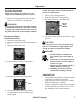
Troubleshooting Engine Will Not Start NO Is there fuel in the tank? Refill the tank. YES NO Is there oil in the engine? Add the recommended oil. YES Is there a spark from the spark plug? YES Replace the spark plug. Still no Spark To Check: 1. Remove the spark plug cap and clean any dirt from around the spark plug. 2. Remove the spark plug and install the spark plug in the plug cap. 3. Set the plug side electrode on the cylinder head. 4. Crank engine, sparks should jump across the gap.
Troubleshooting No Electricity at the AC Receptacles Is the AC circuit breaker on? NO Turn the AC circuit breaker on. YES Check the electrical appliance or equipment for defects. NO DEFECTS Take the generator to a KDAR authorized service center. DEFECTS Replace the electrical appliance or equipment or take the appliance or equipment to an electrical repair shop. NOTE: The nearest KDAR authorized service center can be found by visiting www.hotmaxtorches.com.
Power Needs Watts Estimate Chart Determining Your Power Needs There are two parts to determining your power requirements. 1) The running watts required, calculated by adding the running watts of each of the appliances to be run and 2) Peak watts required, calculated by adding the total running watts needed to the highest level of surge watts required (additional start watts).
Limited Warranty KDAR Company, and its affiliates, warrants that the generators covered under this warranty are free from defects in material and workmanship for one year from the date of purchase. This warranty is extended to the original purchaser who uses the product in a consumer application (personal, residential or household usage). All generators covered under this limited warranty which are used in commercial applications (i.e.