Operator’s Manual AFA-1, AFA-2, & AFP-1 Torch Kits AFA-1 (50210) Torch kit AFA-2 (50211) Torch Kit AFP-1 (50212) Torch kit WARNING: Do not assemble, install, or operate this equipment without reading ALL of this manual and the safety precautions and warnings illustrated in this manual. KDAR Company 1 Mulch Lane St. Louis, MO 63044 Tel: (314) 692-8555 Fax: (314) 692-8578 Web Site: www.hotmaxtorches.
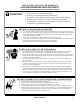
SAFETY PRECAUTIONS AND WARNINGS PLEASE READ BEFORE USING EQUIPMENT WARNING Keep children away from this equipment Protect your self and others from possible injury Pacemaker wearers should consult with their doctor before operating Read and follow all instructions in this manual before operating All installation, operation, and maintenance procedures are to be performed only by qualified individuals ARC RAYS CAN BURN SKIN AND EYES Arc rays when welding produce intense ultraviolet a
CYLINDERS CAN EXPLODE IF DAMAGED Gas cylinders contain gas under very high pressure. If damaged they can result in that cylinder exploding. Gas cylinders are a major part of metalworking and must be treated with care.
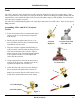
Installation & Setup PACKAGE CONTENTS AFA-1 Quick Connect Acetylene Kit Quick Connect Handle 12’ Hose, A x A Fittings Single Stage Acetylene Regulator with CGA - 200 MC Fitting “B” Tank Adapter CGA-520 with Nut Single Flint Striker 4 Quick Connect Tips HA-5, HA-8, HA-14, & HA-32 AFA-2 Screw Connect Acetylene Kit Screw Connect Handle 12’ Hose, A x A Fittings Single Stage Acetylene Regulator with CGA - 200 MC Fitting “B” Tank Adapter CGA-520 with Nut Single Flint Striker 4 Screw Con
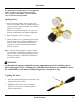
Installation & Setup Tanks The AFA-1 and AFA-2 are designed to be used with CGA 200 and CGA 520 type acetylene tanks. These tanks can purchased or leased from your local gas distributor. Different welding gas suppliers handle tank filling differently; some will fill the tanks while you wait while others require a tank exchange. You will need to select the type of supplier you prefer. The AFP-1 uses standard liquid propane (LP) vapor draw tanks with CGA 510P valves. These are the typical BBQ grill tanks.
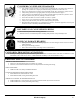
Installation & Setup 2 Assembling AFP-1 Propane Torch 1 1. Secure the propane tank to an immovable object such as a wall or a cart specifically designed to hold the tank. 2. Briefly open the propane tank valve (1) to remove any debris that may have accumulated and immediately close the valve. Propane Regulator 3. Wipe the propane regulator threaded fitting (2) with a clean dry cloth and tread the fitting onto the tank valve and tighten with a wrench. Propane Tank with CGA 510P Valve 3 4.
Operation It is important that all fittings have been tightened with a wrench by this point. Insure the tank valve, regulator valve handle, and torch handle valve is turned to the off position. Opening Valves 1. Slowly open the cylinder valve to allow gas to flow to the regulator. Once the regulator begins to register pressure, open the cylinder valve an additional 1 to 1 1/2 turns. Note: This must be done slowly, as a sur ge of pressure could damage the regulator diaphragm. 2.
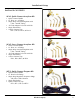
Operation Adjusting the Flame The amount of gas that you use will depend on the tip size you are using, the thickness of the material you are working on, the settings of the regulator, and possibly other factors. You will need to experiment with the different settings in order to get the desired result. Basically you are looking for the flame pattern in Figure 2. Secondary Envelope Primary Envelope Figure 2 Shutting Down Beginning of Cone 1. Shut the control valve completely off at the torch handle. 2.
Warranty KDAR Company, and its affiliates, warrants that all torch kit components (except hoses) covered under this warranty are free from defects in material and workmanship for two years from the date of purchase. KDAR also warrants that all hose assemblies are free from defects in material and workmanship for 90 days from the date of purchase. This warranty is extended to the original purchaser who uses the product in a consumer application (personal, residential or household usage).