
User's Manual


Table Of Contents
- CONTENTS
- I. Specifications
- 1. Icemaker
- KM-1300SAH
- KM-1300SWH
- KM-1300SRH
- KM-1300SAH3
- KM-1300SWH3
- KM-1300SRH3
- 2. Condensing Unit
- URC-12F
- II. General Information
- 1. Construction
- [a] KM-1300SAH, KM-1300SAH3
- [b] KM-1300SWH, KM-1300SWH3
- [c] KM-1300SRH, KM-1300SRH3
- 2. Controller Board
- [a] Solid-State Control
- [b] Controller Board
- [c] Sequence
- [d] Controls and Adjustments
- [e] Checking the Controller Board
- III. Technical Information
- 1. Water Circuit and Refrigerant Circuit
- [a] KM-1300SAH, KM-1300SAH3
- [b] KM-1300SWH, KM-1300SWH3
- [c] KM-1300SRH, KM-1300SRH3
- 2. Wiring Diagrams
- [a] KM-1300SAH, KM-1300SWH
- [b] KM-1300SRH
- [c] KM-1300SAH3, KM-1300SWH3
- [d] KM-1300SRH3
- 3. Timing Chart
- 4. Performance Data
- [a] KM-1300SAH
- [b] KM-1300SWH
- [c] KM-1300SRH
- [d] KM-1300SAH3
- [e] KM-1300SWH3
- [f] KM-1300SRH3
- IV. Service Diagnosis
- 1. No Ice Production
- 2. Evaporator is Frozen Up
- 3. Low Ice Production
- 4. Abnormal Ice
- 5. Other
- V. Removal and Replacement of Components
- 1. Service for Refrigerant Lines
- [a] Refrigerant Recovery
- [b] Evacuation and Recharge [R-404A]
- 2. Brazing
- 3. Removal and Replacement of Compressor
- 4. Removal and Replacement of Drier
- 5. Removal and Replacement of Expansion Valve
- 6. Removal and Replacement of Hot Gas Valve and Line Valve
- 7. Removal and Replacement of Evaporator
- 8. Removal and Replacement of Water Regulating Valve - Water-Cooled Model Only
- 9. Adjustment of Water Regulating Valve - Water-Cooled Model Only
- 10. Removal and Replacement of Condensing Pressure Regulator (C.P.R.) -
- 11. Removal and Replacement of Thermistor
- 12. Removal and Replacement of Fan Motor
- 13. Removal and Replacement of Water Valve
- 14. Removal and Replacement of Pump Motor
- 15. Removal and Replacement of Spray Tubes
- VI. Maintenance and Cleaning Instructions
- 1. Preparing the Icemaker for Long Storage
- 2. Cleaning and Sanitizing Procedures
- [a] Cleaning Procedure
- [b] Sanitizing Procedure - Following Cleaning Procedure
- 3. Maintenance
64
[2] Remove the water from the potable water supply line:
1) Remove the front panel. (Except water-cooled model)
2) Move the control switch on the control box to the “OFF” position.
3) Wait 3 minutes.
4) Close the potable water supply line shut-off valve and open the potable water supply line drain
valve.
5) Allow the line to drain by gravity.
6) Attach compressed air or carbon dioxide supply to the potable water line drain valve.
7) Move the control switch to the “ICE” position.
8) Blow the potable water line out using compressed air or carbon dioxide.
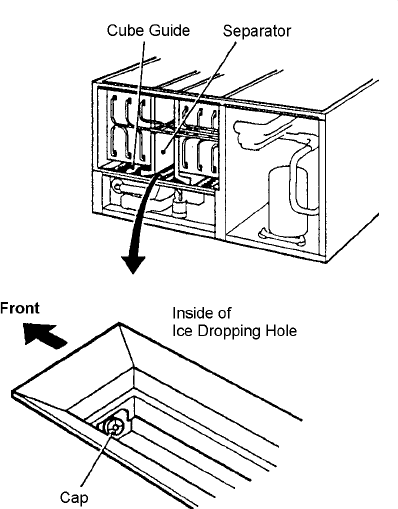
[3] Drain the potable water tank:
1) Turn off the power supply.
2) Move the control switch to the “OFF”
position.
3) Drain the water tank by removing the
insulation panel and the cap located
on the front bottom part of the ice
dropping hole. See Fig. 4.
4) Replace the removed parts in their
correct positions.
5) Remove all ice from the storage bin,
and clean the storage bin.
6) Replace the front panel in its correct
position.
7) Close the drain valve.
Fig. 4