Instruction Manual Modular Cuber Models IM-200BAC hoshizakiamerica.
WARNING Only qualified service technicians should install and service the appliance. To obtain the name and phone number of your local Hoshizaki Certified Service Representative, visit www.hoshizaki.com. No installation or service should be undertaken until the technician has thoroughly read this Instruction Manual. Likewise, the owner/manager should not proceed to operate the appliance until the installer has instructed them on its proper operation.
IMPORTANT This manual should be read carefully before the appliance is installed and operated. Read the warnings and guidelines contained in this manual carefully as they provide essential information for the continued safe use and maintenance of the appliance. Retain this manual for any further reference that may be necessary. CONTENTS Important Safety Information.................................................................................................. 4 I. Specifications..........................
Important Safety Information Throughout this manual, notices appear to bring your attention to situations which could result in death, serious injury, damage to the appliance, or damage to property. WARNING Indicates a hazardous situation which could result in death or serious injury. NOTICE Indicates a situation which could result in damage to the appliance or property. IMPORTANT Indicates important information about the installation, use, and care of the appliance.
WARNING, continued • Children should be properly supervised around the appliance. • Do not climb, stand, or hang on the appliance or allow children or animals to do so. Serious injury could occur or the appliance could be damaged. • Do not use combustible spray or place volatile or flammable substances near the appliance. They might catch fire. • Keep the area around the appliance clean. Dirt, dust, or insects in the appliance could cause harm to individuals or damage to the appliance.
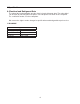
I. Specifications A. Electrical and Refrigerant Data The rating label and nameplate provide electrical and refrigerant data. The rating label can be seen by removing the front panel. The nameplate is located on the rear panel. For certification marks, see the nameplate. We reserve the right to make changes in specifications and design without prior notice. 1. IM-200BAC Single Phase Model Number IM-200BAC AC Supply Voltage 115/60/1 Amperes 8.0 AMPS Design Pressure HI-387PSI LO-203PSI Refrigerant 404A 10.
1004 [ 39 - 1/2 ] 700 [ 27 - 1/2 ] AIR IN 600 [ 23 - 5/8 ] 185 [ 7 - 1/4 ] AIR OUT POWER SUPPLY CORD 1.8 m [ 5 ft. 8 - 1/2 ] LONG 86 [ 3 - 3/8 ] 230 [9] 314 [ 12 - 3/8 ] ADJUSTABLE LEGS 852 [ 33 - 1/2 ] 607 [ 23 - 7/8 ] 307 [ 12 - 1/8 ] 149 [ 5 - 7/8 ] [ 3 - 1/4 ] WATER DRAIN 3/4" FPT 82 WATER INLET 1/2" FPT 71 [ 2 - 3/4 ] 93 [ 3 - 5/8 ] 7 22 [ 7/8 ] 785 [ 30 - 7/8 ] 665 [ 26 - 1/8 ] 225 [ 8 - 7/8 ] B.
II. Installation and Operating Instructions WARNING • The appliance must be installed in accordance with applicable national, state, and local codes and regulations. • Failure to install, operate, and maintain the appliance in accordance with this manual will adversely affect safety, performance, component life, and warranty coverage and may result in costly water damage. • CHOKING HAZARD: Ensure all components, fasteners, and thumbscrews are securely in place after installation.
B. Checks Before Installation NOTICE • Remove all shipping cartons, tape, and packing material. If any are left in the appliance, it will not work properly. • Remove the shipping tape holding the door and the bin control actuator. • Visually inspect the exterior of the shipping container and immediately report any damage to the carrier. Upon opening the container, any concealed damage should also be immediately reported to the carrier. • Remove the package containing the accessories.
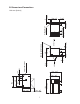
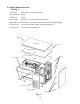
C. How to Remove Panels See Fig. 1 • Top Panel: Remove the screws and lift up. • Top Insulation: Lift up. • Top Sheet: Lift up. • Front Panel: Remove the screw and pull towards you. • Right Side Panel: Remove the screws (front and rear) and slide right slightly. • Front Frame: Loosen the screws. Lift up and pull towards you. • Front Sheet: Lift up and pull towards you. Screw Top Panel Screw Top Insulation Top Sheet Front Sheet Screw Front Frame Screw Front Panel Screw Screw Fig.
D. Setup NOTICE • Do not place more than 33 lb. (15 kg) on the top panel. • Do not use the frame to lift the appliance. Lift the appliance from the base. • Handle the appliance carefully to avoid damaging the exterior. 1) Attach the five adjustable legs provided to the bottom of the appliance. 2) Position the appliance in its permanent location. 3) Level the appliance from side-to-side and front-to-rear by adjusting the legs. A Max. 1/8" (3-mm) [0.3°] Fig. 2 A Fig.
E. Electrical Connection WARNING • Electrical connection must meet national, state, and local electrical code requirements. Failure to meet these code requirements could result in death, electric shock, serious injury, fire, or damage. • The appliance requires an independent power supply of proper capacity. See the nameplate for electrical specifications.
F. Water Supply and Drain Connections See Fig. 4 WARNING Water supply and drain connections must be installed in accordance with applicable national, state, and local regulations. NOTICE • Normal operating water temperature should be within 45°F to 90°F (7°C to 32°C). Operation of the appliance, for extended periods, outside of this normal temperature range may affect appliance performance. • Water supply pressure must be a minimum of 10 PSIG and a maximum of 113 PSIG.
1. Icemaker Icemaker Water Supply Inlet Icemaker / Ice Storage Bin Drain Outlet 3/4" Female Pipe Thread (FPT) Minimum Icemaker Water Supply Line Size 1/2" Female Pipe 1/4" Nominal ID Copper Thread (FPT) Water Tubing or Equivalent Minimum Icemaker Drain Line Size 3/4" Nominal ID Hard Pipe or Equivalent • An icemaker water supply line shut-off valve and drain valve must be installed. • Be sure there is sufficient extra water supply line and drain line for the appliance to be pulled out for service.
G. Final Checklist WARNING CHOKING HAZARD: Ensure all components, fasteners, and thumbscrews are securely in place after installation. Make sure that none have fallen into the dispenser unit/ice storage bin.
H. Startup WARNING All parts are factory-adjusted. Improper adjustments may adversely affect safety, performance, component life, and warranty coverage. NOTICE • If the appliance is turned off, wait for at least 3 minutes before restarting the appliance to prevent damage to the compressor. • To prevent damage to the water pump, do not leave the control switch in the "WASH" position for extended periods of time when the water tank is empty.
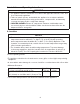
I. Display 1. Normal Operation Display for normal operation is "on". See the figure on the right. 2. Error Code The control board will show an error code and safely stop if the appliance is operating outside of acceptable parameters. See the figure below. If an error code appears, please contact your local Hoshizaki Certified Service Representative for assistance.
III. Maintenance The appliance must be maintained in accordance with the instruction manual and labels provided. Consult with your local Hoshizaki Certified Service Representative about maintenance service. WARNING • Only qualified service technicians should service the appliance. • To reduce the risk of electric shock, do not touch the control switch or plug with damp hands. Make sure the control switch is in the "OFF" position before plugging in or unplugging the appliance.
B. Cleaning and Sanitizing Instructions The appliance must be cleaned and sanitized at least once a year. More frequent cleaning and sanitizing may be required in some water conditions. WARNING • To prevent injury to individuals and damage to the appliance, do not use ammonia type cleaners. • Carefully follow any instructions provided with the bottles of cleaning and sanitizing solution.
12) Slowly pour the cleaning solution over the top of the evaporator and into the water tank. Do not splash or spill the solution onto other parts. 13) Replace the top sheet, top insulation, and top panel. 14) Plug in the appliance. Move the control switch to the "WASH" position to start the cleaning process and then replace the front panel. 15) After 30 minutes, remove the front panel and then move the control switch to the "OFF" position. Unplug the appliance.
14) Allow the appliance to operate for 3 minutes to drain the water tank and then remove the front panel. 15) Move the control switch to the "OFF" position. After 5 seconds, move the control switch to the "ICE" position and then replace the front panel. 16) Repeat steps 14 and 15 three more times to rise thoroughly. 17) Repeat steps 1 through 16 one more time. 18) Remove the front panel and then move the control switch to the "OFF" position. Unplug the appliance.
IV. Preparing the Appliance for Periods of Non-Use NOTICE • When storing the appliance for an extended time or in sub-freezing temperatures, follow the instructions below to prevent damage. • To prevent damage to the water pump seal, do not leave the control switch in the "WASH" position for extended periods when the water tank is empty. During extended periods of non-use, extended absences, or in sub-freezing temperatures, follow the instructions below.
2. Drain the water tank: [Normal Position] 1) Move the control switch to the "OFF" position and then unplug the appliance. 2) Remove the top panel, top insulation, and top sheet. 3) Remove the screw and then move the tank drain pipe to the drain position. See Fig. 6. 4) Replace the top sheet, top insulation, and top panel. 5) Close the icemaker water supply line drain valve. Screw Tank Drain Pipe [Drain Position] 6) Plug in the appliance and then move the control switch to the "ICE" position.
V. Disposal The appliance contains refrigerant and must be disposed of in accordance with applicable national, state, and local codes and regulations. Refrigerant must be recovered by properly certified service personnel.
HOSHIZAKI AMERICA, INC. 618 Hwy. 74 S., Peachtree City, GA 30269 USA TEL (770) 487-2331 FAX (770) 487-3360 www.hoshizaki.