
Instruction Manual

MAN0810-10-EN Specifications / Installation
__________________________________________________________________________________________________________________________________________________________________
12/18/2008 Page 2 of 4 ECN # 947
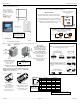
2 Panel Cut-Out and Dimensions
Note: Max. panel thickness: 5 mm.
3 Ports / Connectors / Cables
Note: The case of the XLe is black, but for clarity, it is shown in a lighter gray color.
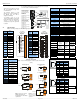
4.1 I/O Jumpers Settings (JP1 – JP4)
3.622 [92mm]
3.622 [92mm]
001XLE002
Refer to XLe/XLt User
Manual for panel box
information and a handy
checklist of requirements.
Note:
The tolerance to meet
NEMA standards is
± 0.005” (0.1 mm).
To Remove Back Cover:
Unscrew 4 screws located on
the back of the unit.
Remove Cover.
CAUTION:
Do not over tighten screws
when replacing the back cover.
001ACC009
Power Connector
Power Up:
Connect to Earth Ground.
Apply 10 - 30 VDC.
Screen lights up.
Torque rating 4.5 – 7 Lb-In
(0.50 – 0.78 N-m)
CAN Connector
Use the CAN Connector when
using CsCAN network.
Torque Rating 4.5 – 7 Lb-In
(0.50 – 0.78 N-m)
I/O Jumpers (Not Shown): I/O Jumpers (JP) are located
internally. To access, remove back cover of unit.
Wiring Connectors (J1 – J3), I/O Jumpers (JP1 – JP4), and
External Jumpers (RS-485) are described in the Wiring and
Jumpers section of this document.
Note: The Cscape Module Setup configuration must match
the selected I/O (JP) jumper settings.
Negative Logic
Positive Logic
JP1 Digital DC Inputs
Default
I1
0V
001XLE036
12-24VDC
I1
0V
Positive Logic In Negative Logic In
Positive Logic vs. Negative Logic Wiring
The XLe can be wired for Positive Logic inputs or
Negative Logic inputs.
Memory Slot:
Uses Removable Memory for
data logging, screen captures,
program loading and recipes.
Horner Part No.: HE-MC1
Serial Communications:
MJ1: (RS-232 / RS-485) Use for
Cscape programming and
Application-Defined
Communications.
MJ2: (RS-232 / RS-485) Use for
Application-Defined
Communications.
J1 J2
J3
JP2
JP1
JP3
JP4
001XLE030
Location of I/O jumpers (JP)
and wiring connectors
(J1 – J3).
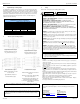
Wiring Specifications
For I/O wiring (discrete), use the following wire type or
equivalent: Belden 9918, 18 AWG (0.8 mm
2
) or larger.
For shielded Analog I/O wiring, use the following wire type
or equivalent: Belden 8441, 18 AWG (0.8 mm
2
) or larger.
For CAN wiring, use the following wire type or equivalent:
Belden 3084, 24 AWG (0.2 mm
2
) or larger.
CURRENT
(20mA)
VOLTAGE
(10V)
JP4
ANALOG OUTPUT SETTING
VOLTAGE OR CURRENT
AQ2 AQ1 AQ2 AQ1
Default
A
nalog In Settings
AI1 AI2
JP2 JP3
RTD (PT100)
T1 T2
JP2
JP3
T/C/100mV
T1 T2
Note: When using JP4 (output) or JP2 / JP3
(inputs), each channel can be independently
configured. For example, JP2 can be
configured for 10 V and JP3 can be configured
as an RTD.
JP2 JP3
10V/20mA
MA1/V1 MA2/V2
Default
MJ1
(RS-232 / RS-485)
MJ2
(RS-232 / RS-485)
J1
I/O
Jumper
Memory Slot
001XLE029-R2
J2
I/O
Jumper
NET 1
(CsCAN)
Power
DIP
Switch
Note – Your keypad overlay
appearance may differ.
Standard US/EU overlays
pictured here for example.
* +5Vdc 60mA Max on XLe Rev E and later
Pin MJ1 Pins MJ2 Pins
Signal Direction Signal Direction
8
TXD OUT TXD OUT
7
RXD IN RXD IN
6
0 V Ground 0 V Ground
5*
+5 60mA OUT +5 60mA OUT
4
RTS OUT TX- OUT
3
CTS IN TX+ OUT
2
RX- / TX- IN / OUT TX-/RX- IN
1
RX+ / TX+ IN / OUT TX+/RX+ IN
1
8
Serial
Communications:
MJ1 and MJ2
(RS-232 / RS-485)
4 Wiring and Jumpers
• Wire according to the type of inputs / outputs used and select the appropriate jumper
option. Use Copper Conductors in Field Wiring Only, 60/75° C