OWNER'S MANUAL Lock-N-Load® Classic ™ Metallic Press *Photo shows optional Automatic Primer Feed (Item No.
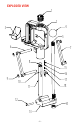
EXPLODED VIEW 1 2 4 3 5 6 7 8 9 10 15 16 17 18 11 12 14 13 -2-
PARTS LIST Item No. Part No. Qty.
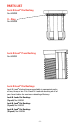
PARTS LIST Lock-N-Load® Die Bushing Part #392302 O – Ring Part #392303 Lock-N-Load® Press Bushing Part #392301 Lock-N-Load® Die Bushings Lock-N-Load® die bushings are available in convenient packs of two, three, or ten. Put a Lock-N-Load® die bushing on all of your favorite dies for maximum reloading efficiency. Lock-N-Load® Die Bushings (2-pack) No. 044094 Lock-N-Load® Die Bushings (3-pack) No. 044093 Lock-N-Load® Die Bushings (10-pack) No.
NO-RISK LIFETIME WARRANTY All Hornady reloading tools and accessories are warranted against material defects and workmanship for the life of the product. Simply stated – if it breaks, we’ll repair it or replace it at no charge (at Hornady Manufacturing Company’s option). Hornady reloading tools and accessories are warranted against defective materials and workmanship only.
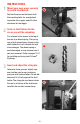
INSTRUCTIONS your new press securely 1 Mount to a solid level bench. 1 Position the press on the bench with the mounting holes far enough back to provide firm support and still allow clearance for the toggle. a shell holder for the 2 Select cases you will be reloading. It is retained in the recess in the top of the ram by a detent spring. The spring may at first prevent easy change in the shell holder, but it will smooth out with a few changes.
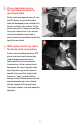
4 Install primer arm into ram. NOTE: Screw the proper seater punch/ cup for the type of primer you are using into the arm before placing in ram. If you are using the automatic primer feed, it will be necessary to adjust the feed body. The ram should be at the top of the stroke. Adjust the primer feed body so the primer retainer spring is deflected by the primer cup (on the primer arm) far enough to allow a primer to drop (see APF instruction). Do not overtighten the adjusting screw.
a lubricated case in 6 Place the shell holder and pull the 6 operating handle. As the ram moves upward, you will see the PPS primer arm pivot forward to allow the decapped primer to deflect off the arm into the primer catcher. As the primer arm pivots, it moves into position to pick up a new primer. If you are not using the automatic primer feed, a primer should be inserted by hand at the top of the ram stroke. a primer in the cup, return 7 With the handle to the rest position.
8 Check case length (for cases to be crimped) and trim with Hornady Case Trimmer. 8 Chamfer inside and debur outside of case mouth with Hornady Chamfering and Deburring tool, and wipe case free of all lubricant with clean dry cloth. Please Note: Sizing before trimming can result in Case Mouth not fitting over the Trimmer Pilot. 9 9 Charge prepared cases with selected powder and weigh using either a scale, or powder measure in conjunction with a scale.
HOW LOCK-N-LOAD® WORKS The Lock-N-Load® Reloading System is Hornady’s unique bushing system that lets you change dies with a simple flick of the wrist. With Lock-N-Load® technology in your reloading press, you can stop loading, change dies, and start loading another caliber in SECONDS. If you load more than one caliber, Lock-N-Load® will dramatically speed up your reloading efforts. This unique technology is featured on our Lock-N-Load® Classic™ and Lock-N-Load® AP™ (Auto Progressive) reloading presses.
STEP 3 3 STEP 2 2 STEP 1 1 - 11 -
P.O. Box 1848 • Grand Island, NE 68802-1848 (308) 382-1390 • www.hornady.