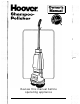
: .. . . :t Review this manual before operating appliance .
This cleaner was inspected and packaged carefully before being shipped from the factory. If you should happen to need assistance during assembly or operation, call l-800-944-9200 for automated referral of authorized service outlet locations (U.S. only) or l-330-499-9499 to speak with a representative in our Consumer Response Center. DO NOT RETURN THIS PRODUCT TO THE STORE. Fill in and retain The model and serial number are located on the rear wheel cover of polisher.
IMPORTANT SAFEGUARDS! When using an electrical appliance, always follow basic precautions, including the following: READ ALL INSTRUCTIONS BEFORE USING THIS APPLIANCE To reduce the risk of fire, electric shock, or injury Use indoors only. This appliance is provided with double insulation. Use only identical replacement parts. See instructions for servicing of doubleinsulated appliance under “Service”. Close supervision is necessary when any appliance is used by or near children.
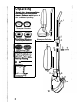
Unpacking Unpack the shampoo-polisher and identify the accessories shown. Remove Remove and and dispose of the cardboard packing.
, 1 Questions or Concerns? ; i The Hoover Company wants to quickly resolve any concerns about your cleaner or questions regarding its use. Look on the list provided with the product for your local Hoover-Factory Service Center or in the Yellow Pages under “Vacuum Cleaners - Household” for the nearest Authorized Hoover Warranty Service Dealer (Depot) or call: l-888-944-9280 for an automated referral of authorized service locations (U.S.
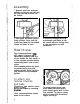
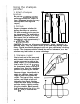
Assembly 1. Remove tank from shampoopolisher and remove nut, bolt and cord clip from top of lower handle section. 2. Join upper and lower handles, lining up holes. Place cord clip around cord with flat side toward handle and holes to front. 3. Insert bolt through cord clip, and through small holes of handle; secure with nut. Pull up slack in cord and tighten nut with screwdriver. How to use The shampoo-polisher’s ONOFF switch is internal and is operated by lowering and raising the handle.
To attach pads, insert end of fastener through opening in pad. Place pad over scrubbing-wax- ing-polishing brushes only. The fastener fits around the brush shaft. Press the fastener to snap into place. Unsnap fastener to remove pad. To attach tank Attach brushes and pads before attaching tank. Set bottom of tank into tank support. Turn tank cap lock until the rivet is directly above slot. Raise tank cap lock and tank cap. Snap tank against handle. Push tank cap down.
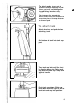
To dispense solution Squeeze trigger to dispense cleaning solution onto carpet, rug or floor. To remove tank Turn tank cap lock until the rivet is directly above slot. Lift up lock and tank cap. - Pull top of tank forward; lift tank from shampoo-polisher. 1 Shampooing carpet and rugs Use a carpet shampoo designed specifically for rotary and foam type carpet shampooers. Use shampoo only in concentration as recommended on container. Use shampoo brushes only on carpet and rugs.
Before you begin 1. Test for colorfastness Apply some shampoo solution to a small inconspicuous area of the carpet and rub with a white cloth. Check to see that color does not come off on the cloth and that the color of the carpet is satisfactory after the area dries. 2. Check effect of shampoo brushes Attach shampoo brushes to shampoo-polisher. Prepare a small amount of shampoo solution in the tank following directions on the shampoo container.
Using the shampoo polisher 1. Attach shampoo brushes. liters Do not use scrubbing-waxingpolishing brushes on carpet or rugs. (Shampoo brushes are very soft to protect fine rugs and carpet.) 2. Fill tank Prepare shampoo solution following directions on container. Fill tank according to the area being shampooed. The tank holds a maximum of 4 quarts (3.75 liters). Each quart (liter) of solution will shampoo an area approximately 3 ft. x9ft. Umx3m).
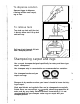
foam. Crisscross area to work foam uniformly into the carpet (see illustration) until the foam disappears. The final strokes over each area should always be in the same direction. Repeat the process over another 3 ft. x 3 ft. area (Im x Im), overlapping the areas bv several inches. Continue until a 3 ft. (Im) length the width of the carpet or rug has been cleaned. 4. Brush pile Brush pile in one direction with a long-handled brush, This speeds the drying and gives a uniform appearance.
Cleaning floors There are two methods of cleaning hard surface floors: t 1. Water method - used for all floors that can be cleaned with soap or detergent and water solution. 2. Solvent or solvent cleaning wax method - used for wood and sealed cork floors that may be damaged by water solutions. .’ Water method Linoleum, asphalt, rubber, vinyl, masonry and stone floors may be cleaned with a soap or detergent and water solution. Use the shampoopolisher to dispense cleaning solution and to scrub floor.
Check this chart for floor care methods recommended for your floor. Floors Cleaning method Wax* Wood Solvent cleaning wax method - Use solvent base liquid wax. Solvent-Base Linoleum Water method - Use mild soap or detergent and water solution. Water-Base Rubber tile Water method - Clean with detergent or soap and water solution. Water-Base Vinyl Water method - Clean with detergent or soap and water solution. Water-Base Asphalt tile Water method - Use detergent or soap and water solution.
i Check this chart for floor care methods recommended for your floor. t Cleaning method Wax* Wood Solvent cleaning wax method - Use solvent base liquid wax. Solvent-Base Linoleum Water method - Use mild soap or detergent and water solution. Water-Base Rubber tile Water method - Clean with detergent or soap and water solution. Water-Base Vinyl Water method - Clean with detergent or soap and water solution. Water-Base Asphalt tile Water method - Use detergent or soap and water solution.
Solvent cleaning wax method I. Wood and sealed cork floors may be damaged by using water solutions; therefore, use only those cleaners and waxes recommended specifically for wood or cork. 2 ‘I The following directions are for cleaning wood or cork floors with a cleaning polishing solvent base liquid wax. .-. 1. Vacuum floor to remove loose dirt and litter. Wipe up sticky spots with $ a damp cloth. 2. Apply wax-cleaner according to manufacturer’s instructions on the container.
There are two kinds of solventbase wax: paste wax and liquid polishing wax. Paste wax To spread wax evenly, attach scrubbing-waxing-polishing brushes to shampoo-polisher and snap on cleaning-waxing pads. FLOOR WAX Solvent Base Spread a thin coat of wax on pads or spread a small amount on floor with spatula. Start by pressing handle release lever and lowering handle. Apply wax to floor, by guiding in straight lines or with grain of the wood, until the wax is spread evenly.
To achieve a high lustre finish ,’ 1. Attach felt buffing pads over scrubbing-waxing-polishing brushes using ’ fasteners. Polish to a soft shine by guiding shampoo polisher in straight lines : or with the grain of the wood. If more shine is desired proceed to step 2. 2. Remove felt buffing pads and attach high lustre polishing pads (available at additional cost). Once again, guide the handle in straight lines or with the grain of the wood to achieve a high lustre finish.
Shampooer base Remove brushes and dry bottom of shampoo-polisher with a paper towel or cloth before storing. Brushes The brushes need to be washed in warm water and detergent to remove wax. Rinse well. Shake to remove excess water. To dry, place on paper towels with brushes turned toward towels. Let brushes dry before reattaching. To clean shampoo brushes, hold under warm water to remove any lint that has collected. Wash cleaning-waxing pads the same way as brushes; rinse, and shake water from them.
If you have a problem This appliance was inspected thoroughly and was in good operating condition when it was shipped from the factory. If a minor problem occurs it usually can be solved quite easily when the cause is found. Therefore, this check list is provided for your convenience. Problem Possible cause 1. Not firmly plugged in. Shampoo-Pol- 2. No voltage in wall plug. isher 3. Blown fuse/tripped won’t run breaker. 1. Tank valve clogged. Shampoo-Polisher won’t dispense solution Sham1.
3 ?
Floor care hints Floors may be difficult to care for when not treated properly. Refer to the chart below for solutions to floor problems. Problem ZiJ)“W Dull floor Streaked Floor Yellow or Grayed Fioors Scratched Floor Cause Too much wax. Detergent not rinsed from floor. Floor not dry when wax applied. Floor not polished properly. Not enough wax. Floor not dry when wax applied. Floor not clean when wax applied. Uneven application of wax. Heavy build-up of wax. Applying one type of wax over another.
:. Accessories ;. (Available at your Hoover Dealer (Depot) or Hoover Factory Service Center at a slight additional cost.) ,. Steel wool pads for applying sol- High lustre polishing pads for vent-base paste wax. Snap on over scrubbing-waxibg-polishing brushes. polishing furniture and floors. Snap on over scrubbing-waxingpolishing brushes. .^” HOOVER and are registered trademarks THE HOOVER COMPANY, NORTH CANTON, OHIO 44720 R6 3-96 F4255, F4255-040 Litho USA 56518-060 ; .