Fill in and retain! The HOOVER vacuum cleaner you have just purchased is a combination cleaner. It has a motorized power nozzle for carpet and floor cleaning and has cleaning tools for above the floor cleaning. Your cleaner is a model no. and has a serial number For your personal records, please enter the model number and serial number in the spaces provided above and retain in a safe place. The model number and serial number appear on the bottom of the cleaner. Save! Index Assembling Cleaner . . . . . . .
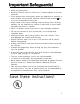
l l l l l l l l l l l l l l l Read all instructions. Warning: Electric shock could occur if used outdoors or on wet surfaces. Close supervision is necessary when any appliance is used by or near children. Do not allow vacuum cleaner to be used as a toy or to run unattended at any time. Keep hands, feet, loose clothing, and hair away from rotating agitator. Do not operate the cleaner in bare feet or when wearing open toe shoes or sandals. Don’t run power nozzle over cord. It may damage insulation.
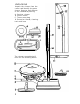
UNPACKING Unpack the cleaner from the carton and identify the parts shown. Remove and dispose of the cardboard packing. A. Canister cleaner B. Power nozzle C. Throw away bag D. Extension wands, cleaning tools and hose D The cleaner assembled will look like the drawing below.
1. Wall Floor Brush 2. Power Nozzle automatically adjusts to different carpet pile heights. 3. Casters provide easy towing; pull cleaner using hose to guide the cleaner over carpet, area rugs and door sills. 4. Hose Cord Connection to Cleaner is made by plugging hose cord into cleaner base at receptacle. 5. ON-OFF Switch is a convenient toe operated switch near the front of the cleaner. 6. Carrying Handle 7. Furniture Guard 8. Cord Storage Hook 9.
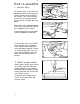
How to assemble 1. Connect hose To connect hose, insert hose into opening of cleaner lining up the arrow on the hose with the dot on the cleaner. Turn the hose clockwise until it lines up with the bar on the cleaner and latch locks into place. L A T C H m& 7T?Zff- When the hose is attached properly, the hose cord plug will reach to the receptacle on the cleaner. Insert the plug firmly and as deep into the receptacle as possible. To disconnect hose, first remove hose cord plug from receptacle.
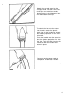
Attach the curved wand to the straight wand. Position cord into cord clips on extension wands, placing excess cord between nozzle and bottom cord clip. To attach the hose to the extension wands, rotate the plastic latch ring on the handle to accept the button projection on the curved wand. Push the handle over the wand so that the button projection fits into the slot. Turn the latch ring on the handle to lock the handle and wand in place. Connect nozzle power cord to receptacle underneath handle.
How to use Handle adjustments The handle has two positions when used with the power nozzle: Upright and Operating. To lower handle to the Operating position, place your foot on the power nozzle and push the handle down. Automatic nozzle adjustment The power nozzle adjusts automatically to effectively clean hard surface floors and all carpet from low pile to shag. However, the nozzle is not recommended for very irregular floor surfaces such as brick, slate and certain parquet floors.
Nozzle connector Removing larger items from carpet and floor surfaces before vacuuming will help maintain the cleaning effectiveness of your cleaner.
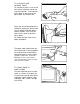
To connect and remove tools To connect the tools, insert end of tool into the extension wand and snap into position. To disconnect, press down on the center of the spring latch and remove tool. Tools may also be attached to the handle by rotating the plastic latch ring to accept the button projection on the tool. Then, turn the latch ring as shown to lock the tool in place. To remove the tool, reverse the above procedure.
To clean stairs Clean stairs by placing the cleaner on its side as pictured in the illustration. Clean stairs from bottom to top. How to store Cord wrap When cleaner is not in use, wrap the cord around the cord storage hook, located on the cover of the cleaner, and the carrying handle. Store the power nozzle with the handle in the upright position. The hose, extension wands and power nozzle can be stored separately from the cleaner if desired.
Maintenance The following sections are concerned with proper maintence of the cleaner. Familiarize yourself with these home maintenance tasks and keep this owner’s manual in a convenient place where you can refer to it when needed. Proper use and care of your cleaner will insure continued cleaning effectiveness. THE BAG When to replace Check bag from time to time. When the bag is filled with dirt, the cleaner will not operate efficiently. Discard used bag.
Push used bag awayfrom holder and lift out. Grasp edges of collar section and push opening of collar section of new bag onto holder. Make sure collar is pushed completely up to the ridge on the holder. Adjust bag around the motor housing and open the folds of the bag to allow the bag to properly fill. Make sure all four folds are open. Note: A bag that does not expand properly may restrict air flow. In this event, check the bag, making sure all the folds are open.
SECONDARY FILTER To clean secondary filter Disconnect cleaner from electrical outlet. The secondary filter protects the motor from dirt particles. If the filter becomes dirty, either clean or replace it. To remove secondary filter, open cover of cleaner and lift the filter from the top of the motor housing. Clean filter by rinsing it in water. When dry, slide secondary filter back into place. THE BELT The belt in your power nozzle drives the agitator.
Return nozzle to original position and lift up back of nozzle cover. Then remove cover, rotating it forward and lifting it off. To remove the agitator, position your hand underneath the nozzle base at the agitator opening and push up the belt side of the agitator. Remove agitator and old belt. Place one end of new belt around the motor pulley, with lettering on outside of belt. Then slip other end of belt around the plastic pulley end of the agitator.
Slide belt side of agitator into place, pushing the agitator slightly to left, pulling it forward and then down. Roll agitator to make sure belt is positioned properly. The cover attaches at the front of the nozzle. Place the notched edge at the front of the cover into the groove in the nozzle base. While maintaining front connection, rotate cover over nozzle base and pull nozzle cord through opening in cover. Turn nozzle over and replace screws.
AGITATOR BRUSHES When to replace brushes To check condition of brushes, place edge of a card on the bottom of nozzle base, across agitator opening. Rotate agitator by hand. If brushes do not touch edge of card, all four brushes and brush roll should be replaced to maintain cleaning effectiveness. When replacing agitator brushes, ask for HOOVER part No. 48445017. How to replace agitator brushes Disconnect cleaner from electrical outlet and disconnect power nozzle from extension wands.
3. Note position of bar-brush assemblies to insure correct replacement. . 1 / / Remove bar-brush assemblies by pulling them from agitator slots. Use pliers if necessary. The word “BAR” is stamped near the slots on the agitator. Match the bar side of the bar brush assembly with the label on the agitator shell. Slide the new assemblies into the slots, while twisting the assemblies in a counterclockwise motion. Push in as far as possible, tapping the other end lightly if necessary.
1 lJ ser check list I This appliance was inspected thoroughly and was in good operating condi- tion when it was shipped from the factory. If a minor problem develops, it usually can be remedied quite easily when the cause is identified. Accordingly, this check list is provided for your convenience. Problem Possible cause Possible solution A. Cleaner won’t run 1. Not firmly plugged in. 2. No voltage in wall plug. 3. Blown fuse/tripped breaker. 1. Plug unit in firmly. 2. Check fuse or breaker. 3.
VCMA VACUUM CLEANER MANUFACTURERS ASSOCIATION (HOOVER - AN ASSOCIATION MEMBER) Service To The Consumer Since 19 13 This information has been compiled by the Vacuum Cleaner Manufacturers Association from Governmental and Private Sources concerned with product safety. These basic guidelines are for your protection and convenience. TO AVOID ELECTRIC SHOCK Never vacuum liquids. Never vacuum carpeting that is damp or wet. Do not store machine outdoors. Replace worn or frayed power cord immediately.