® TM Widepath The Easy TM to TurboPOWER Deep Use Cleaner Congratulations on your TM brushes carpets and SteamVac by www, cleaners Widepath rotating TM applying hoover,co scrub Widepath hot m purchase TM SteamVac 6 TM tap TM water that deep bare floors! Deep and Cleaner cleaning have clean cleans solution.
Fill in Retain and This HOOVER deep cleaner designed for deep cleaning is carpet, Your deep cleaner Review this operating sales receipt Verification be required your number that you attach Safeguards! to this owner s manual. • • may of • • product. • Important safeguards .......... Assembly ................... Carton contents .............. How to use .................. Agitator speed selector ....... Automatic "shut-off". ......... 2 3-5 3 6-8 7 7 Deep cleaner description .....
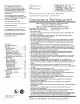
Grounding Instructions A 0© © DANGER- C Improper This appliance should must be malfunction grounding tance risk or provides for of shock. that is into an properly accordance (A). The (C) plug appropriate all codes doubt will not (B) appliance in and fit the by to whether outlet, circuit that looks for and like the has not outlet is modify a the proper electrician.
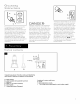
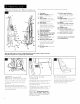
The assembled cleaner drawing. will look like this Assemble m handle I Attach upper Remove from clean deep handle solution tank (upper tank) Gleaner. With hose back of down (A1) hook deep onto and Gleaner, lower holes on front cord push handle. hook upper Push of handle. (A2) bolts If bolts go through hole easily handle pushed completely down.
IlUll il t A2 Press cord handle. Pull around hooks into cord cord clip tight on and back of wrap Storing Store hose hose Position stair/upholstery nozzle and snap Continue _x tools hook (A2). at base of cleaner as shown at arrow. hose cord in holder it into place in front on holder section Powered by of first positioning er powered plastic bag hand for To tool tool is protection.
Deep Cleaner The Description ml assembled clean Hose Hose holder: wrap around and holder 4 for The top right or easy cord to for hook can left hose of for cord be quick 8. 9. Carrying handle Clean solution tank for to removal; forward on lock for brush cleaning edges of either pedal carpet. floor to operating handle or tool pedal: lower (floor) 21. Stair/upholstery step handle to position; nozzle This deep cleaner is intended for household use.
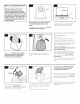
Thedeepcleaner mayalsobeliftedby placing a hand solution tank under the handle as upper Automatic shut off Brush speed selector clean When shown. the off the recovery automatic the deep At that the The dirty the of deep suction yellow the is full will and agitator will HI will noticeably disk tank no longer motor higher will lid rise (E). pick up sound will in pitch.
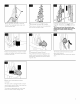
NOTE: They with Use only are your HOOVER specially 'SteamVac' for deep CAUTION: Detergents Anionic and Nonionic p_mll detergents. formulated use cleaner. contain Surfactants. Avoid contact with eyes and skin. In case of contact with eyes, flush with cold water for 15 minutes. In case of contact Irritation with skin, persists, For Medical wash with water. call a physician. Information c If (U.S.) call 1-800-752-7869. Pour detergent into tank. fill line (B) (1 gallon) with water.
under "Fill clean 2-14. Wet a white solution. Before cleaning you begin a. Vacuum thoroughly use a HOOVER vacuum agitator for stery with ing to best a tool into and - Use deep upholstery fabric "wet" is or clean marked ("s01vent/dry" upholstery does professional wax "W" a code, according furniture help carpet prevent carpet, frorn or until it is necessary pet, place towels traffic upholstery If no up to and children surface dry.
Read "Before you begin instructions on page 9. 1. Fill cleP]n solution HOOVER with Detergent Figs. tank (upper tank) Carpet/Upholstery according 2-8 cleaning" to instructions for 2-14. to 2. M0ve speed selector to LO for gentle cleaning or HI for normal cleaning. A nozzle clean-out additional tool, cost cleaner, can debris or if not be available at included used for with 3.
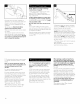
How to attach bare floor attachment (available at additional cost if not included with your cleanerl Disconnect cal outlet. deep To prevent clean possible solution ery tank bare from leaking, tank (Fig. 2-15) (Fig. floor Set cleaner electri- remove 2-8) before and recov- positioning attachment. tanks aside (do not set tank on furni2. With foam (A) (located strip ture). netting) 1.
/ / After using tool 1. Follow ing" steps on page Rinse tool a and b 3. for "After [)rain a small deep with and eral seconds. by turning holding end deep of cleaner hose up for sev- cleanBe not press trigger. 9. and arnount hose by ON filling sink with Turn of water. cleaner the hose ON 4. 2. / and pickup the water Disconnect cal 5. Drain solution hose) tool. by and 6. deep Gleaner from electri- outlet.
\ Read "Before you begin instructions on page 9. Be sure to check the your upholstery. only on upholstery cleaning" cleaning code A on your deep cleaner marked "W" or Use "W/S'. 1. Place handle Agitator in upright brushes not handle is in upright 2. Fill clean instructions 3. Attach tank to end of tools refer to or deep "Before tool" the press the zle over 7. Overlap section to 10. For fabric.
Storage Before Full Two storing: • Empty solution thoroughly tank with and clean rinse Possible water. • empty Replace turn deep trigger and ward deep cleaner several solution and Squeeze deep back any tank ON. push and expel solution cleaner for- times cleaner's system.
HOOVER and 7-02 F6021-900 _})are registered hitho USA trademarks 56518-152