FOR REVIEW ONLY – DO NOT PUBLISH OR DISTRIBUTE DRAFT 08 RX2 User’s Guide Preliminary - Draft 08 (Microsoft® Windows® CE .NET Equipped) Copyright © March 2006 by LXE Inc.
Language: English Notices LXE Inc. reserves the right to make improvements or changes in the products described in this guide at any time without notice. While reasonable efforts have been made in the preparation of this document to assure its accuracy, LXE assumes no liability resulting from any errors or omissions in this document, or from the use of the information contained herein.
Table of Contents Preliminary - Draft 08 INTRODUCTION 1 Overview .................................................................................................................... 1 Document Conventions ............................................................................................................2 RX2 Environmental Specifications ..........................................................................................2 Battery Charger Environmental Specifications .......................
ii Table of Contnents APPENDIX A REGULATORY NOTICES AND SAFETY INFORMATION 21 Approvals ................................................................................................................ 22 INDEX 23 Preliminary - Draft 08 Illustrations Figure 1 RX2 Connector Panel ............................................................................................................................3 Figure 2 RX2 Components ............................................................................
Introduction Overview Preliminary - Draft 08 The LXE RX2 is a rugged, vehicle mounted Microsoft® Windows® CE .NET equipped mobile computer capable of wireless data communications and equipped with an RFID module. The mobile device can transmit information using its 2.4 GHz 802.11 radio with integrated antenna. The RX2 does not feature a display or keypad. Configuration is performed via the USB port using Microsoft ActiveSync and other utilities.
2 Overview Document Conventions ALL CAPS Menu | Choice “Quotes” < > All caps are used to represent disk directories, file names, and application names. Rather than use the phrase “choose the Save command from the File menu”, this guide uses the convention “choose File | Save”. Indicates the title of a book, chapter or a section within a chapter (for example, “Document Conventions”). Indicates a key on the keypad (for example, ).
Components 3 Components Preliminary - Draft 08 1 2 3 1. Power Switch 2. Input Power/Battery Charger Connector 3. USB Client Connector Figure 1 RX2 Connector Panel 1 2 1. RX2 Computer 2. Fork Truck Mounting Bracket 3. Power LED 4. Antenna Enclosure 3 4 Figure 2 RX2 Components Quick Start Note: The RX2 is assembled with an optional internal battery pack (if ordered) and radio card installed before shipment.
4 RFID Introduction RFID Introduction Radio frequency identification, or RFID, is a generic term for technologies that use radio waves to automatically identify individual items. The individual items identified/read by a RFID reader contain a tag (also known as an electronic label or transponder).
Getting Help 5 Getting Help All LXE user guides are now available on one CD and they can also be viewed/downloaded from the LXE ServicePass website. Contact your LXE representative to obtain the LXE Manuals CD. You can also get help from LXE by calling the telephone numbers listed on the LXE Manuals CD, in the file titled “Contacting LXE”. This information is also available on the LXE website www.lxe.com.
Getting Help Preliminary - Draft 08 6 RX2 User’s Guide E-EQ-RX2OGWW-A
Installation Introduction Preliminary - Draft 08 The general installation procedure consists of 1. Mounting the RX2 and any accessories to the forklift truck. 2.
8 Mounting RX2 Accessories 1. Install the bracket by placing the hook (at the bottom of the bracket) over the lip of a Cascade E or F series side shifter. 2. Slide the RX2 over to the desired position. 3. Secure with (4) 1/4-20 set screws in the threaded holes on the top surface of the bracket. Thread a lock nut onto each set screw. Using an Allen wrench, tighten all four set screws to an equal depth, but do not tighten the locking nuts yet. 4.
Connect Power Source 9 Connect Power Source A power source must be connected to the RX2 before it can be used. Please refer to the following sections to determine the desired method to power the RX2. Internal Battery Pack (Optional) The RX2 is available with an optional internal battery pack. Preliminary - Draft 08 Use the battery charger to charge the RX2’s internal battery. The RX2 battery charger charges the RX2 battery pack in less than 6 hours.
10 Connect Power Source External Battery Pack The external battery pack may be used when the optional internal battery pack was not ordered or there is not time to permit a recharge of the optional internal RX2 battery pack. The external battery pack mounts to the fork truck via a battery bracket and is connected to the RX2 with cables. The cable on the external battery connects to the coupler. The coupler is mounted on a bracket. The coupler is connected via a cable to the RX2.
Connect Power Source 11 When the low battery warning is displayed, there is approximately 30 minutes of power left in the battery. If the battery is not recharged or replaced before it is depleted, the RX2 automatically shuts down. The RX2 internal battery pack does not charge from the external battery pack. Caution: Preliminary - Draft 08 ! To prevent damage to the RX2, the cables or the battery charger, make sure the charger is disconnected before moving the forklift truck.
12 Connect Power Source Vehicle 12VDC Power Connection Caution: ! Caution: For proper and safe installation, the input power cable must be connected to a fused circuit on the vehicle. This fused circuit requires a 2 Amp maximum time delay (slow blow) high interrupting rating fuse. If the supply connection is made directly to the battery, the fuse should be installed in the positive lead within 5 inches of the battery positive (+) terminal. For installation by trained service personnel only.
Connect Power Source 13 How To: Connect Vehicle 12VDC Connection 1. The RX2 must be turned off and the power cable must be UNPLUGGED from the RX2. 2. While observing the fuse requirements specified above, connect the power cable to the terminal block or as close as possible to the actual battery terminals of the vehicle. When available, always connect to unswitched terminals in vehicle fuse panel, after providing proper fusing. Preliminary - Draft 08 ATTENTION: 3.
14 Connect Power Source DC to DC Power Supply If the vehicle does not provide 12V DC power, the DC to DC converter may be used. The DC to DC converter accepts 24 – 60VDC input power and provides 12VDC output power. The DC to DC power supply is designed to be mounted in the forklift cab. Customer supplied wiring connects the DC to DC power supply (over the forklift mast) to the terminal block mounted on the bracket. The cable from the terminal block connects to the RX2.
The RX2 Battery Charger 15 The RX2 Battery Charger The RX2 battery charger accepts AC power input. Preliminary - Draft 08 Figure 12 RX2 Battery Charger The charger can be used to charger either an internal RX2 battery pack or the external battery pack. Either type of battery pack recharges in less than six hours. The battery changer can operate in environments from 32°F to 104°F (0°C to 40°C).
The RX2 Battery Charger Preliminary - Draft 08 16 RX2 User’s Guide E-EQ-RX2OGWW-A
Operation The Power Switch Preliminary - Draft 08 The power switch is a toggle switch located on the connector panel side of the RX2. Figure 15 Power Switch When the switch is set to On: • The CPU is on and the RX2 functions normally if power is present and the battery charger is not attached. • The CPU remains Off if the battery charger is attached, even if the power switch is flipped to On. This allows the optional internal battery to charge.
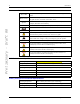
18 The Power LED The Power LED Preliminary - Draft 08 The RX2 has a power status LED on the font of the antenna enclosure. Figure 16 Power LED The LED indicates the status of the RX2: Off Indicates the RX2 is switched off or no power is applied to the RX2. The LED is off when the battery charger is attached to the RX2. Solid Green Indicates the RX2 is booting and battery power is good (or DC power is attached). Solid Red Indicates the RX2 is booting and battery power is low.
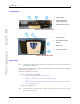
Tag Orientation and the RX2 19 Tag Orientation and the RX2 The RX2 contains an RHCP (right had circularly polarized) antenna. Preliminary - Draft 08 Tags orientation by rotation on the “Z” axis does not decrease the range of the RX2’s RFID reader. Figure 17 Tag Rotation, Example 1 However, changing tag orientation by rotating on the “X” axis or “Y” axis can reduce the range of the RX2’s RFID reader.
Tag Orientation and the RX2 Preliminary - Draft 08 20 RX2 User’s Guide E-EQ-RX2OGWW-A
Preliminary - Draft 08 Appendix A Regulatory Notices and Safety Information FCC Information: This device complies with FCC Rules, part 15. Operation is subject to the following conditions: 1. This device may not cause harmful interference and 2. This device must accept any interference that may be received, including interference that may cause undesired operation. Note: This equipment has been tested and found to comply with the limits for a Class A digital device, pursuant to part 15 of the FCC rules.
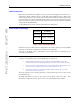
22 Approvals Approvals Product EMI / EMC Standards RX2 FCC Part 15 Subpart B, Class A Industry Canada Class A Preliminary - Draft 08 Transceiver: Transceiver RF Standards Notes 6726 (LXE Model No.) [Cisco] FCC Part 15, Subpart C FCC Part 2 Unlicensed Operation IC-RSS 210 Requires License for Outdoor Use IC-RSS 102 Important: This symbol is placed on the product to remind users to dispose of Waste Electrical and Electronic Equipment (WEEE) appropriately, per Directive 2002-96-EC.
Preliminary - Draft 08 Index C O Color Codes, Wiring................................................13 Operating Temperature..............................................2 E P Environmental Specifications....................................2 Polarity ....................................................................13 F Q Features .....................................................................1 Quick Start Instructions .............................................
Index Preliminary - Draft 08 24 RX2 User’s Guide E-EQ-RX2OGWW-A