
Product Overview
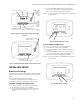
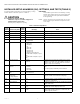

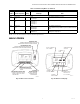
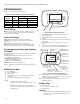

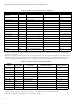
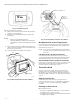
Table Of Contents
- Application
- Features
- Specifications
- Installation
- Wiring
- Power the Thermostat
- Set Calendar and Time
- Installer Setup
- Installer Setup Numbers (ISU), Settings, and Tests (Table 6)
- Main Screen
- Programming
- Operation
- Fan Sequence Operations (ISU 347, 348, 349)
- Equipment Sequence Operations (ISU 170)
- Special Programmable Mode Functions
- Special Non-Programmable Mode Functions
- Screen Locked
- Minimum-Off Timer Compressor Protection
- Temperature Sensor Operation and Checkout
- C7189U Remote Indoor Temperature Sensor
- TR21 Remote Temperature Sensor
- Troubleshooting (Table 12)

TB7100A1000 MULTIPRO™ MULTISPEED AND MULTIPURPOSE THERMOSTAT
19 63-2675—04
Special Programmable Mode
Functions
Installer Setup 160 allows the thermostat to be configured
for either a mode with a programmable 7 day schedule or
as a non-programmable thermostat.
Preoccupancy purge (ISU 185)
This feature is available only when the thermostat is
configured as a programmable schedule and when a fan is
used. The fan will run 1-3 hours before the occupied
schedule starting time to circulate air.
Override Button, Temporary Override (Duration Limit
ISU 535)
While in the programmable schedule mode, an override
button is available to perform temporary override control.
The default override time can be configured through ISU
535. Lockout configuration via ISU 670 can provide
restrictions on access to setpoint changes, system
changes, and schedule changes.
No remote setback
The remote setback feature only works in the non-
programmable mode.
Special Non-Programmable Mode
Functions
Override (Optional)
The override feature is optional in the non-programmable
mode. The override can be configured through ISU 342.
When the override is activated in the non-programmable
mode it will temporarily override to a new setpoint until the
end time expires.
Remote Setback
Remote Setback is available (ISU 340). Occupancy
sensors, manual time clock inputs, and DDC night setback
can be used to provide inputs to setback the thermostat.
Unoccupied heating (ISU 343) and unoccupied cooling
(ISU 346) setpoints are available to configure the setback
setpoints.
Setting Temperature Overrides
There are three temperature override options:
— Hold Temperature Until
— Override, and
—Holiday.
HOLD TEMPERATURE UNTIL
Holds the temperature temporarily until the time set by
the user, or the next scheduled period time.
1. Press the Up or Down arrow next to the temperature
to adjust. The Hold Until time appears on the screen.
The time defaults to the next scheduled period start
time
2. Press NEXT to adjust the time for the thermostat to
resume schedule.
NOTE: The installer setup can limit the length of
time for an override to 1, 2, 3, or 4 hours
beyond the current time.
3. Press DONE or wait 5 seconds.
4. Press CANCEL or SCHEDULE to cancel “Hold
Temperature Until” and resume the schedule.
OVERRIDE
Changes temperature setting until the next period takes
effect. For use during Unoccupied periods.
1. Press OVERRIDE. The settings change by default to
the next Occupied period.
NOTE: Changes are limited to those allowed by the
lockout level.
2. Press Up or Down arrow to change the override
temperature, and NEXT to adjust override time.
HOLIDAY
Changes temperature setting for a designated number of
days. Press MORE and then HOLIDAY. The screen shows
“Hold Until 1 DAYS”.
1. Press Up or Down arrow to change the temperature
desired for the thermostat to override the schedule.
2. Press NEXT to change the desired days for the
duration of the holiday.
3. To cancel the Holiday Override early, press CANCEL.
Fan Status Displayed on Main Screen
When the thermostat is running the fan, the fan blade
symbol appears next to FAN to indicate the thermostat
has the fan on.
NOTE: If the thermostat is not controlling the fan—
typical for many gas, forced-air heating systems—
the fan blade symbol will not appear even
though the fan may be running.
Replacing Batteries
Not all thermostat models require batteries. If the
thermostat has batteries, a low battery warning (see
Fig. 37) flashes on the main screen for approximately
30 days.
NOTE:
— If batteries are not replaced when the Low
Battery warning is flashing, the LO batt screen
displays continuously and the thermostat
stops operating until batteries are replaced.
— The thermostat has a low battery indicator.
However, it is recommended that the batteries
be replaced once each year. Do this to prevent
leakage and prevent the thermostat and HVAC
system from shutting down due to lack of
thermostat battery power.