U S E R’S M A N U A L T60H563 MiniPCI WLAN/Bluetooth Combo Module Ambit Microsystems Corporation 5F-1, 5 Hsin-An Rd., Hsinchu Science-Based Industrial Park, Hsinchu, Taiwan, R.O.C. TEL: 886-3-5784975, FAX: 886-3-5782924, Internet: http:\\www.ambit.com.tw\ 1
Contents SECTION ONE: 1.1 INTRODUCTION............................................................................................ 1 FEATURES .............................................................................................................................. 1 WLAN HARDWARE SPECIFICATION ............................................................ 1 1.1.1 1.1.2 BLUETOOTH HARDWARE SPECIFICATIONS.......................................................................... 1 1.1.
Section One: Introduction AMBIT MINIPCI 3B WLAN/Bluetooth Combo Module complied with IEEE 802.11b 11Mbps Standard. The WLAN/Bluetooth application is implemented via a Intersil Prism 2.5 RF circuit. This RF circuit is developed for Wireless LAN application complied with IEEE 802.11b 11Mbps standard in ISM band. It can be used to provide a variety of low-cost wireless network interfaces to build your wireless connection via simply SMT procedure to speed the time to market.
Supply Voltage 2.7V to 3.3V Power Features Host wake-up on the module Detach the module from host Frequency Range 2.400-2.497 GHz Antenna Load 50 Ohm Receive Sensitivity –80 dBm@0.1% BER Maximum Receiver Signal -20 dBm TX Power (ERP) 4 dBm maximum (class 2 and class 3) RF Power Control Step Size 2 dB Range 10 meters at 0 dBm TX power (class 2) Radio Compliant with Bluetooth standard version 1.
One Mini-PCI Type IIIB WLAN/Bluetooth Module One Phone Cable (Bluetooth) User Manual Section Two: Bluetooth Installation The following steps provide instructions for installing Bluetooth. 1. Make sure your MiniPCI WLAN/BT Combo card already insert into the slot. 2. Insert the connector of Antenna cable into the antenna connector of MiniPCI Module . The antenna connector assembly need to be performed by well trained engineer to cause antenna connector mismatch then degrade Bluetooth connection performance.
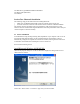
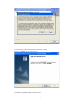
3.Wait for the install program to do the installation. 4.
5.Congratulations! Bluetooth has been installed successfully. Please click ‘Finish’ to go to the next step. 6.Select the Application that you want to use.
6
Uninstall Bluetooth (Windows 98/2K/ME/XP) One can remove the Bluetooth via the ‘Add/Remove Programs’ in the ‘Control Panel’. Select ‘Bluetooth’ and click ‘Add/Remove’ button, the dialog as below displays. 2.Wait for the un-installation to do its work. 3.Then Complete the un-Installation.
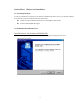
Section Three: Wireless Lan Installation 3-1 System Requirements In order to install Wireless LAN and use the Wireless LAN/Bluetooth combo card in your notebook computer. Your notebook system must meet the following requirements: A Mini-PCI Type III Slot that already insert in WLAN/BT Combo module Windows 98SE,2K,ME,XP Support 3-2 Installation and Uninstall Process Install Wireless LAN (Windows 98/2K/ME/XP) 1. Execute the program ‘Setup.exe’ in the CD. Windows displays the dialog as below.
2. It displays a License Agreement dialog. Press ‘Next’ to continue. 3. Select the destination folder that you want to place the files.
4. Wait for the install program to do the installation. 5. Congratulations! Wireless LAN has been installed successfully. Please click ‘Finish’ to go to the next step.
6. Please remove any disks from any drives before your click ‘Finish’. Then click ‘Finish’ to complete setup. Uninstall Wireless LAN (Windows 98/2K/ME/XP) 1. One can remove the AMBIT Wireless LAN via the ‘Add/Remove Programs’ in the ‘Control Panel’. Select ‘AMBIT Wireless LAN’ and click ‘Add/Remove’ button, the dialog as below displays.
2. Select ‘Remove’ and then click the ‘Next’ button to perform the un-installation. Click ‘OK’ button if you really want to remove the AMBIT Wireless LAN.
3. Wait for the un-installation to do its work. 4. Click ‘Finish’ to complete the un-Installation.
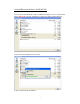
Section 4 Wireless Utility and Configuration The following sections describe the Wireless Network Configuration Utility. This utility provides quick access and friendly interface to configure the card setup. 4-1 Windows 98/ME/2000 Wireless Utility After installation is completed, a Wireless LAN Utility icon will appear in Desktop screen. Click it, then you will see the screen below. If you cannot find the icon, you can select “Start” ->”Program”->”Wireless LAN Configuration Utility” Icon.
identical for all clients or Access Points participating in the same network. The ESSID is case sensitive and must not exceed 32 characters. Press ‘Rescan’ it will scan the specific ESSID that your profile set. If your profile set the ESSID to be ANY, then while you press ‘Rescan’, it will scan AP in the nearby area and choose the stronger one. From Link Quality and Signal Strength, you can tell the wireless transmission quality.
Power Save: enable it, so it will be triggered when your computer system is inactive. WEP Key: Wired Equivalent Privacy, WEP is an encryption scheme used to protect your wireless data communications. WEP uses a combination of 40-bit keys,128-bit keys to provide data encryption for your wireless network. AP and wireless card should use the same WEP key in order to communication.
4-2 Windows XP Wireless Utility 1. To configure the wireless card setting, you can select Start\Settings\Network Connection in the Windows XP. Choose the wireless network connection, then you will see below screen. From this screen, you can see wireless connection status and wireless signal level. 2. Select ‘Properties’ in the above screen. The following windows will show up.
In ‘General’ page, Wireless LAN card information and networking protocol have been displayed. Extra networking protocol can be installed in this page.
3. Select Wireless Networks page, you can see available wireless networks in your nearby area. You can add your preferred wireless Access Point to your list, so your wireless card will search for specific wireless networks. Configure To connect to an existing access point (infrastructure) network, under Available networks, click the network name, and then click ‘Configure’ to setup wireless security and data encryption.
Advanced *If your network are configuring to a computer-to-computer (ad hoc) network, select ‘Computer-to-computer (ad hoc) network only’. *If you want to connect to a computer-to-computer and access point (infrastructure) networks are within range of your computer, click ‘Access point (infrastructure)network only’.
Define your network name (SSID) in the following windows, so your can join a specific wireless network. Check AP has WEP on or not. You wireless network will need to have same WEP setting with AP in order to communicate.
This window provides authentication via 802.1X. 802.1X, an IEEE standard that provides an authentication framework for 802-based LANs. 802.1X takes advantage of an existing authentication protocol known as the Extensible Authentication Protocol. 802.1x, giving someone secure, encrypted, wireless access on a Microsoft network will be as easy as setting a flag on the users domain account. What does this mean for the Home Network user? 802.
The ‘Advanced’ window offers Firewall and Internet Connection Sharing functions. Depends on your networking environment, you can select below functions.
Appendix A Glossary Access Point - An internetworking device that seamlessly connects wired and wireless networks together. Ad-Hoc - Ad-Hoc is a peer- to-peer wireless network without Access Point. A group of wireless clients consistent an independent wireless LAN. Backbone - The core infrastructure of a network, the portion of the network that transports information from one central location to another central location. The information is then off-loaded onto a local system.