
User Manual


Ess
BSS1
BSS2
㆚太網路
File Server
Desktop PC
Desktop PC
Desktop PC with
T60L198/T60L244
Desktop PC with
T60L198/T60L244
Access Point Access Point
Notebook with
T60L198/T60L244
Notebook with
T60L198/T60L244
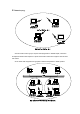
Fig.4 Roaming in an Extended Service Set (ESS)
Before enabling an ESS with roaming capability, choosing a feasible radio channel and optimum Access Point
position is recommended. Proper Access Point positioning combined with a clear radio signal will greatly enhance
performance.
Chapter 3 Adapter Installation and Configuration – Windows
®
98 / 2000
3-1
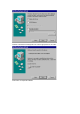
SYSTEM REQUIREMENTS
In order to install and use the T60L198 PCMCIA/T60H424 MiniPCI card your PC system must meet the following requirements:
A PCMCIA Type II or Type III slot / Type III MiniPCI slot
PCMCIA/MiniPCI revision 2.10 compliant card and socket services
Windows 98 (with the Floppy, for use during installation)
500 Kbytes free disk space for utility and driver installation
3-2
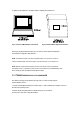
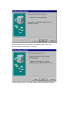
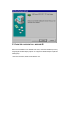
INSERTING THE ADAPTER
To insert the T60L198/ T60H424 Network Adapter into a notebook computer, do the following:
1. Locate an available Type II or Type III PCMCIA slot / Type III MiniPCI slot.
2. With the PCMCIA adapter’s 68-pin / MiniPCI Adapter’s 124-pin connector facing the PCMCIA/MiniPCI
slot and the “T60H424 MiniPCI” label facing up slide the PCMCIA adapter