
User Manual


6
Cisco Edge 300 Series Switch Installation Guide
OL-24909-01
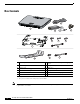
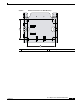
Installing the Switch
Installing the Switch
You can install the switch on a wall by using the wall-mount bracket or install the switch on a desk or
table by using the desktop bracket. You can also install the switch in a ventilated cabinet using the
wall-mount or desktop bracket.
Equipment That You Need
• Phillips screwdriver
• Scratch awl or other sharp pointed object (wall-mount)
• Electric drill with a 6-mm drill bit (wall-mount)
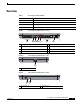
Before You Begin
Before installing the switch, verify that these guidelines are met:
• Front clearance so that the LEDs can be seen.
• AC power cord reaches from the AC power outlet to the rear-panel connector.
• Cabling is away from sources of electrical noise, such as radios, power lines, and fluorescent
lighting. Make sure that the cabling is safely away from other devices that might damage the cables.
• Airflow around the switch is unrestricted.
• Temperature around the unit does not exceed 104°F (40°C).
• Humidity around the switch does not exceed 85 percent.
• Altitude at the installation site is below 10,000 feet.
• For Ethernet ports, cables from the switch to connected devices are not longer than 328 feet
(100 meters).
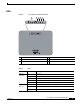
WiFi Off WiFi is disabled.
Green WiFi is enabled and functioning.
Blinking green WiFi is transmitting data.
Bluetooth Off Bluetooth is disabled.
Green Bluetooth is enabled and functioning.
Power Off There is no power or the self test has failed.
Green System is operating normally.
Blinking green System software is being upgraded.
Blinking amber System software download has failed.
Table 2 LEDs (continued)
LED Color Meaning