
User Manual


12
Cisco Edge 300 Series Switch Installation Guide
OL-24909-01
Installing the Switch
Note If you are mounting the switch on a wooden wall (not drywall), you can screw the tapping screws
directly into the wall.
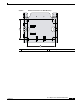
Step 6 Drill four 0.25-inch (6-mm) holes that are at least 1 inch (25 mm) deep.
Step 7 Insert the plastic drywall anchors into the holes.
Step 8 Insert a tapping screw into each anchor, and leave 0.06 inches (1.5 mm) of the screw head exposed.
Step 9 Place the bracket slots over the tapping screws, and slide the bracket down until the screws fit snugly
into the slots.
Install the Switch on a Desk or Table
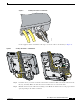
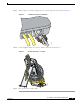
Step 1 Use the two M3.0 x 6-mm Phillips pan head screws to attach the desktop bracket to the bottom of the
switch (see Figure 9).
Figure 9 Attaching the Desktop Bracket
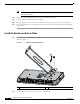
Step 2
Connect all the cables that are necessary for your installation.
1 M3.0 x 6mm Phillips pan head screws
255424
1