PRO Mini Timer Owner's Manual Model XPMT1
Contents Introduction Introduction ................................................................................................... 3 Quick Tour ...................................................................................................... 5 How to program a timed event .................................................................. 6 Special programming buttons ................................................................... 6 Setting up the Mini Timer ...................................
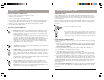
Introduction Quick Tour How it works The Mini Timer plugs into any AC outlet in your home and transmits digitally encoded signals over your house wiring instantly or at the times you set. These signals are received by the X10 PRO Modules. Let’s quickly review the functions of each part of the keyboard (you can go to page 7 for a step by step tutorial if you prefer).
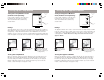
Quick Tour Setting up the Mini Timer How to Program a timed event Setting the clock 1. Place the mode switch in “Prog Set/Review” position. Plug the Mini Timer into any convenient AC outlet. Fit two AA alkaline batteries in the battery compartment to protect the time and program for up to 48 hours in the event of a power outage. If the battery is low, dead, or not installed, the low battery indicator will show in the display. 2. Advance to the desired time. 3.
Setting up the Mini Timer Programming ON and OFF times Setting something to happen every day at the same time. Setting a timed event to occur Once only After you have installed all of your Modules and checked that they are working instantly from the Mini Timer you are ready to program timed events. If (within 4 seconds after setting an On or Off time) you press the “Mode” button once or twice until Once shows in the display, you will modify the program for that particular Unit Code to occur only Once.
Programming ON and OFF times Programming ON and OFF times Reviewing timer events If the display shows FULL Set the Mode Switch in the “Prog Set/Review” position. If no events exist in memory 0:00 is displayed, otherwise the first event found in memory is displayed. If FULL is displayed when you try to enter a programmed time, this means that you have tried to enter an additional time when you have already used up all the available memory.
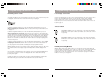
Alarm settings Alarm settings Setting the Alarm Buzzer Suspending the wake up function With the “Wake” switch in the “ON” position, any program you set for Module number 1 will also set the internal alarm buzzer. If you set channel 1 for an On time of 7:00 AM and number 1 is your bedside lamp, at 7:00 AM every day, your bedside lamp will turn on and the internal buzzer will sound.
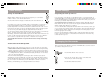
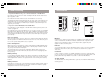
Setting up the Lamp Module Setting up the Appliance Module Setting The Lamp Module’s Code (modules sold separately) UNIT CODE DIAL 15 • Using a small screwdriver, set the red House Code dial to the same letter as your Mini Timer. Set the Black Unit Code dial to any unused number. 1 • 3 5 • 11 • 9 • 7 • A • O • C • • M E • K • I • G UNIT CODE DIAL 15 • Using a small screwdriver, set the red House Code dial to the same letter as your Mini Timer.
Troubleshooting Accessories 1. If a particular Module won’t go on or off from the buttons on the Mini Timer: Check that you have power to the outlet controlling the Module and the switch on the light or appliance is ON. ON OFF 1 Check that the Unit Code and Housecode on the Module are set correctly. 2 1 Try plugging the Module and the Mini Timer into the same outlet.
WARRANTY NOTES X10 PRO (X10) warrants X10 products to be free from defective material and workmanship for a period of two (2) years from the original date of purchase at retail. X10 agrees to repair or replace, at its sole discretion, a defective X10 product if returned to X10 within the warranty period and with proof of purchase. If service is required under this warranty: Call 800-411-2888, or visit www.x10pro.com.
X10 PRO, North Las Vegas, NV 89032 www.x10pro.