SteamMachine 053 ™ Instruction Manual WARNING TO REDUCE THE RISK OF INJURY, USER MUST READ INSTRUCTION MANUAL. FOR HOUSEHOLD USE ONLY. KEEP CHILDREN AWAY FROM WORK AREA. Contents Customer Service Important Safeguards 2 Quick Start Quick Reference Guide 4 Filling the Water Tank 5 Steam Gun Operation 6 Assembling and Attaching Accessories 7 Cleaning and Storage 9 Troubleshooting 10 Parts List 11 1-800-264-5442 or 763-780-5115, 8 a.m. to 5 p.m. CST.
Safeguards and Warnings HomeRight will not be responsible for losses or damage resulting from use of this product in any manner not specifically stated in this manual. User assumes all risks associated with such non-specific use. Before using this product, user must evaluate it and determine if it is suitable for intended application. User assumes all risks and liability associated with such use. Read and Follow All Safeguards The SteamMachine is safe when properly used but can be dangerous if misused.
Safeguards and Warnings Cleaning Fabrics: Warning A number of materials and fabrics are NOT suitable to be cleaned by steam: DO NOT use on leather, wax polished furniture or floors, synthetic fabrics, velvet, Dralon® or other delicate, steam sensitive materials. When steaming any surface for the first time, it is recommended that you consult the manufacture’s guidelines for cleaning. Cleaning Glass/Mirrors: Thermal shock can also shatter glass.
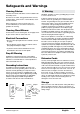
Quick Start Reference Guide This is only a quick reference. Read the entire instruction manual prior to using the product. Read all warnings and safety instructions in the instruction manual before use. 1 2 NOTE: Only use distilled water, mineral build-up from tap water can shorten the life of the steamer. Unscrew the safety cap by turning counter clockwise. 3 Fill the tank using the funnel and measuring cup provided. The tank holds up to 40 oz. /1200ml of water.
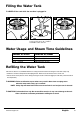
Filling the Water Tank NEVER fill the tank while the machine is plugged in. 1 2 Unscrew the safety cap. 3 Fill the tank using the funnel and measuring cup provided. The tank holds up to 40 oz. /1200ml of water DO NOT overfill the water tank. Fasten the safety cap tightly into place. Water Usage and Steam Time Guidelines Amount of Water Duration of Steam 13 oz. / 400ml 26 oz. / 800ml 40 oz. / 1200ml Approximately 15 min. Approximately 30 min. Approximately 45 min.
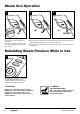
Steam Gun Operation 1 2 TRIGGER TRIGGER TRIGGER ON A B ON ON OFF LOCK 3 OFF/LOCK The steam output is controlled through the steam gun. The gun has both a steam trigger and red safety switch. For continuous steam generation: For intermittent steam generation press the red safety switch to the ON position. Pull the trigger to release steam. (B) To unlock from continuous steam mode, release the trigger and press the red safety switch back to the ON position.
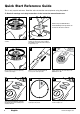
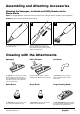
Assembling and Attaching Accessories Attaching the Squeegee, Jet Nozzle and Utility Brushes to the Steam Nozzle NOTE: The straight adaptor is used to attach all accessories to the steam gun with the exception of the Large Brush. ALWAYS attach accessories before turning the unit on. 1 Use the straight adaptor to attach accessories to the steam gun nozzle.
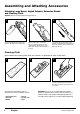
Assembling and Attaching Accessories Attaching Large Brush, Angled Adaptor, Extension Wands and Cleaning Cloth ALWAYS attach accessories before turning the unit on. 1 2 Slide the angled adaptor into the large brush receptacle. The adaptor must be angled down. 3 Rotate the adaptor 90° to set into place. Align the brush adaptor with the end of the extension wand so that the oval hole on the adaptor aligns with the lock/release button on the wand. Press down on the lock/release button.
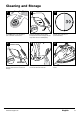
Cleaning and Storage 1 2 3 OFF LOCK ON TRIGGER Set the ON/OFF switch to off and unplug the power cord from the electrical outlet. 4 ON Release all remaining steam from tank by pressing the steam nozzle flow trigger (the Red safety switch must be in the ON position). 5 Allow the unit to completely cool (at least 30 minutes). 6 ine ach M eam OFF LOCK ON St OFF/LOCK Lock the steam nozzle flow trigger into the off position and remove all accessories from the trigger. www.homeright.
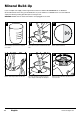
Mineral Build-Up If your municipal water supply contains high mineral content it is HIGHLY RECOMMENDED to use distilled or de-mineralized water when using your SteamMachine. If you are unable to use distilled water it is recommended to employ the following cleaning procedure prior to storing the unit. WARNING: NEVER clean the water tank while the unit is plugged into an outlet. 1 2 Use a measuring cup to mix 8 oz. of vinegar an 8 oz of water. 4 5 Drain the water-vinegar solution from the tank.
Troubleshooting PROBLEM CAUSE REMEDY 1. Unit fails to heat up. Red Power light DOES NOT illuminate when ON/OFF switch is set to ON. A. Unit is not plugged in. A. Check wall outlet. B. Loose electrical connection. B. Discontinue use and call Customer Service. C. Unit is damaged or in need of repair. C. Discontinue use and call Customer Service. 2. U nit fails to heat up. Red Power light DOES illuminate when ON/ OFF switch is on. A. Water tank is empty. A.
Parts List 12 Included in Package 4 6 5 16 7 21 10 8 3 11 2 20 17 19 18 13 14 1b 1a 22 15 1 9 23 Item 1 1a 1b 2 3 4 5 6 7 8 9 10 11 Customer Service Part No. — — — — — — — — C900061.
Two Year Limited Warranty HomeRight® warrants this product from any defects in material or workmanship for two years from the date of purchase, when it is maintained and operated according to the instructions in the Instruction Manual. HomeRight will repair or replace defective product at no charge and return postage-paid to you. This warranty does not cover accessories or damage resulting from improper use, negligence, accidents, or normal wear and tear.