
User manual


39
Start-up
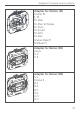
Step 2 If necessary, pull the rocker o the frame
of the relevant switch. Then pull the
frame o the switch together with the
clamping/retaining piece. The clamping/
retaining piece can be transparent, grey
or black depending on the manufacturer,
and holds the frame onto the switch.
To make removal easier, a flat, pointed
object such as a slotted screwdriver can
be used.
Step 3 Loosen the fastening of the existing
switch and carefully remove it from the
flush-mounted box.
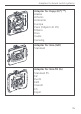
Step 4 Release the wiring and remove the exist-
ing switch if necessary.
Step 5 Connect the phase conductor to con-
necting terminal L (B) (see fig. 2).
Step 6 Connect the neutral conductor to con-
necting terminal N (C) (see fig. 2).
Step 7 Secure the wall-mount remote control
using the provided screws into the
flush-mounted box. Please note that the
system button (A) of the actuator must be
at the top left during installation.
Step 8 Fit the adapter to the rocker (see fig. 3).