OPERATOR’S MANUAL Manuel d’utilisation Manual del operador 5000 WATT GENERATOR Générateur de 5000 watts Generador 5000 watts CHE ON / MAR HG5000 Series 00:00 OFF / ARRET CHE ON / MAR OFF / ARRET NEUTRAL BONDED TO FRAME (CONNECTEUR NEUTRE RELIÉ AU CADRE, PUNTO NEUTRO CONECTADO AL MARCO) Your generator has been engineered and manufactured to our high standard for dependability, ease of operation, and operator safety.
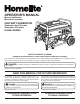
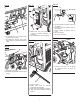
See this fold-out section for all of the figures referenced in the operator’s manual. Consulter l’encart à volets afin d’examiner toutes les figures mentionnées dans le manuel d’utilisation. Consulte esta sección desplegable para ver todas las figuras a las que se hace referencia en el manual del operador. Fig. 1 c F d G E N H RCHE ON / MA OFF / 00:00 O ARRET RCHE ON / MA OFF / J ARRET b a K M L I H - AC circuit breaker (disjoncteur de c.a.
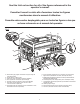
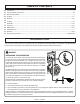
Fig. 2 2 1 3 10 8 5 4 6 2 9 7 Fig. 3 B A - Socket wrench (clé à douille, llave de casquillo) B - Combination wrench (clé mixte, llave de combinación) A Fig. 5 Fig. 4 Fig.
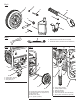
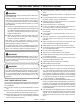
RCHE ON / MA Fig. 7 OFF / 00:00 Fig. 9 Fig. 11 b T ARRE b A E ARCH ON / M OFF / T ARRE A RCHE ON / MA OFF / 00:00 T ARRE RCHE ON / MA OFF / T ARRE A b A - Oil cap/dipstick (bouchon/jauge d’huile, tapa de relleno de aceite/varilla medidora de aceite) B - Lubricant fill hole (orifice de remplissage d’huile, agujero de llenado de aceite) Fig.
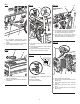
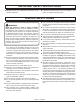
OFF / 00:00 Fig. 13 OFF / Fig. 17 Fig. 15 RCHE ON / MA T ARRE b T ARRE d A A c e b A A - Oil drainage bolt (vis de vidange d’huile, perno de drenaje de aceite) B - Oil cap/dipstick (bouchon/ jauge d’huile, tapa de relleno de aceite/varilla medidora de aceite) b A - Muffler outlet cover plate (couvercle de la sortie du silencieux, silenciador y el parachispas) B - Hex bolts (boulon hex.
TABLE OF CONTENTS Introduction..................................................................................................................................................................... 2 Important Safety Instructions......................................................................................................................................3-4 Specific Safety Rules...................................................................................................................
important safety instructions DANGER: Carbon Monoxide. Using a generator indoors will KILL YOU IN MINUTES. Generator exhaust contains high levels of carbon monoxide (CO), a poisonous gas you cannot see or smell. If you can smell the generator exhaust, you are breathing CO. But even if you cannot smell the exhaust, you could be breathing CO. Never use a generator inside homes, garages, crawlspaces, or other partly enclosed areas. Deadly levels of carbon monoxide can build up in these areas.
important safety instructions Maintain the unit per maintenance instructions in this Operator’s Manual. Inspect the unit before each use for loose fasteners, fuel leaks, etc. Replace damaged parts. SPECIFIC SAFETY RULES WARNING: When this generator is used to supply a building wiring system: generator must be installed by a qualified electrician and connected to a transfer switch as a separately derived system in accordance with NFPA 70, National Electrical Code.
SYMBOLS The following signal words and meanings are intended to explain the levels of risk associated with this product. SYMBOL SIGNAL MEANING DANGER: Indicates an imminently hazardous situation, which, if not avoided, will result in death or serious injury. WARNING: Indicates a potentially hazardous situation, which, if not avoided, could result in death or serious injury. CAUTION: Indicates a potentially hazardous situation, which, if not avoided, may result in minor or moderate injury.
SYMBOLS Some of the following symbols may be used on this product. Please study them and learn their meaning. Proper interpretation of these symbols will allow you to operate the product better and safer.
WILL KILL YOU IN MINUTES. Product does not include ground rod or copper wire. National Electric Code requires generator to be properly grounded to an approved earth ground. Call an electrician for local grounding requirements. carbon monoxide. This is a poison you Le produit ne comprend pas de piquet de terre ou de fil en cuivre. Le code electrique americain (National Electric Code) requiert un générateur pour une bonne mise à la terre approuvée.
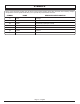
electrical extension cord cable size Refer to the table below to ensure the cable size of the extension cords you use are capable of carrying the required load. Inadequate size cables can cause a voltage drop, which can damage the appliance and overheat the cord. Load in Watts Current in Amperes At 120V At 240V 2.5 300 5 Maximum Allowable Cord Length #8 Wire #10 Wire #12 Wire #14 Wire #16 Wire 600 1000 ft. 600 ft. 375 ft. 250 ft. 600 1200 500 ft. 300 ft. 200 ft. 125 ft. 7.
electrical generator Capacity Make sure the generator can supply enough continuous (running) and surge (starting) watts for the items you will power at the same time. Follow these simple steps. 1. Select the items you will power at the same time. 2. Total the continuous (running) watts of these items. This is the amount of power the generator must produce to keep the items running. See the wattage reference chart at right. 3. Estimate how many surge (starting) watts you will need.
FEATURES PRODUCT SPECIFICATIONS Engine Engine Type........................................................389cc OHV Cooling System....................................................Forced Air Starting System.......................................................... Recoil Ignition System............................................................... TMI Generator Rated Voltage......................................................120V/240V Rated Amps.........................................................
assembly Inspect the unit carefully to make sure no damage occurred during shipping. WARNING: Do not attempt to operate the generator until assembly is complete. Failure to comply could result in possible serious personal injury. LOOSE PARTS LIST See Figure 2. The following items are included with the generator: Key No. 1 2 3 4 5 6 7 8 9 10 11 Description Qty. Wheel....................................................................2 Spacers...........................................................
ASSEMBLY Raise the end of the generator opposite the recoil starter high enough to gain access to the frame bottom; securely position props underneath to support. Slide an axle through the hole in the frame as shown. Install a nut on the inside of the frame. Using a wrench, hold the axle firmly while you securely tighten the nut. Slide a wheel over the axle. Insert a pin through the axle. Repeat the process on the other side to install second wheel. attaching the handles See Figure 6.
operation APPLICATIONS This generator is designed to supply electrical power for operating compatible electrical lighting, appliances, tools, and motor loads. BEFORE OPERATING the UNIT Only use OUTSIDE and far away from windows, doors, and vents. NEVER use inside a home or garage, EVEN IF doors and windows are open. Always position the generator on a flat firm surface. CAUTION: Attempting to start the engine before it has been properly filled with lubricant will result in equipment failure.
maintenance Apply a light coat of engine lubricant to the element, then squeeze it out. WARNING: When servicing, use only identical Homelite replacement parts. Use of any other parts may create a hazard or cause product damage. Replace the element in the air filter unit. Replace the air filter cover and close the clasp to secure. NOTE: Do not run the generator without the air filter or gasket. Rapid engine wear will result.
maintenance CLEANING THE EXHAUST PORT AND MUFFLER Draining the fuel tank Depending on the type of fuel used, the type and amount of lubricant used, and/or your operating conditions, the exhaust port and muffler may become blocked with carbon deposits. If you notice a power loss with your gas-powered products, you may need to remove these deposits to restore performance. We highly recommend that only qualified service technicians perform this service. Turn the fuel valve to the OFF position.
MAINTENANCE storage When preparing the generator for storage, allow the unit to cool completely then follow the guidelines below. storage time prior to storing Less than 2 months Drain gasoline from tank and dispose of in a suitable container according to state and local ordinances. 2 months to 1 year Drain fuel from carburetor. Drain gasoline from tank and dispose of in a suitable container according to state and local ordinances. 1 year or more Drain fuel from the carburetor.
troubleshooting PROBLEM POSSIBLE CAUSE Engine will not start. Engine switch is off. No fuel. Lubricant level is low. Engine lacks power. Fuel element clogged. AC receptacle does not work. Circuit breaker is off. Item plugged in is defective. SOLUTION Turn engine switch to ON. Fill fuel tank. Check engine lubrincant level and fill, if necessary. Fuel valve is off. Turn fuel valve on. Spark plug faulty, fouled, or improperly Replace spark plug. gapped. Choke lever is in RUN position.
WARRANTY LIMITED WARRANTY WARRANTY COVERAGE Homelite Consumer Products, Inc., (the Company) warrants to the original retail purchaser that this Homelite Product is free from defects in material and workmanship and agrees to repair or replace, at the Company’s discretion, any defective Product free of charge within these time periods from the date of purchase: Two years, if the Product is used solely for personal, family, or household use; 90 days, if the Product is used for business or commercial use.
WARRANTY EPA EMISSION CONTROL WARRANTY STATEMENT YOUR WARRANTY RIGHTS AND OBLIGATIONS The United States Environmental Protection Agency (EPA), together with Chongqing Dajiang Power Equipment Co., Ltd (herein “Dajiang”). are pleased to explain the Emission Control System Warranty on your new small off-road engine. New small off-road engines must be designed, built and equipped to meet stringent anti-smog standards for the federal government.
TABLE DES MATIÈRES Introduction..................................................................................................................................................................... 2 Instructions importantes concernant la sécurité.........................................................................................................3-4 Règles de sécurité particulières..................................................................................................................
INSTRUCTIONS IMPORTANTES CONCERNANT LA SÉCURITÉ zone fermée ou partiellement fermée. L’inhalation des fumées d’échappement provoquent le décès. DANGER : Monoxyde de Carbone. Utiliser une génératrice à l’intérieur d’un bâtiment CAUSERA LA MORT EN QUELQUES MINUTES. Toujours porter une protection oculaire avec d’écrans latéraux certifiée conforme à la norme ANSI Z87.1, ainsi qu’une protection auditive lors de l’utilisation de cet outil.
INSTRUCTIONS IMPORTANTES CONCERNANT LA SÉCURITÉ Utiliser uniquement des pièces de rechange et des accessoires approuvés et suivre les instructions dans la section Entretien de ce manuel. L’usage de pièces non autorisées ou le non-respect des instructions peut présenter des risques de choc électrique ou de blessures. Entretenir le produit conformément aux instructions de ce manuel d’utilisation.
Symboles Les termes de mise en garde suivants et leur signification ont pour but d’expliquer le degré de risques associé à l’utilisation de ce produit. SYMBOLE SIGNAL SIGNIFICATION DANGER: Indique une situation extrêmement dangereuse qui, si elle n’est pas évitée, aura pour conséquences des blessures graves, voire mortelles. AVERTISSEMENT : Indique une situation potentiellement dangereuse qui, si elle n’est pas évitée, aura pour conséquences des blessures graves ou mortelles.
Symboles Certains des symboles ci-dessous peuvent être utilisés sur le produit. Veiller à les étudier et à apprendre leur signification. Une interprétation correcte de ces symboles permettra d’utiliser le produit plus efficacement et de réduire les risques.
Product does not include ground rod or copper wire. National Electric Code requires generator to be properly grounded to an approved earth ground. Call an electrician for local requirements. Using a generator indoorsgrounding WILL KILL YOU IN MINUTES. carbon monoxide. This is a poison you Generator exhaust contains carbon monoxide. This is a poison you Le produit ne comprend pas de piquet de terre ou de fil en cuivre. code electrique americain cannot see orLe smell.
Caractéristiques électriques taille du câble du cordon prolongateur Voir le tableau ci-dessous pour vérifier que la taille de câble des cordons prolongateurs utilisés est capable de porter la charge requise. Des tailles de câbles inadéquates peuvent causer une chute de tension qui peut dommage l’appareil et surchauffer le cordon. Charge en watts Longueur de cordon permise maximum Courant en ampères À 120 V À 240 V 2.
Caractéristiques électriques capacité du générateur S’assurer que le générateur peut fournir les watts continus (de fonctionnement) et de surtension (démarrage) suffisants pour tous les articles alimentés au même moment. Suivre ces simples étapes. 1. Sélectionner les articles qui seront alimentés au même moment. 2. Faire le total des watts continus (de fonctionnement) de ces articles. Ceci correspond à la somme de puissance que le générateur doit produire pour que ces articles puissent fonctionner.
Caractéristiques FICHE TECHNIQUE Volume de carburant........................................25 l (6,6 gal.) GÉNÉRATEUR Tension nominale...............................................120 V/240 V Ampérage nominal..............................................41.6/20.8A Sortie nominale.......................................................5 000 W Sortie maximum......................................................6 250 W Fréquence nominale....................................................
Assemblage AVERTISSEMENT : Ne pas tenter d’utiliser le générateur avant d’avoir terminé l’assemblage. Le non-respect de cette instruction pourrait entraîner des blessures graves. Liste des pièces détachée Voir la figure 2. Les articles suivants sont inclus avec le générateur : No. de Pièce Description Qté. 1 Roulette................................................................2 2 Pièces d’écartement.............................................4 3 Boulon.................................................
Assemblage Localiser les pièces suivantes : 2 essieu 2 roulette 2 écrou de blocage 2 goupille Soulever l’extrémité de la génératrice, opposé au lanceur, suffisamment pour avoir accès au bas du cadre. Fixer solidement les béquilles sous celui-ci afin de le soutenir; placer des cales en dessous pour obtenir un bon support. Glisser un essieu dans le trou du cadre, tel qu’illustré. Installer un écrou à l’intérieur du cadre. À l’aide d’une clé, tenir fermement l’essieu au moment de serrer l’écrou.
Utilisation danger : Une mauvaise mise à la terre du générateur peut causer une électrocution, surtout si le générateur est équipé d’un kit de roues. Le code électrique américain (National Electric Code) requiert un générateur correctement mis à la terre à une source de terre approuvée. Appeler un électricien pour connaître les exigences locales de mise à la terre. Essuyer la jauge et l’insérer de nouveau dans le trou sans visser. Retirer une nouvelle fois la jauge et vérifier le niveau de lubrifiant.
Utilisation ATTENTION : Sur une surface à niveau, avec le moteur sur arrêt, vérifier le niveau d’huile avant chaque utilisation du générateur. MISE EN MARCHE DU MOTEUR Voir les figures 9 -11. NOTE : Si l’emplacement de générateur n’est pas à niveau, l’unité peut ne pas démarrer ou peut s’arrêter durant le fonctionnement. Débrancher toutes les charges du générateur. Ouvrir le robinet de carburant. Régler le commautateur de moteur en position ON (MARCHE). Tirer le volet de départ.
Entretien Replacer le couvercle du filtre à air et fermer l’attache pour la fixer solidement. NOTE : Ne pas faire tourner le générateur sans le filtre à air ou garniture. Ceci entraînerait une usure rapide du moteur. vivement recommandé de confier ce travail à un technicien qualifié. VIDANGE DE Le lubrifiant MOTEUR Pour nettoyer le pare-étincelles : ENTRETIEN DE LA BOUGIE VIDANGE DU RÉSERVOIR DE CARBURANT/ CARBURATEUR Voir la figure 13. Retirer le bouchon/la jauge d’huile.
Entretien REMISAGE Lors de la préparation du générateur pour le remisage, laisser l’appareil refroidir complètement puis suivre les instructions ci-dessous. DURÉE DU REMISAGE AVANT LE REMISAGE Moins d’2 mois Vidanger l’essence du réservoir et la disposer dans un récipient adapté selon les règlements nationaux et locaux en vigueur. 2 mois à 1 an Vidanger le carburant du carburateur.
Dépannage PROBLÈME CAUSE POSSIBLE SOLUTION Le moteur ne démarre pas. Le contacteur du moteur est sur Mettre le contacteur du moteur sur ARRÊT. marche. Pas de carburant. Remplir le réservoir de carburant. Niveau d’huile bas. Vérifier le niveau d’huile moteur et faire l’appoint si nécessaire. Le robinet de carburant est FERMÉ. Mettre le robinet de carburant sur MARCHE. Bougie défectueuse, encrassée ou mal Remplacer la bougie. écartée.
Garantie GARANTIE LIMITÉE COUVERTURE DE LA GARANTIE Homelite Consumer Products, Inc.
Garantie ÉNONCÉ DE GARANTIE SUR LE CONTRÔLE DES ÉMISSIONS POUR LES ÉTATS UNIS VOS DROITS ET RESPONSABILITÉS EN VERTU DE CETTE GARANTIE L’U.S. Environmental Protection Agency (EPA) et Chongqing Dajiang Power Equipment Co., Ltd (ci après « Dajiang ») se font ici le plaisir de vous expliquer la garantie de conformité du dispositif antipollution de votre nouveau petit moteur hors route.
ÍNDICE DE CONTENIDO Introducción.................................................................................................................................................................... 2 Instrucciones de seguridad importantes.....................................................................................................................3-4 Reglas de seguridad específicas..................................................................................................
Instrucciones de seguridad importantes Use botas o zapatos robustos y secos. No utilice la unidad estando descalzo. Peligro: Monóxido de carbono. Usar un generador en el interior LO MATARÁ EN POCOS MINUTOS. Los gases de escape del generador contienen niveles altos de monóxido de carbono (CO), un gas venenoso que no puede verse ni olerse. Si puede oler los gases de escape del generador, está respirando CO. Pero incluso si no puede oler los gases de escape, es posible que esté respirando CO.
Instrucciones de seguridad importantes de las instrucciones de mantenimiento puede significar un riesgo de descarga eléctrica o de lesiones. Mantenga la unidad según las instrucciones de mantenimiento señaladas en este manual del operador. Inspeccione cada vez la unidad antes de usarla para ver si tiene tornillos flojos, fugas de combustible, etc. Reemplace toda pieza dañada.
SÍMBOLOS Las siguientes palabras de señalización y sus significados tienen el objeto de explicar los niveles de riesgo relacionados con este producto. SÍMBOLO SEÑAL SIGNIFICADO PELIGRO: Indica una situación peligrosa inminente, la cual, si no se evita, causará lesiones graves o mortales. ADVERTENCIA: Indica una situación peligrosa posible, la cual, si no se evita, podría causar lesiones graves o mortales.
SÍMBOLOS Es posible que se empleen en este producto algunos de los siguientes símbolos. Le suplicamos estudiarlos y aprender su significado. Una correcta interpretación de estos símbolos le permitirá utilizar mejor y de manera más segura el producto.
ILL KILL YOU IN MINUTES. Using a generator indoors WILL KILL YOU IN MINUTES. Product does not include ground rod or copper wire. National Electric requires generator toisbe Generator exhaustCode contains carbon monoxide. This a poison you see or smell. properly grounded to an approved earth ground. Call an cannot electrician for local grounding requirements. carbon monoxide. This is a poison you Prod prope Le pr (Nati élect símbolos Le produit ne comprend pas de piquet de terre ou de fil en cuivre.
aspectos eléctricos Calibre del cordón de extensión Consulte el cuadro mostrado abajo para asegurarse de que el calibre de los cordones de extensión que utilice puedan con la carga eléctrica requerida. Los cordones de calibre insuficiente pueden causar una caída de voltaje, lo cual puede daño el dispositivo y recalentar el cordón mismo. Corriente en Carga en vatios Amperios A 120 V A 240 V Longitud máxima permitida del cordón Conduct. #10 Conduct. #12 Conduct. #14 Conduct. #16 2,5 300 600 Conduct.
aspectos eléctricos Capacidad del generador Cerciórese que el generador pueda suministrar suficientes vatios de potencia continua (en marcha) y de sobrecorriente (al arrancar) para los equipos que desee alimentar al mismo tiempo. Siga estos pasos sencillos. 1. Seleccione los equipos que desea alimentar al mismo tiempo. 2. Sume la potencia continua (en marcha) en vatios de estos equipos. Esta es la cantidad de potencia que el generador debe producir para mantener en marcha los equipos.
CARACTERÍSTICAS ESPECIFICACIONES DEL PRODUCTO Volumen de combustible..........................25 L (6,6 galones) Generador Voltaje nominal................................................120 V / 240 V Amperaje nominal...............................................41.6/20.8A Salida nominal.........................................................5 000 W Salida máxima.........................................................6 250 W Frecuencia nominal.....................................................
ARMADO ADVERTENCIA: No intente accionar el generador antes de terminar de armarlo. De lo contrario puede ocurrir un riesgo de lesiones graves. Lista de piezas sueltas Vea la figura 2. Los siguientes accesorios vienen incluidos: Núm. ref. Descripción Cant. 1 Rueda...................................................................2 2 Separador.............................................................4 3 Perno....................................................................2 4 Eje......................
ARMADO Levante el extremo del generador opuesto del arrancador retráctil a la altura necesaria para poder acceder a la parte inferior del armazón; ajuste la posición de los soportes debajo para apoyar. Deslice el eje a través del orificio en el armazón tal como se indica. Coloque una tuerca en la parte interior del armazón. Con una llave, sostenga con fuerza el eje mientras ajusta la tuerca firmemente. Deslice una rueda sobre el eje. Inserte un pasador través del eje.
Funcionamiento APLICACIONES Este generador está diseñado para suministrar alimentación eléctrica para el funcionamiento de iluminación eléctrica compatible, electrodomésticos, herramientas y cargas de motor. ANTES DE ACCIONAR LA UNIDAD Sólo utilícelo AL AIRE LIBRE y lejos de ventanas, puertas y respiraderos. NUNCA lo use dentro de su hogar o del garaje, INCLUSO con las puertas y las ventanas abiertas. Coloque siempre el generador sobre una superficie firme plana.
Funcionamiento NOTA: No permita que el arrancador retráctil vuelva a calzar en su lugar una vez encendido. Colóquelo nuevamente en su lugar original con cuidado. Deje que el motor funcione durante varios segundos, luego presione el anegador. Apagado del motor Vea las figuras 9 a 11. Para apagar el motor en condiciones normales de funcionamiento: Desconecte del generador toda carga presente. Ponga la válvula de combustible en la posición OFF (APAGADO).
mantenimiento mantenimiento de la bujía Vea la figura 14. La bujía debe tener el debido espacio interelectródico y debe estar libre de depósitos para que el motor funcione de forma correcta. Para verificar: Retire la tapa de la bujía. Limpie toda la tierra presente alrededor de la base de la bujía. Retire los bujías con la llave (no incluido). Inspeccione la bujía para ver si está dañada, y límpiela con un cepillo de alambre antes de volver a instalarla.
MANTENIMIENTO almacenamiento Al preparar el generador para guardarlo, deje que la unidad se enfríe por completo y luego siga los lineamientos señalados abajo. tiempo de almacenamiento antes de guardarlo Menos de dos meses V acíe el tanque de combustible y colóquelo en un recipiente apropiado según lo establecido por las disposiciones estatales y locales. De dos meses a un año Drene el combustible del carburador.
corrección de problemas PROBLEMA El motor no arranca. CAUSA POSIBLE El interruptor del motor está en apagado (off). No hay combustible. Está bajo el nivel de lubricante. SOLUCIÓN Ponga el interruptor del motor en encendido (ON). Llene el tanque de combustible. Revise el nivel del lubricante del motor, y reabastézcalo si es necesario. Abra la válvula (on). Está cerrada la válvula de combustible (off). Bujía defectuosa, sucia o con separación Reemplace la bujía. incorrecta.
GARANTÍA GARANTIA LIMITADA COBERTURA DE LA GARANTÍA Homelite Consumer Products, Inc., (la Compañía) garantiza al comprador minorista original que este Producto Homelite carece de defectos en material y mano de obra, y acuerda reparar o reemplazar, a la discreción de la Compañía, cualquier Producto defectuoso sin cargo en los siguientes períodos a partir de la fecha de la compra: Dos años si el Producto se utiliza exclusivamente para fines personales, familiares o domésticos.
GARANTÍA DECLARACIÓN DE GARANTÍA DE CONTROL DE EMISIÓN FEDERAL DERECHOS Y OBLIGACIONES DE SU GARANTÍA La Agencia de Protección Ambiental de los EE. UU. (EPA), junto con Chongqing Dajiang Power Equipment Co., Ltd (en adelante, “Dajiang”) se complacen en explicar la garantía del sistema de control de emisiones de su nuevo y pequeño motor todo terreno. Los nuevos y pequeños motores todo terreno deben ser diseñados, fabricados y equipados para cumplir con los estrictos estándares antiesmog del gobierno federal.
5000 WATT GENERATOR OPERATOR’S MANUAL Générateur de 5000 watts Generador 5000 watts HG5000 MANUEL D’UTILISATION MANUAL DEL OPERADOR WARNING: The engine exhaust from this product contains chemicals known to the State of California to cause cancer, birth defects, or other reproductive harm. CALIFORNIA PROPOSITION 65 SERVICE For parts or service, contact your nearest Homelite authorized service dealer. Be sure to provide all relevant information when you call or visit.