
Installation Guide
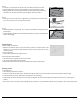
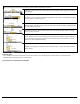
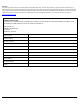
Table Of Contents
- WARNING: This product can expose you to formaldehyde gas which is known to the State of California to cause cancer. For more information, go to www.P65Warnings.ca.gov.
- WARNING: This product can expose you to formaldehyde gas which is known to the State of California to cause cancer. For more information, go to www.P65Warnings.ca.gov.
- WARNING: This product can expose you to formaldehyde gas which is known to the State of California to cause cancer. For more information, go to www.P65Warnings.ca.gov.
- WARNING: This product can expose you to formaldehyde gas which is known to the State of California to cause cancer. For more information, go to www.P65Warnings.ca.gov.
- WARNING: Drilling, sawing, sanding or machining wood products can expose you to wood dust, a substance known to the State of California to cause cancer. Avoid inhaling wood dust or use a dust mask or other safeguards for personal protection. For mo...
- WARNING: Drilling, sawing, sanding or machining wood products can expose you to wood dust, a substance known to the State of California to cause cancer. Avoid inhaling wood dust or use a dust mask or other safeguards for personal protection. For mo...
- WARNING: Drilling, sawing, sanding or machining wood products can expose you to wood dust, a substance known to the State of California to cause cancer. Avoid inhaling wood dust or use a dust mask or other safeguards for personal protection. For mo...
- WARNING: Drilling, sawing, sanding or machining wood products can expose you to wood dust, a substance known to the State of California to cause cancer. Avoid inhaling wood dust or use a dust mask or other safeguards for personal protection. For mo...
- CAUTION: ASBESTOS IN EXISTING FLOOR
- Home Legend product does not contain asbestos. Existing installed resilient flooring and asphaltic adhesive may contain asbestos fillers or crystalline silica. Do not sand, dry sweep, dry scrape, drill, saw, bead-blast, or mechanically chip or pulve...
- IF YOU HAVE ANY QUESTIONS REGARDING THE HEALTH EFFECTS OF FORMALDEHYDE, CONSULT YOUR DOCTOR OR LOCAL HEALTH DEPARTMENT."
- Tools and Materials
- Basics:
- Tape measure • Moisture meter (wood, concrete or both) • Chalk line & chalk • Hammer • Electric power saw • Carbide tipped saw blade for fine cut • NIOSH-designated dust mask • Hand saw or jamb saw • Eye protection • Straight edge or Spacers • Pry Bar...
- Technical Support
- Toll Free Number: 877-630-1800 or 877-960-8001
- Warranty

Doc. ID: 282 Rev: 3 Effective: 6-27-2022 Page | 5
Racking Pattern
• There are several options, but the most common one is the random pattern.
• It is important to ensure there is a minimum of 6 inch joint stagger between the
rows.
• Lack of sufficient stagger joint length may compromise the stability of the whole
flooring installation.
Installation Process
Step 1
• Install the product from left to right, across the room.
• Place the first floor plank with the locking groove facing the room.
• Ensure there is expansion gaps between floor and the wall; and all vertical fixtures
during installation.
• Place the short side tongue of the next floor panel right over the top of the short
side groove of the first one and lay it flat.
• Make sure the edges are perfectly lined up and square. Notice that the short sides
have an easy to install tongue and groove.
• Use a soft hammer and gently tap the tongue into the groove to lock them
together.
• Continue with the next floor panels in the same way.
Step 2
• If you have a cut piece from the previous row and it is longer than 12 inches long,
you can use this piece to start the next row. Plan it so that you will have have at
least 6 inches short joints stagger between the rows.
• Begin installing the first plank in the second row. Use an angling technique, insert
the tongue into the groove of the previous row, push gently, then lay the plank flat
to lock the long edges together.
• Insert the tongue of the next plan into the groove about a few inches away from
the previous plank. Slide the plank toward the first plank until the tongue and
groove line up with each other.
• Lay the plank flat ensuring there is no gap on the long edge joints.
• Use a non metal headed hammer to tap the short end joint.
• If the joints are not locked properly, the planks will not lay flat or a gap will appear.
To solve this problem, use a tapping block. Make sure you follow tapping block
manufacturer instruction to avoid damaging the planks edges.
• Continue in the same way with the rest of the subsequent rows.
>6 in
> 15 cm
2a
2f
Attention.
Disassembling the planks at the short sides.
Place the joined planks on flat surface, lift the free long side of the plank
and rotate it toward the joined side of the plank. See Figure 1.
Once the short end is completely disengaged except at the corner, pull the
plank out from the groove at an angle.
Do not dissemble by lifting the far end of the short side. This will
damage the locking mechanism.
Figure 1