
Installation Guide
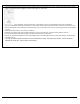
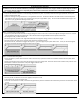
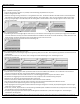
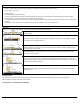
Table Of Contents
- WARNING: This product can expose you to formaldehyde gas which is known to the State of California to cause cancer. For more information, go to www.P65Warnings.ca.gov.
- WARNING: This product can expose you to formaldehyde gas which is known to the State of California to cause cancer. For more information, go to www.P65Warnings.ca.gov.
- WARNING: Drilling, sawing, sanding or machining wood products can expose you to wood dust, a substance known to the State of California to cause cancer. Avoid inhaling wood dust or use a dust mask or other safeguards for personal protection. For mo...
- WARNING: Drilling, sawing, sanding or machining wood products can expose you to wood dust, a substance known to the State of California to cause cancer. Avoid inhaling wood dust or use a dust mask or other safeguards for personal protection. For mo...
- CAUTION: ASBESTOS IN EXISTING FLOOR
- Warranty

Doc. ID: 268 Rev: 3 Effective: 9-18-2020 Page | 9
Floating Installation (For Residential Installation only)
Step 1 – How to Apply the Glue
• Use adhesive or glue which is formulated for tongue and groove floating installation. Refer to glue manufacturer’s information on
applicability to engineered hardwood floating installation.
• The glue must be placed along the topside of the groove the full length of the grooved side and end. This can be accomplished by
inverting the plank and applying a bead of glue (3/32”) to the topside of the groove (side of the groove nearest the face of the plank).
• When the plank is turned back over, the glue will flow down the back of the groove allowing total coverage. Apply only a 3/32” bead
of glue; if the groove is filled, it will be difficult to close the seam not allowing a tight fit.
Step 2 – Starting Line
• Lay out the direction of the floor. If possible, install the flooring perpendicular to the joists.
• Select a straight starter wall.
• Mark the starting line using a chalk line or a string between two nails. This distance between the wall and the line should equal the
face width of 2 floor planks plus 3/4” (1/2” expansion gap plus 1/4” tongue width = 3/4”). Do not include the width of the tongue.
Step 3 – Installing the First Row
• The planks are laid with the groove side facing the wall. The first row starts with a full-length board. Depending on tongue and groove
orientation, work can begin at either corner of the floor with groove side facing the walls.
• Ensure there is 1/2” expansion gap by following the starting line or using spacers or board.
• Plank 2 end groove is connected to the end tongue of Plank 1. Lay the rest, plank after plank, in this manner until you have completed
the first row.
Step 4 – Installing Rows 2 and 3
• After setting the first row and making sure you are against a firm starting point, layout two more rows and install them.
• The three rows of flooring are held in place using flooring straps.
• These three rows must be straight, square and in rack because they establish the alignment of the rest of the floor.
• After putting these three rows together allow the glue to set (15 to 45 minutes or per glue manufacturer’s information) before
proceeding with the rest of the rows installation.
• With the tongue facing out, the planks can be tapped together with a tapping block on the tongue to make a snug fit.
Step 5 – Installing Rest of Rows
• Continue installing rows. After installing 8 or 10 rows of flooring, stand back and check for crowning or heaving due to tension
strapping or any damage caused by improper tapping.
• Use a pull bar on the last row to ensure snug and tight joint.