
Installation Guide
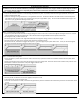
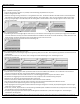
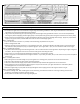
Table Of Contents
- WARNING: This product can expose you to formaldehyde gas which is known to the State of California to cause cancer. For more information, go to www.P65Warnings.ca.gov.
- WARNING: This product can expose you to formaldehyde gas which is known to the State of California to cause cancer. For more information, go to www.P65Warnings.ca.gov.
- WARNING: Drilling, sawing, sanding or machining wood products can expose you to wood dust, a substance known to the State of California to cause cancer. Avoid inhaling wood dust or use a dust mask or other safeguards for personal protection. For mo...
- WARNING: Drilling, sawing, sanding or machining wood products can expose you to wood dust, a substance known to the State of California to cause cancer. Avoid inhaling wood dust or use a dust mask or other safeguards for personal protection. For mo...
- CAUTION: ASBESTOS IN EXISTING FLOOR
- Warranty

Doc. ID: 268 Rev: 3 Effective: 9-18-2020 Page | 7
Nail Down Installation
For Products 6 inches and wider:
In addition to the use of mechanical fasteners, assisted glue applications should be used. The glue should be a premium grade urethane
construction adhesive applied in a serpentine pattern to the back of each board. Then follow the recommended fastening pattern.
Step 1 – Establish a Starting Line
• Lay out the direction of the floor. Install flooring perpendicular to joists. If possible, install the flooring perpendicular to the joists
• Select a straight starter wall.
• Mark the starting line using a chalk line or a string between two nails. This distance between the wall and the line should equal the
face width of floor plank plus 3/4” (1/2” expansion gap plus 1/4” tongue width = 3/4”). Do not include the width of the tongue. This
will result in 1/2” gap between flooring and the wall.
Step 2 – Install the First and Second Rows
• Lay the first plank behind the line with the tongue facing the center or the room. Position the edge of the tongue on the line. Leave a
1/2” gap between flooring end and the wall. There should not be a tongue between the floor planks and the wall.
• On the groove side, pre-drill and face nail.
• On the tongue side, pre-drill at 45° angle and hand blind nail trough the nailing “pocket” on top of the tongue.
• Counter sink the nails with nail set. Repeat same method to complete first row.
• On the second row, remember to stagger the end joints. If you can safely use your power nailer use it. If not: pre-drill the tongue at
45° angle and repeat hand blind nailing with finish nails as above.
Step 3 – Install the Remaining Rows
• If the pneumatic or power nailer cannot be used on the next row, repeat the second-row installation method until the power nailer
can be used.
• When the pneumatic nailer can be used, blind nail the rows on the tongue side. Place nails at the same intervals as the previous rows.
• Remember to maintain minimum 6” end joints stagger between rows.
Step 4 – Install the Last Row
• Use the pull bar to draw the last row to fit tightly to the previous row.
• Face-nail the last row on the tongue side.
• If the last row is less than 1” wide, it should first be glued to the previous uninstalled row and the two joined unit should be face nailed
as one.