
Installation Guide

5
ASSEMBLY INSTRUCTIONS
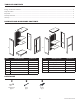
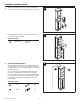
6.
Attach the assembled upper unit to the assembled lower
unit and twist the locking nut clockwise to secure in place.
6
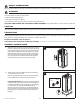
7.
Put shelf (M) into unit. Insert shelf support (AA) into unit.
Put movable shelf (G) into unit.
Hardware Used
AA
Shelf support x 12
7
G
G
M
G
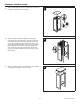
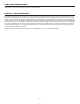
8.
INSTALLATION TO WALL
With the help of another person, move the assembly unit
to desired location. Use a pencil (not included) to mark the
pre-drilled holes on upper back panel (K) onto the wall. Set
assembled unit aside.
Use a 3/16 in. drill bit (not included) to drill 1/4 in. pilot
holes at the marked locations. Insert anchors (CC) into
holes until they are ush with the wall, then move assembly
back into position. Secure item to the wall by inserting the
screws (BB) through upper back panel (K) and into the
anchors (CC).
Hardware Used
BB
Screw
x 2
CC
Anchor
x 2
8
CC
BB
www.homewerksww.com