
Installation Guide

4
ASSEMBLY INSTRUCTIONS
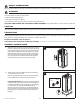
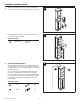
3.
Attach middle panel (F) to the assembled unit and twist the
locking nut clockwise to secure in place.
3
F
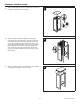
4.
Attach left upper side (H) to upper back panel (K) by
inserting the tabs on the left upper side (H) into the slots
on the upper back panel (K) and push down until the left
upper side (H) slides into place. Repeat this step for right
upper side (I). Attach left upper side (H) to upper front (J)
by Inserting the tabs on the left upper side (H) into the
slots on the upper front (J) and push down until the left
upper side (H) slides into place. Repeat this step for right
upper side (I).
4
H
I
J
K
5.
Attach top panel (L) to the assembled upper unit and twist
the locking nut clockwise to secure in place.
5
L
www.homewerksww.com