
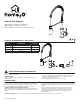
Installation Guide


2
www.homewerksww.com
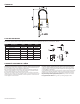
PRODUCT SPECIFICATIONS
SPECIFICATIONS SPECIFICATIONS
Max. Flow Rate: 1.8 GPM (6.814 LPM) at 60 PSI Ceramic cartridges
ASME A112.18.1/CSA B125
Manufactured to include no more than 0.25% weighted average lead content
on wetted surfaces
NSF 61-9
Polished chrome, brushed nickel or oil rubbed bronze nish
Total weight of item: 4.87 lbs.
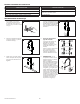
ASSEMBLY INSTRUCTIONS
1. Turn off water at the supply valve
under the sink or at the main water
supply, disconnect the supply line,
and remove old faucet.
Clean and dry surface area where
new faucet will be mounted.
1
4. Install the metal washer (1) onto
the threaded shank (2). Thread the
locking nut (3) onto the shank (2).
Lock the locking nut (3) into posi-
tion by tightening the hex bolts (4).
Do not overtighten.
1
2
3
4
4
2. Before installation, unscrew the
locking nut (1) and remove the
metal washer (2).
1
2
2
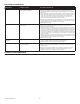
5.
Connection Water Supply
Lines:
(1) use 1/2 in. IPS faucet supply
lines (not included) or (2) use
couplilng nuts (not supplied) with
(3) ball-nose risers (not included).
Turn water supply or shut-off
valve back on and check for leaks.
If leaks occur, gently tighten the
faucet connections.
5
3. Install faucet with attached ange (1).
Insert the faucet body assembly (2)
through the hole in the sink.
1
2
3
6. IMPORTANT: After installation
is complete, turn on the hot and
cold water supply. Check for leaks.
Remove the spray head (3) by
unscrewing it from the hose
assembly (1) in a counterclockwise
direction. Be sure to hold the end
of the hose assembly (1) down
into the sink and turn the faucet
(2) on to the warm positon where
it mixes hot and c old water. Flush
line for one minute. Check for
leaks. Re-tighten any connecions if
necessary, but do not overtighten.
Reinstall the spray head (3) by
hand tightening it back onto the
hose assembly (1).
1
3
2
6