TM PR EL IM IN A RY 11 Mbps Network User Guide
© 2000 Home Wireless Networks, Inc. All rights reserved. AirWay™ TransPort User Guide Part Number 84-xxxx-000 A0600 Home Wireless Networks, Inc. 3145 Avalon Ridge Place, Suite 200 Norcross, Georgia 30071-1582 The information in this manual is subject to change without notice and should not be construed as a commitment by Home Wireless Networks. Home Wireless Networks assumes no responsibility or liability for any errors or inaccuracies that may appear in this document.
Contents Introduction . . . . . . . . . . . . . . . . . . . . . . . . . . . . . . . . . . . . . . . . . . . . . 1 About This Manual . . . . . . . . . . . . . . . . . . . . . . . . . . . . . . . . . . . . . . 1 Getting Help. . . . . . . . . . . . . . . . . . . . . . . . . . . . . . . . . . . . . . . . . . . . 2 Getting Started . . . . . . . . . . . . . . . . . . . . . . . . . . . . . . . . . . . . . . . . . . . 3 About the 11 Mbps Airway Network . . . . . . . . . . . . . . . . . . . . . . . .
Viewing Link Information . . . . . . . . . . . . . . . . . . . . . . . . . . . . . Viewing Network Information . . . . . . . . . . . . . . . . . . . . . . . . . . Advanced Mode . . . . . . . . . . . . . . . . . . . . . . . . . . . . . . . . . . . . . . . Viewing Link and Version Information . . . . . . . . . . . . . . . . . . . Changing Your Configuration . . . . . . . . . . . . . . . . . . . . . . . . . . Setting Encryption Keys for Computers . . . . . . . . . . . . . . . . . . .
Introduction About This Manual This User Guide provides detail information on installing, using, and maintaining your AirWay 11 Mbps (Megabits per second) Network. It contains the following sections: ■ Getting Started - an introduction to the AirWay 11 Mbps Network system, requirements for using the system, and suggestions for choosing a location. ■ Installing TransPort - how to connect the TransPort unit.
Getting Help If you need help installing or using your AirWay system, you can refer to the following resources: 2 ■ The Troubleshooting section in this manual ■ Toll-free Telephone Support; call 1-888-WHY-WIRE (949-9473) ■ Internet Support at http://www.AirWaySystem.
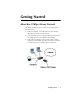
Getting Started About the 11 Mbps Airway Network The AirWay 11 Mbps Network is a wireless networking product that allows you to: ■ Build a fast, flexible, secure Wireless Local Area Network (WLAN) in your home or small business. ■ Connect WLAN clients to a high-speed Internet connection or an existing high-speed wired (Ethernet-based) LAN.
Overview of the Wireless Network The AirWay 11 Mbps Network enables you to connect to a broadband Internet connection (DSL or cable) and to transmit data wirelessly at high speed (11 megabits per second.) Many of you are familiar with a wired LAN (Local Area Network) that is in many offices. In that environment, a network server is connected by wires to computers called clients1; this is client/server architecture. The server manages the data that is transmitted over the network.
Roaming You also have the ability to roam, which means you can take your computer with a network card from one TransPort area to another area. You must use the same Service Set Identifier (SSID) and the same encryption method and code for all the units in the network. If you remove your computer from one network and go to another without the same SSID, then you have to reset the identifier so that the client can communicate with the access point.
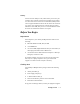
Learning about Your TransPort Refer to the following illustration to become familiar with your TransPort. RJ45 slot Power adapter connection Choosing a Location Remember the following points when deciding where to place TransPort. ■ ■ 6 Do not install TransPort in the following locations: • Attics, garages, or other temperature-extreme locations • On top of or immediately adjacent to a TV, VCR, stereo system, or computer, or beside a window facing a street with heavy traffic.
■ In general, all computers in your WLAN must be within 100 300 feet of TransPort. Although radio waves pass quite readily through most walls as well as glass, they will not pass through metal. If your walls or floors contain metal, or there are metal structures between TransPort and network computers, you will noticed degraded service. ■ Per FCC guidelines on radio frequency radiation exposure, this product should not be installed within 20 cm (7.8 inches) of the user or other nearby individuals.
7. This product must not be installed in an attic, garage or other temperature-extreme environment. 8. To reduce the risk of electric shock, do not disassemble the equipment. Opening or removing covers may expose you to dangerous voltages or other risks. Incorrect reassembly could cause electric shock. If service or repair work is required, take the unit to a qualified technician. 9.
■ Avoid placing static-causing surfaces such as plastic and Styrofoam near your unit. ■ Avoid sliding the unit across any surface.
Installing TransPort Setting up Your Network Setting up the AirWay 11 Mbps Network consists of installing the TransPort unit and then configuring the software for the computers and TransPort. The procedure for the initial setup includes the following steps: 1. Connect TransPort to the modem with the supplied cable and to the power source. 2. Install a AirWay network card into the first client computer. (This card is sold separately from TransPort.) 3.
locating the serial number. Be sure to replace the cover after recording the serial number. 2 Affix the included self-adhesive protective feet to the underside of the TransPort module.
3 Connect the provided Ethernet cable to your external DSL (Digital Subscriber Line) or cable modem and plug it into the Transport RJ45 connector. 4 Connect the power adapter to the TransPort module and plug the adapter into a standard 120V electrical outlet. 5 Make sure that the yellow and green lights are on. If the lights are not on, see “Troubleshooting” on page 46 to resolve the problem.
Adding Computers to the Network After you have connected TransPort, you can add computers to your wireless AirWay 11 Mbps Network. To add a computer, you must complete the following steps: 1. Install network card (PCI or PCMCIA) 2. Install 802.11b Adapter driver and software 3. Set up the Internet Gateway for the first computer you add to the network. You do not need to do this step for subsequent computers you add. Note: You may be asked for your Windows CD-ROM during software installation.
4 5 6 7 Replace the computer case. Connect the AirWay external antenna to the PCI card. Plug in the computer and turn it on. Install the AirWay 11 Mbps Network drivers and software. Laptop Computer Use the following procedure to install a network (PCMCIA) card in a laptop computer. 1 Turn off your laptop computer. Note: You must have computer that supports a 3.3 VDC (Volts Direct Current) card. The AirWay PCMCIA card uses 3.3 VDC. Some older computers do not support this voltage; they support only 5.
Installing the Network Card and TransPort Software After you have installed the network card into your computer, Windows will detect the new card and the Add New Hardware Wizard appears. The Wizard walks you though the process of finding and installing a driver for the 802.11 adapter. Note: This procedure describes installation with the AirWay network card and CD-ROM. To set up your client computers using non-AirWay 802.11 adapters, see “Installation with Non-Airway Network Adapters” on page 19.
Adapter Setup 1 When the Welcome window appears, click Next. The PC-AP Software License Agreement appears. 2 Read the Agreement and click Yes to accept the conditions and to continue installation. 3 Enter the last eight digits of your TransPort serial number. This is your SSID (Service Set Identifier). Note: In order to communicate with each other, all computers on the network and TransPort must have the same SSID. 4 5 Click Next.
Configuring Your Internet Gateway on TransPort When your computer is on again, your default browser will automatically display the AirWay 11 Mbps Network Status page. The Network Status page indicates whether you need to configure your TransPort. You must configure the Internet Gateway when you install software on the first computer of your network. You do not need to do this when you install software on subsequent computers.
3 Click one of the Configure options. If your Internet connection is DHCP (Dynamic Host Configuration Protocol), you do not need to enter any further information. Go to step 5. 4 If you click the option for PPPoE Server or for Configure Manually, type the information into the text boxes. ■ For the PPPoe (Point-to-Point Protocol over Ethernet) server, type your ISP (Internet Service Provider) user name and your password in the ISP Password and Confirm ISP Password boxes.
Installation with Non-Airway Network Adapters You can use other, non-AirWay 802.11-standard adapters or network cards for the AirWay 11 Mbps Network. However, because other cards do not have the AirWay CD-ROM installation, you cannot use the AirWay installation procedures.
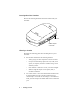
Monitoring Your Network Connection After you have setup your network, you can quickly monitor the status of your AirWay 11 Mbps Network connection by looking at the light (actually LEDs, light-emitting diodes) indicators Lon TransPort. These lights are located on the side of the unit where the Ethernet connector is. See the illustration below. Yellow LED Wireless Network Green LED Wired Network The green light indicates the state of the data being transferred of the Internet or wired LAN.
The table below describes the statuses indicated by the LEDs. Light Status Indication Green Off No power Slow Flashing (one flash per second) Problem; see the “Troubleshooting” on page 46. Fast flashing (five flashes per second) Data is being transferred on the wired 802.3 port On (not flashing) The wired network is functioning, but no data is being transferred. Off No Power Slow Flashing Problem; see the “Troubleshooting” on page 46.
Managing Your Computers You can perform system administration and configuration of client computers by using the Station Configuration Utility. There are two types of system administration modes: Standard and Advanced. Standard Mode ■ Allows you to view the version and dates of your AirWay 11 Mbps Network software driver, configuration utility, and NIC firmware. ■ Allows you to view current link info. To access Standard Mode, click the TransPort icon in your system tray.
Viewing Link Information The Link Info pane of the Station Configuration Utility displays information about the status of the link between TransPort and the computer. An example is shown below. The Link Information is described below. State Displays the current state of the connection between the computer and TransPort. ■ The state is linked when the computer is connected to the network. Also displayed is the SSID (Service Set Identification) number of the TransPort.
Current Tx Rate (Mbps) Displays the rate that data is being transmitted in megabits per second (Mbps) Data Transfer Indicates the rate that data is being transferred (Tx) and received (Rx). Link Quality Indicates the quality of the link between the computer and TransPort. The range of qualities are Not Connected, Poor, Fair, Good, Excellent. If the link is Not Connected, see Troubleshooting.
Click the About tab to view the version information. An example is shown below.
Advanced Mode The Advanced Mode of the Configuration Utility enables you to change the default settings of your computer’s link to TransPort. You should not attempt to change these settings unless you are thoroughly knowledgeable of this type of configuration. Read the instructions carefully before changing these parameters. To access Advanced Mode, hold down the Control (Ctrl) key and click on the TransPort icon in your system tray.
Changing Your Configuration In Advanced mode, you can change the configuration of your network. Click the configuration tab to access the options. A configuration pane is shown below. Use the following procedure to change your settings. 1 Click the Configuration tab of the Station Configuration Utility window. 2 Change the settings. Look at the following section for descriptions of the configuration options. 3 Click Apply Changes.
Configuration Options The configuration options are described below. Mode Two modes are available in Transport: • Infrastructure - All communication is done through TransPort to other computers, not from one computer to other as in the Ad Hoc mode. • Ad hoc - This mode is peer-to-peer or totally wireless; client computers are not connected to a wired LAN. All communication is from computer to computer. SSID The Service Set Identifier is the last eight numbers of your TransPort serial number.
• RFC1042 - This setting converts DIX Ethernet frames to 802.11 frames with a normal 802.2 SNAP header. On reception, all SNAP header frames are converted to DIX frames. All others are converted to 802.3 Ethernet frames. Power Saving Mode When this mode is enabled, it reduces the average power consumption of the radio by periodically turning off the power. In this enabled mode, TransPort sends data only when the computer specially signals for it.
Setting Encryption Keys for Computers To set the encryption key for your wireless network, you must first set the key on TransPort using the Network Management Console. For this procedure, see “Setting an Encryption Key on TransPort” on page 41. After you set up TransPort, return to this section for the procedure to set up your computers. On the Encryption pane of the Station Configuration Utility, you can set an encryption or security code by entering a passphrase or a Wired Equivalent Privacy (WEP) code.
2 3 4 5 From the Encryption (WEP) list, select Enabled. Click one of the methods of entering an encryption key, passphrase or WEP key. Click either Passphrase or Encryption (WEP). Type your encryption key. ■ If you chose passphrase, type your password into the Passphrase box. The passphrase can be 21 characters long and any alphanumeric character. The system automatically converts your passphrase into an encryption key. ■ If you chose WEP, type the numbers into the WEP key boxes.
Managing TransPort TransPort acts as your gateway to the Internet. You can manage how TransPort is configured through the Network Management Console. It allows you to administer your Internet connection and your own network’s settings. The only setting that you must configure is the Internet Gateway, which was originally done when you install the software. (See “Installing the Network Card and TransPort Software” on page 15.
Opening the Console for TransPort You can access TransPort’s settings in one of two ways: ■ Open the Network Management Console from your browser: 1. Type the IP address of TransPort in the address box; the default address is http://192.168.0.1. The Network Status page is displayed. Note: The original TransPort IP address is the one used here. If you change the IP address, use the new address to access TransPort. ■ 2. Click Login. The Enter Network Password window appears. 3.
34 • 4. Click Login. The Enter Network Password window appears. 5. If the user name is not already entered, type your user name. The default value is admin. 6. Type your password. The default value is 1234. 7. Click OK. The Network Management Console is displayed.
View Configuration The View Configuration option on the Network Management Console displays a page with all of the configuration information of the Internet Gateway and the Airway 11 Mbps Network. To view this page, click View Configuration on the Network Management Console.
Changing Your Internet Gateway Settings The Internet Gateway option allows you to share the Internet connection from your wired network through TransPort and to set up the parameters. TransPort can be used as an Internet gateway with a firewall protecting the WLAN and distributing IP addresses to computers on the network. It can also be used as a bridge where the outside network is directly linked to the computers on the WLAN. The “bridge” configuration is used only for special requirements.
information into the correct boxes. The table below describes each of your options. Configuration Table Option Description PPPoE Point-to-Point Protocol over Ethernet; a format for transmitting data over an Ethernet line. This format requires a login and password. DHCP Dynamic Host Configuration Protocol; a method for assigning IP addresses dynamically, which means that every time you connect to the network the IP address can change.
7 Click Submit Changes. The Network Management Console is displayed with the Internet Gateway option checked to show a change has been made. 8 When you have completed all of your network changes, click Apply Changes on the Console page. A change is not actually made until you click this button. The Configuration Complete page appears. You can review the network configuration to ensure that the changes are correct. 9 Click Finish to restart TransPort.
Changing the TransPort Radio Settings From this Console option you can change the radio channel for an Infrastructure network or change your SSID. Note The radio channel setting is for an infrastructure network, where all computers are linked to the TransPort and the wired network. This is not the channel for an ad hoc (peer-to-peer) network, where computers are linked to each other and not to TransPort. To change an ad hoc channel, see “Changing Your Configuration” on page 27.
The Configuration Complete page appears. You can review the network configuration to ensure that the changes are correct. 6 Click Finish to restart TransPort. The Network Status page is displayed and shows that TransPort is resetting. Configuring Your Network IP Addresses The option for Network IP Addresses allows you to change TransPort’s IP Address and to set the Subnet Mask for your network. 1 Open the Network Management Console. For instructions on opening the Console, see page 33.
The Network Status page is displayed and shows that TransPort is resetting. Setting an Encryption Key on TransPort In order to secure your wireless transmission beyond the SSID, you can encrypt the data transmission on your wireless network. Setting the encryption key is a two-step process: 1. Set the key on Transport using the Network Management Console. The procedure is described below. 2. Set the key for each computer in your network using the Station Configuration Utility.
6 When you have completed all of your network changes, click Apply Changes on the Console page. The Configuration Complete page appears. You can review the network configuration to ensure that the changes are correct. 7 Click Finish to restart TransPort. The Network Status page is displayed and shows that TransPort is resetting. Now you must complete the second step of the Encryption setup process, which is setting the encryption key for each client computer.
Attaching TransPort to the Controller If you have the AirWay Controller, the Transport can be attached to it in order to save space. Even though the two units can be attached, the wireless networks that they control remain separate. Thus, the computers linked to the AirWay 11 Mbps network (through TransPort) can exchange data with each other, but they cannot exchange data with computers that are connected to the 900 MHz data jacks.
2 Unscrew the TransPort ESD (Electostatic Discharge) plate. Top Cover Screw ESD Plate Thumb Notch Controller Connector 3 Insert your thumb into the thumb notch and pull the lid to remove it from the TransPort body. 4 Using a coin, remove the connector cover plate from the bottom of the Controller.
5 Attach the top of TransPort to the bottom of the Controller. Make sure the connector is snapped meshed together and that the units are flush. 6 Connect the provided Ethernet cable to your external DSL (Digital Subscriber Line) or cable modem and plug it into the Transport RJ45 connector. Controller TransPort TransPort RJ45 Cable 7 Connect the TransPort power adapter to the Controller (not into TransPort).
Troubleshooting Link questions My computer is not linked to TransPort. Many things could cause this problem. Check the following: • Is your network card fully slotted and working? • Is TransPort connected and is the computer within radio range? • Does the SSID for the computer match the SSID of the TransPort? Check the Station Configuration Utility (“Viewing Link Information” on page 23) and the Network Management Console (“Opening the Console for TransPort” on page 33) for this information.
Interpreting Network Status Lights My indicator light is flashing slowly. A problem is indicated when you have one or both lights flashing slowly. The type of problem is designated by the number of times a light flashes in a period of seven seconds. In each seven-second period, there is a two-second period where no light flashes.
48 • Troubleshooting
Frequently Asked Questions About TransPort What is the frequency range used by the AirWay 11 Mbps Network? The AirWay 11 Mbps Network system operates in the 2.4 GHz frequency range. What is the maximum range of the AirWay 11 Mbps Network? It has a maximum range of 1500 feet and typically from 150 to 300 feet indoors. How many computers can the TransPort unit support? You can connect up to 63 computers to a single TransPort on the AirWay 11 Mbps Network.
have the CD-ROM, which includes the installation and setup software and the Station Configuration Utility. If you want to connect your computers to another network, then the configuration of the network must be changed. About the Wireless Network Are my transmissions secure? First, only computers with your SSID can communicate on the AirWay 11 Mbps Network, so no one without the SSID can enter or extract data from your network.
Glossary This glossary describes many of the technical terms used in this guide and that are relevant to understanding network management. 10Base-T A type of Ethernet. 10 stands for signaling speed of 10MHz; Base means Baseband; T is for a twisted pair cable. A baseband transmission carries only one signal, or channel, at a time; unlike broadband, which can carry more than one signal simultaneously. 802.
Gateway A gateway is a network point that acts as an entrance to another network; TransPort acts a gateway for the AirWay 11 Mbps Network. Infrastructure network This is a client/server network as defined by the IEEE’s 802.11b specification; the opposite is an ad hoc network. In a infrastructure network, network devices communicate with an access point, which connects the WLAN to a wired network.
Router A device or software that determines where to forward data (information packets) from one network to another Server In the client/server environment, a server is a program that awaits and fulfills requests from client programs; in the AirWay 11 Mbps NetWork, TransPort acts as a network server or access point. SSID Service Set Identifier is the IEEE 802.
Appendix Specifications TransPort Size 8.5” x 4.75” x 2.25” Weight 14.7 oz. Channels 14 Ambient Temperature range 32o - 104o Fahrenheit Humidity range 10 - 90% (non-condensing) Power Source 7.5 VDC 2.0 Amp power adapter Frequency range 2.4 - 2.
will not occur in a particular installation. If this equipment does cause harmful interference to radio or television reception, which can be determined by turning the equipment off and on, the user is encouraged to try to correct the interference by one or more of the following measures. • Reorient or relocate the receiving antenna. • Increase the separation between the equipment and receiver. • Connect the equipment to an outlet on a circuit different from that to which the receiver is connected.
Canada Interference Information To prevent radio interference to the licensed service, this device is intended to be operated indoors and away from windows to provide maximum shielding. Equipment (or its transmit antenna) that is installed outdoors is subject licensing. Operation is subject to the following two conditions: 56 • 1. This device may not cause interference 2. This device must accept any interference, including interference that may cause undesired operation of the device.
Wall Mounting Instructions Mounting the TransPort on the wall Use the template on page 58 to help position the TransPort on the wall. 1. Locate a wall stud in the area where you want to mount TransPort. 2. Hold the template against the wall with the crossmarks centered on the stud and mark through the center of each crossmark with a pencil or other sharp-pointed object. 3. Insert the mounting screws through the wall board and into the stud at the marked locations.
TransPort Wall-Mounting Template Use this template when mounting the TransPort on the wall. To mark the positions of the mounting screws, hold the template against the wall with the crossmarks on a wall stud. Push a pencil or pen point through the center of each crossmark to mark the wall.