Home NetWerks VENTILATING BATH FAN WITH BLUETOOTH® SPEAKER SIMPLE SOLUTIONS FOR A SMARTER HOME MODEL #7130-06-BT Español p. 14 U.S. Pat. No. 9,398,357 The BLUETOOTH® word mark and logos are registered trademarks owned by BLUETOOTH SIG, Inc. and any use of the said mark by Homewerks Worldwide is under license. Other trademark and trade names are those of their respective owners.
TABLE OF CONTENTS Product Specifications.........................................................................................................................2 FCC Compliance.................................................................................................................................2 Package Contents...............................................................................................................................3 Hardware Contents..........................................
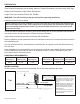
PACKAGE CONTENTS A B C NIGHT LIGHT F D E H PART A G DESCRIPTION Fan body Grille w/BLUETOOTH® speakers and light Suspension Bracket I Suspension bracket II B C D QTY 1 PART E F G 1 1 1 H HARDWARE CONTENTS (not actual size) AA BB CC M4x30 Qty. 8 M4x12 Qty. 2 M4x10 Qty. 1 www.homewerksww.
SAFETY INFORMATION Please read and understand this entire manual before attempting to assemble, operate or install the product. 1. Always disconnect the power supply prior to servicing the fan, motor or junction box. 2. Installation work must be carried out by a qualified person(s) in accordance to all local and safety codes including the rules for fire-rated construction. 3.
PREPARATION Tools Required for Assembly (not included): Hammer, Flathead Screwdriver, Wire Nuts, Nails, Duct Tape, Phillips Head Screwdriver, Utility Knife or Drywall Saw, Helpful Tools (not included): Electric Drill, Drill Bits WARNING: Turn off electricity at breaker box before beginning installation. Carefully remove unit from carton. * Before removing your current ventilation unit, verify your switch box on the wall has the required supply wires necessary for this install.
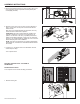
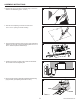
ASSEMBLY INSTRUCTIONS NEW CONSTRUCTION – ATTACHING TO THE JOIST BEFORE INSTALLATION Turn off power source. Review all safety precautions. 1. Insert suspension bracket onto fan housing using suspension bracket I (C) and II (D). If spacing between joists is 21.5 in. to 23.5 in.attach suspension bracket III (E). 1 C E D 2 3. Secure the fan housing to joist with suspension brackets using (AA) (included). (Joist spacing of less than 21.25 in.) 3 4. Mounting with joist spacing of 21.25 in. to 23.5 in.
ASSEMBLY INSTRUCTIONS 5. Secure the suspension bracket I (C) to fan housing using screw (CC) (included). Secure suspension brackets (D & E) with screws (BB) (included). 5 6. Remove junction box cover. As shown in wiring diagram on page 5, using quick connect ports connect house wires to switch and fan. 6 Green Wall switch wire back view NIGHT LIGHT Red wire Note: Do not use metal wall plate with the switch, as it may cause interference with the fan operation.
ASSEMBLY INSTRUCTIONS 2 3. If this fan is not replacing an old fan be sureto cut a 9.4 in. x 9.4 in. opening for the fan housing. 3 4 5 6 7 8 9 10 11 1 2. Measure the opening to assure it is largeenough to accommodate the new fanhousing (9.4 in. x 9.4 in.). 9.4" " 9.4 4. Insert suspension bracket onto fan housing using suspension bracket I (C) and II (D). If spacing between joists is 21.5 in. to 23.5 in. attach suspension bracket III (E). 4 C E D 5 6.
ASSEMBLY INSTRUCTIONS 7. Secure the suspension bracket I (C) to fan housing using screw (CC) (included). Secure suspension brackets (D & E) with screws (BB) (included). 7 8. Remove junction box cover. As shown in wiring diagram on page 5, using quick connect ports connect house wires to switch and fan. 8 Wall switch Green Wall switch wire back view NIGHT LIGHT Red wire Note: Do not use metal wall plate with the switch, as it may cause interference with the fan operation.
BLUETOOTH SPEAKER FAN GRILLE INSTALLATION 2. Attach grille by pinching mounting springs and insert into narrow rectangular slots in the fan housing. 2 Turn on power source. PAIRING LIGHT SWITCH WITH FAN This is a one-time pairing to be done after turning on the power source. 1. Turn switch to on ON. The white LED light on the fan should be on. 2. Cycle the switch ON & OFF multiple times (pause one second between each cycle) until the blue LED night light on the fan is flashing. 3.
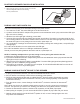
INSTALLING BATTERY INTO REMOTE CONTROL 1. R emove the two screws securing the battery cover on the remote. 2. S lide out the battery cover. The battery cover has a small rubber gasket, take care not to lose this gasket. 3. P lace the battery into the plastic prong on the battery cover, printed side down and slide the battery and battery cover back into the remote. 4. Replace the screws. CARE AND MAINTENANCE See safety information before proceeding.
CARE AND MAINTENANCE 2. Remove dust and dirt from the fan housing with a vacuum cleaner. 2 3. Wipe the fan housing with a damp cloth. Dry. 3 4. Replace the BLUETOOTH® speaker and grille. 4 Turn on power source. TROUBLESHOOTING PROBLEM The fan seems louder than it should POSSIBLE CAUSE CORRECTIVE ACTION CFM too great Be sure the CFM rating on the fan matches the size of your room. Damper not working properly or damaged Check damper to ensure it is opening and closing properly.
TROUBLESHOOTING PROBLEM POSSIBLE CAUSE CORRECTIVE ACTION Insufficient intake airflow within room Be sure a door or window is slightly ajar or opened to allow airflow. The fan is not able to draw air out of the room without enough airflow to draw from. Insufficient CFM Be sure the CFM rating on the fan matches the requirements for your room size. NOTE: Using a tissue is not an accurate method for determining if the fan is operating properly.
Home NetWerks SIMPLE SOLUTIONS FOR A SMARTER HOME VENTILACIÓN DEL VENTILADOR DE BAÑO CON BLUETOOTH® ALTAVOZ MODELO #7130-06-BT Número de patente de EE.UU. 9,398,357 La marca BLUETOOTH® y sus logotipos son marcas comerciales registradas propiedad de Bluetooth SIG, Inc. y cualquier uso de dicha marca por Homewerks Worldwide es bajo licencia. Otros nombres de marcas y el comercio son de sus respectivos propietarios.
TABLA DE CONTENIDO Especificaciones del producto...........................................................................................................15 FCC Conformidad.............................................................................................................................15 Contenido del paquete......................................................................................................................16 Aditamentos..........................................................
CONTENIDO DEL PAQUETE A B C NIGHT LIGHT D F E H PIEZA A G DESCRIPCIÓN Fan cuerpo Rejilla w/altavoces BLUETOOTH® y luz Suspensión soporte I Suspensión soporte II B C D CANTIDAD 1 PIEZA 1 F G E 1 H 1 DESCRIPCIÓN Suspensión soporte III Interruptor de pared Control remoto Soporte para control remoto y ventosa CANTIDAD 1 1 1 1 ADITAMENTOS (no es el tamaño real) AA BB CC M4x30 Cantidad 8 M4x12 Cantidad 2 M4x10 Cantidad 1 16 www.homewerksww.
INFORMACIÓN DE SEGURIDAD Lea y comprenda completamente este manual antes de intentar ensamblar, usar o instalar el producto. 1. Desconecte siempre el suministro de electricidad antes de realizar tareas de mantenimiento en el ventilador, el motor o la caja de unión. 2. Se recomienda instalación profesional. El trabajo de instalación debe ser realizada por una persona cualificada (s) de acuerdo con todos los códigos locales y de seguridad, incluyendo las normas de construcción resistente al fuego. 3.
PREPARACIÓN Herramientas necesarias para el ensamblaje (no incluido): martillo, destornillador de cabeza plana, nueces de alambre, clavos, cinta aislante, Destornillador Phillips, Cuchillo o sierra Drywal Herramientas útiles (no incluidas): Taladro eléctrico, Brocas ADVERTENCIA: Apague la electricidad en la caja de fusibles antes de comenzar la instalación. Retire con cuidado la unidad de la caja.
INSTRUCCIONES DE ENSAMBLAJE NUEVA CONSTRUCCIÓN - COLOCACIÓN DE LA VIGA ANTES DE LA INSTALACIÓN Apague la fuente de poder. Revisar toda la seguridad precauciones. 1. Introducir el soporte de suspensión en la cubierta del ventilador con el soporte de suspensión I (C) y II (D). Si el espacio entre las vigas es de 54,6 cm a 59,7 cm adjuntar suspensión III soporte (E). 1 C E D 2 3. Fije la caja del ventilador a la viga con soportes de suspensión utilizando tornillos largos para madera (AA) (incluidas).
INSTRUCCIONES DE ENSAMBLAJE 5. Fije el soporte de suspensión I (C) a la caja del ventilador usando el tornillo de máquina corta (BB) (incluido). 5 6. Retire la cubierta de la caja de conexiones. Como se muestra en el diagrama de cableado en la página 18, utilizando los puertos de conexión rápida conectan cables de la casa para cambiar y ventilador. Nota: No utilice la placa de pared de metal con el interruptor, ya que puede causar interferencia con el funcionamiento del ventilador.
INSTRUCCIONES DE ENSAMBLAJE 2 3. Si este ventilador no está reemplazando un viejo ventilador asegúrese de cortar unos 23,9 cm x 23,9 cm apertura de la caja del ventilador. 3 4. Introducir el soporte de suspensión en la cubierta del ventilador con el soporte de suspensión I (C) y II (D). Si el espacio entre las vigas es de 54,6 cm a 59,7 cm adjuntar suspensión III soporte (E). 4 4 5 6 7 8 9 10 11 1 2.
INSTRUCCIONES DE ENSAMBLAJE 7. Fije el soporte de suspensión I (C) a la caja del ventilador usando el tornillo de máquina corta (BB) (incluidas). 7 8. Retire la cubierta de la caja de conexiones. Como se muestra en el diagrama de cableado en la página 18, utilizando los puertos de conexión rápida conectan cables de la casa para cambiar y ventilador. Nota: No utilice la placa de pared de metal con el interruptor, ya que puede causar interferencia con el funcionamiento del ventilador.
BLUETOOTH® INSTALACIÓN DE ALTAVOCES REJILLA VENTILADOR 2. Coloque la rejilla pellizcando resortes de montaje y se insertan en ranuras rectangulares estrechas en la carcasa del ventilador. 2 Encienda la fuente de alimentación. MARIDAJE LUZ INTERRUPTOR CON VENTILADOR Se trata de un apareamiento de una sola vez por hacer después de encender la fuente de alimentación. 1. Coloque el interruptor de encendido. La luz LED blanco en el ventilador debe estar encendido. 2.
INSTALACIÓN DE LA BATERÍA EN EL CONTROL REMOTO 1. Retire los dos tornillos que aseguran la batería tapa en el mando a distancia. 2. Deslice hacia afuera la tapa de la batería. La tapa de la batería tiene una junta de goma pequeña, tenga cuidado de no para perder esta junta. 3. Coloque la batería en la punta de plástico en la tapa de la batería, con el lado impreso hacia abajo batería y la tapa de la batería en la remoto. 4. Vuelva a colocar los tornillos.
CUIDADO Y MANTENIMIENTO 2. Quitar el polvo y la suciedad de la caja del ventilador con un aspirador. 2 3. Limpie el alojamiento del ventilador con un paño húmedo. Seco. 3 4. Vuelva a colocar el altavoz BLUETOOTH® y parrilla. 4 Encienda la fuente de alimentación. www.homewerksww.
SOLUCIÓN DE PROBLEMAS PROBLEMA El ventilador hace más ruido de lo que debería. CAUSA POSIBLE ACCIÓN CORRECTIVA CFM demasiado grande Asegúrese de que la calificación CFM del ventilador coincide con el tamaño de su habitación. Amortiguador no funciona correctamente o está dañado Compruebe amortiguador para asegurarse de que se está abriendo y cerrando correctamente. Si el amortiguador se ha dañado, por favor llame a Servicio al Cliente.