BATH FAN WITH BLUETOOTH® SPEAKER, LED LIGHT, AND NIGHT LIGHT MODEL 7130-13-BT Español p. 14 Questions, problems, missing parts? Before returning to the store, call our customer service department at 1-877-319-3757, 7:30 a.m. - 4:30 p.m., CST, Monday - Friday. READ AND SAVE THESE INSTRUCTIONS U.S. Pat. No. 9,398,357 The BLUETOOTH® word mark and logos are registered trademarks owned by BLUETOOTH SIG, Inc. and any use of the said mark by Homewerks Worldwide is under license.
TABLE OF CONTENTS Product Specifications.........................................................................................................................2 FCC Compliance.................................................................................................................................2 Package Contents...............................................................................................................................3 Hardware Included..........................................
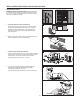
PACKAGE CONTENTS A B C D E PART A DESCRIPTION Fan Housing Grille with BLUETOOTH® Speaker and Light Suspension Bracket B C QTY 1 PART D E 1 2 HARDWARE INCLUDED (not actual size) AA BB Wood Screw M4 x 30 Qty. 8 Machine Screw M4 x 12 Qty. 4 HomewerksWW.
SAFETY INFORMATION Please read and understand this entire manual before attempting to assemble, operate or install the product. • Always disconnect the power supply prior to servicing the fan, motor or junction box. • Follow all local building, safety and electrical codes as well as NEC (National Electrical Code) and OSHA (Occupational Safety and Health Act). • Electric Service supply must be 120 volts, 60 hertz. • This product must properly connect to the grounding conductor of the supply circuit.
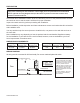
PREPARATION efore removing your current ventilation unit, verify your switch box on the wall has the required B supply wires necessary for this installation. These supply wires are power/black and neutral/white (refer to right side of wiring diagram below) at the switch. If you do not see both of these wires, consult a licensed electrician.
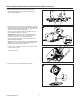
NEW CONSTRUCTION INSTALLATION INSTRUCTIONS BEFORE INSTALLATION WARNING: RISK OF ELECTRIC SHOCK. Ensure the electricity to the wires you are working on is shut off. Either remove the fuse or turn off the circuit breaker before removing the existing bath fan or installing the new one. 1. Installation Without Suspension Brackets 1 1 2 Place the fan body next to a ceiling joist. The fan housing should be level and perpendicular to the joist. Allow for thickness of ceiling board used in your application.
NEW CONSTRUCTION INSTALLATION INSTRUCTIONS (continued) 5. Secure the suspension bracket (C) to fan housing using screw (CC) (included). Secure suspension brackets (D, E) with screws (BB) (included). 5 6. R emove junction box cover as shown in illustration number 6. Using quick connect ports, connect house wires to the switch and fan. Please refer to the wiring diagram on page 5 to ensure proper wire connections are being made.
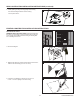
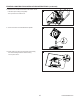
NEW CONSTRUCTION INSTALLATION INSTRUCTIONS (continued) 9. Attach grille by pinching mounting springs and inserting into narrow rectangular slots in the fan housing. 9 Turn on power source. EXISTING CONSTRUCTION INSTALLATION INSTRUCTIONS BEFORE INSTALLATION WARNING: RISK OF ELECTRIC SHOCK. Ensure the electricity to the wires you are working on is shut off. Either remove the fuse or turn off the circuit breaker before removing the existing bath fan or installing the new one. 1 2.
EXISTING CONSTRUCTION INSTALLATION INSTRUCTIONS (continued) 4. Position fan housing so edge of fan is flush with ceiling board/ sheetrock. Do not flush mount housing with joist. 4 1 2 NOTE: HOUSING MUST BE INSTALLED FLUSH WITH CEILING BOARD/SHEETROCK OR THE GRILLE MOUNTING SPRING WILL NOT BE LONG ENOUGH TO INSERT INTO THE SLOTS INSIDE THE FAN HOUSING. 5. Fig. 5A - Secure the fan housing to joist with suspension brackets using M4x30 wood screws (AA) (included). (Joist spacing of less than 21-1/4 in.
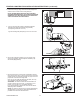
EXISTING CONSTRUCTION INSTALLATION INSTRUCTIONS (continued) 8. Connect a 4 in. circular duct and vent to the outside. Secure it with duct tape or clamp (not supplied). 8 Turn on power source. Test the fan. 9. Join the connectors for the BLUETOOTH® speaker. 9 10. Attach grille by pinching mounting springs and inserting into narrow rectangular slots in the fan housing. 10 Turn on power source. 10 HomewerksWW.
PAIRING YOUR BLUETOOTH® DEVICE TO THE SPEAKER 1. To play your personal music files, you need a wireless BLUETOOTH® device. 2. Set your device to a midrange volume before connecting to the speaker. 3. Follow the instructions that came with your BLUETOOTH® device to make it discoverable or to set it to search for other BLUETOOTH® accessories. This may involve entering a passkey or PIN (Personal Identification Number). 4. From the Home screen, choose Settings > BLUETOOTH®, to search for the speaker.
CARE AND CLEANING 2. Remove dust and dirt from the fan housing with a vacuum cleaner. 2 3. Wipe the fan housing with a damp cloth and wipe dry. 3 4. Replace the BLUETOOTH® speaker and grille. 4 Turn on power source. TROUBLESHOOTING PROBLEM POSSIBLE CAUSE CORRECTIVE ACTION CFM too great Be sure the CFM rating on the fan matches the square footage of your room. The damper is damaged or not working properly. Check the damper to ensure it is opening and closing properly.
FAN – LIMITED 3-YEAR WARRANTY If the fan fails due to a defect in materials or workmanship at any time during the first three (3) years of ownership, the manufacturer will replace it free of charge, postage-paid at their option. This warranty does not cover products that have been abused, altered, damaged, misused, cut or worn. This warranty does not cover use in commercial applications. Use only manufacturer-supplied genuine warranty repair replacement parts to repair this fan.