
Use and Care Manual

Customer Service Hotline 1-877-693-PURE
Page 9
Home Master® Reverse Osmosis System—Owners Manual
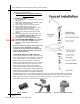
Weak pressure at RO faucet & Reserve tank filling slowly
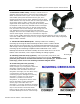
NOTE: Seasonal changes in temperature can cause pressure imbalances within the system
resulting in slow water production. Oftentimes the imbalance will correct itself on its own within
a few days. You may also restore the internal system pressure balance by draining the tank,
unplugging the tubing from the automatic shut off valve (ASV—shown here), then allow the
system to stand open overnight. Then reconnect, open the feed valve, and allow the tank to
refill.
Weak pressure is either a storage problem or a production problem. To
determine which close the tank valve and open the RO faucet. After a brief burst, you
should see a steady thin trickle of water, or -if you have the permeate pump—a trickle
that pulses on and off. If this is what you see, then it’s a storage tank problem. If you
see zero water, or only a few broken drops then it’s a production problem. Also, a light/
empty tank may indicate a production problem, and a heavy/full tank a tank problem.
Storage tank problems:
1. Make sure storage tank is full, and has been flushed at least twice.
2. Make sure the angle-stop is wide open.
3. Check all tubing for kinks or sharp bends - this can impede the flow of water.
4. Check reserve tank air pressure. Tank MUST be empty of water, tank valve OPEN,
system feed valve CLOSED and RO faucet OPEN. Air valve is located on the side of
the tank under a cap. Use a bicycle tire pressure gauge. Tank should have 7.5 psi
when empty of water. If the pressure is less or if tank is heavy with water, then add
air using a bicycle pump (not a compressor.) Please add 3 pumps, then pause,
repeat. Allow 20 minutes to pump out water and repressurize tank. Do not overfill.
Replace tank if it does not hold air .
Production problems
1. Check flow to the membrane housing. Close water at the feed water adapter
and tank, and briefly open the RO faucet at the sink to relieve any system pressure.
Then pull the black tube out of the top of the blue membrane housing at the quick
connect fitting. (There is only one fitting on the top of the membrane housing, the
bottom has two - one white, one grey). Point the tube you have just disconnected
into a pitcher and turn on the EZ adapter valve. The water flow from the tube
should be fairly strong.
2. If the flow to the membrane housing is strong, then check the water flow exiting
both the white elbow and the grey elbow at the bottom of the membrane housing.
The water flow from the white elbow should be a thin, but steady trickle, and the
flow from the grey elbow should be greater than the white elbow . If the flow from
the grey elbow is less than the white than it should be replaced. If there is no flow
from either then change the membrane and the grey elbow. Please note that the
minimum water pressure for the system to operate is 40psi. Also remember
to inspect your drain line where the red tube connects to the drain saddle, and you
can also unscrew the grey elbow at the bottom of the membrane housing. If gunk is
obstructing the drain line, then the system cannot produce good water.