
Use and Care Manual

Customer Service Hotline 1-877-693-PURE
Page 6
Home Master® Reverse Osmosis System—Owners Manual
the lower cabinetry, high along the back wall just below the drawers. Make sure cabinet
contents are removed, prior to drilling, and ¼” tubing does not come into contact with
drawers, doors, or sharp objects. Smooth the holes free from splinters and sharp edges.
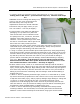
[Alternate route for refrigerator line -- run ¼” refrigerator tubing along the baseboard, and
enter the kitchen sink cabinet by drilling a ¼” opening in the bottom board of your kitchen
sink cabinet, towards the front baseboard.] Push tubing through the cabinetry holes from the
Home Master® RO to refrigerator. Allow 2-4’ of extra tubing at the refrigerator, and
position it so that it cannot be crushed or otherwise damaged while rolling the
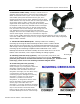
refrigerator. Connect the female metal fitting from the refrigerator kit to the male
metal fitting on the refrigerator. Make sure all male metal fittings are thoroughly
Teflon taped to prevent leaks. Do not roll back refrigerator until the Home Master®
RO is fully installed and operational. IMPORTANT: Make sure shut off valve on the
refrigerator connection kit at the Home Master® RO is in the CLOSED position, where
the blue handle will be perpendicular to the body until after the fill and drain
procedure has been performed at least twice. Also remember to dump the remaining
ice and flush the water center prior to use.
5. Affix product label found in the parts bag to the top
of the reserve tank.
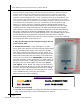
6. Install reserve tank – Using eyedropper or a small
spoon, place a few drops of unscented (regular) bleach inside
the 1/4” threaded water nipple at the top of the storage
tank. Wait 2 minutes then shake out into sink. NOTE: You
should repeat this step when performing annual service. DO
NOT touch the air nipple near the bottom of the tank found
under a blue cap at this time. IMPORTANT: Wrap plumbers
pipe tape clockwise 5 times around the 1/4” water nipple on
top of the reserve tank. Hand tighten the reserve tank shut
off valve to the 1/4” water nipple until it is snug. Do not
over tighten. Insert BLACK 3/8” tubing into the tank shut
off valve. Push tubing all the way in, then pull back gently to
check fit. Most push-pull fittings take about a ¼” of tubing
inserted into them. Make sure reserve tank shut off valve is
in the CLOSED position, where the blue handle is
perpendicular to the body and tubing.
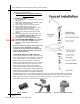
7. Connect System Tubing
A) Line IN: Insert ORANGE 1/4” tubing into cold water EZ adapter used in step 2.
Push tubing all the way in, then pull back gently to check fit.
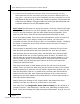
TUBING COLOR CODE
ORANGE—LINE IN BLACK—TO RESERVE TANK
RED—TO DRAIN BLUE—TO RO FAUCET