
Use and Care Manual

Customer Service Hotline 1-877-693-PURE
Page 5
Home Master® Reverse Osmosis System—Owners Manual
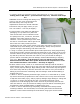
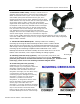
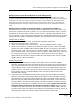
3. Install drain saddle clamp – Identify a vertical section of
drainpipe with enough space to mount the drain saddle clamp.
NOTE: A horizontal section of pipe can be used provided the
drain saddle opening flows downward into the pipe, like a
manhole drops down into the sewer. DO NOT mount the drain
saddle between the P-trap and the wall. The drain pipe material
can be either metal or plastic. Locate drain hole template
supplied with drain saddle clamp, and peel off its backing. Place
the template on the previously identified location of drainpipe
for the drain saddle clamp. Place ¼” drill bit inside template
hole, and drill a hole into the drainpipe. Drill through one side
only. DO NOT drill a hole clean through both sides of the
drainpipe. Mount the drain saddle clamp on top of the template
with the holes aligned. You may use a screwdriver to align the
holes. Fit drain saddle clamp back-plate and screws. Alternate tightening screws on each side
of the drain saddle clamp to ensure an even, snug fit. NOTE: slimmer drain clamp and garbage
disposal adapter available.
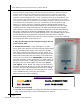
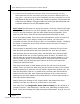
4. . Mount the Home Master® RO - Identify location for installing
mounting clip to hang the Home Master® RO filter cluster. Location should
allow room for the reserve tank, for connecting and disconnecting the unit,
and enough room for performing general service on the unit. Use supplied
mounting clip and mounting template located inside back cover. Home
Master® RO should be mounted vertically where the drain line out is on the
bottom. Once mounted, cut the zip-ties holding the tubing together.
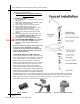
4a. Mounting Permeate Pump (optional) - Mount permeate pump side by side
with the Home Master® RO using supplied mounting clip and screws. IMPORTANT:
permeate pump must be mounted with indicator arrow pointing up. Indicator arrow
is the large, center arrow. See mounting orientation diagram below.
4b. Install refrigerator kit (optional) –
Installation may vary according to make,
model, and age of your refrigerator. Make sure
refrigerator icemaker and water center are
turned OFF. Clean area below and around
refrigerator thoroughly. Use care when rolling
out refrigerator. Flooring may become
scratched, gouged or damaged from moving
refrigerator. Consult your local licensed
contractor or plumber for trimmed-in
refrigerators, or refrigerators without rollers.
Roll out refrigerator. Unplug refrigerator
electric plug. Locate water line in for
refrigerator. (Yours may already be connected
to a water line from wall. If so use local angle-
stop to shut off water. Disconnect female
fitting.) Plan the route for the water line from
the Home Master® RO. Drill ¼” holes through
Drain Saddle
Mounting Clip