
Use and Care Manual

Customer Service Hotline 1-877-693-PURE
Page 3
Home Master® Reverse Osmosis System—Owners Manual
½” masonry drill bit (not required if sink has a pre-drilled hole, or if sink is not porcelain)
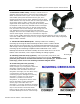
Drilling hole for RO faucet – porcelain sinks steps 1-5; stainless sinks steps
3-5
WARNING: Serious cracking and damage may
occur to your sink even if instructions are
followed exactly due to age and the
imperfections inherent in natural materials.
Instructions may not apply exactly to your
sink. Use caution – sink may be slippery.
1. Remove base cover plate from RO faucet
packaging. Line-up base cover plate with
other sink faucets. Check underside of sink
for spacing from trim, curvatures, and other
obstacles. Don’t place spigot too close to
obstacles - leave yourself enough room under
the sink to use hand tools. Either right or left
side of the sink is OK provided previous
conditions are met. Mark center of base cover plate with marker. Place towel
underneath sink, below drilling site, to collect fillings. Always wear protective
eyewear and gear while drilling, and while under sink.
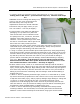
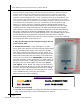
2. Using ½” masonry bit and variable speed corded power drill, slowly begin drilling
through the porcelain. Drill bit should be perpendicular to sink. Failure to do so may
cause the drill bit to slip and cause bodily injury, and/or property damage. Rinse &
dry drill bit tip and sink area with cool water for every 20 seconds of drilling to
prevent drill bit overheating and sink damage. Small localized flaking or chipping
may occur. Use caution – drill bit may be very hot. DO NOT touch drill bit.
Electrical hazard! DO NOT allow power drill electrical components to come
into contact with water. Use caution – sink may be slippery.
3. When metal is struck, switch to ¼” metal bit with cobalt tip. Drill bit should be
perpendicular to sink. Failure to do so may cause the drill bit to slip and cause bodily
injury, and/or property damage. Begin drilling to drill a hole all the way through the
sink. Rinse & dry drill bit tip and sink area with cool water for every 20 seconds of
drilling to prevent drill bit overheating and sink damage. Small localized flaking or
chipping may occur.
4. When ¼” hole is completely drilled through, switch to ½” metal drill bit w/ cobalt
tip. Drill bit should be perpendicular to sink. Failure to do so may cause the drill bit
to slip and cause bodily injury, and/or property damage. Begin drilling to enlarge the
¼” hole to ½” all the way through the sink. Use caution when hole is near
completion to avoid damaging sink surface. Rinse & dry drill bit tip and sink area
with cool water for every 20 seconds of drilling to prevent drill bit overheating and
sink damage. Small localized flaking or chipping may occur.
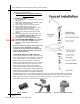
5. When ½” hole is drilled through completely, install RO faucet with provided
mounting hardware. For more details, see mounting instructions enclosed with
hardware. Connect Home Master® RO to RO faucet using Quick connect faucet