
Installation Guide


Doc. ID: 222 Rev: 0 Effective: 5-30-2018 Page | 3
damages. Repair all shortcomings before installation.
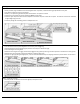
It must be flat with no visible bumps or low spots; the subfloor should be flat to within 1/8” in 6 feet span or 3/16” in 10 feet.
Test for moisture using reliable moisture meter. Perform tests at locations around exterior doorways, near foundation walls, near walls
containing plumbing lines and in the center of the room. Measure 20 locations per 1000 square feet.
Moisture content of subfloor should be less than 12%.
Plywood or Oriented Strand Board (OSB) Specifications
On truss/joist spacing of 16” (406mm) O/C or less, the industry standard for single-panel subflooring is minimum 5/8” (19/32”, 15.1 mm) CD
Exposure 1 plywood subfloor panels (CD Exposure 1) or 23/32” OSB Exposure 1 subfloor panels, 4’ x 8' sheets. Expansion gap between panels
should be 1/8” (3 mm). If panels are not tongued and grooved and there is not sufficient spacing or is inadequate, cut in the required spacing
with a circular saw. Do not cut in expansion space on tongue and groove panels.
Existing Floors
Installation over existing floor requires the installer to consider potential issues related to uneven surfaces in general, uneven spots and other
surface imperfection which would cause the click lock mechanism to fail due to constant movement from walking.
Radiant Heated Subfloor
This product can be installed over hot water heating system subfloor. For other types of radiant heated subfloor, consult the heating system
manufacturer to ensure it will not damage the engineered bamboo with SPC (stone polymer composite) core. Operating surface
temperature must be less than 84°F. Decrease temperature before installation. Increase temperature gradually after installation.
Moisture Barrier and Moisture Retarder
Concrete Subfloor:
For floating installation, use 6 mil polyethylene film or other means with equivalent permeability. Overlap the edge seams and tape it
together. Extend moisture barrier up to the wall. When installed on above grade concrete and the concrete moisture content meets the
concrete moisture standard, a moisture barrier is not required.
Sound Control Underlayment
Check with sound control manufacturer for application guidelines. Generally, the less compressive underlayment is preferred.
Expansion Gap
Required gap width is 1/2 in. It is required around the perimeter of the floor and between floor and all vertical obstructions. Do not place
permanently installed structures such as kitchen counter/cabinet on the installed floor.
Transition Molding
For floating installation, transition T-molding is required in the following cases: floor spanning greater than 40 feet in length or width; floor
areas interrupted by wall sections extending out of the wall, floor areas which are not rectangular, wall openings-with or without door, L
shaped or otherwise not rectangular rooms requires T-molding to split it into rectangular sections.
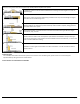
Tools and Materials
Basics:
Tape measure • Moisture meter (wood, concrete or both) • Chalk line & chalk • Hammer • Electric power saw • Carbide tipped saw blade for
fine cut • NIOSH-designated dust mask • Hand saw or jamb saw • Eye protection • Straight edge or Spacers • Pry Bar • Mallet • Broom •
Color matched wood putty • Tapping block • Pull bar
Helpful Pointers
General Tips
• Make sure your work area is well lit. Good visibility ensures that color is consistent and that visually defective planks are detected and
removed.
• The minimum length of the first and last plank is 12”. If the last plank will be less than 12”, adjust the length of the first plank. The
remainder of the last plank can be used as a starter board on the following rows.
• Using a shorter piece at undercut door jams will help when fitting flooring in place.
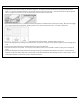
Cutting the First and Last Rows to Width
• Most often the entire length of the last row will need to be cut so that it is narrow enough to fit the remaining space.
• To ensure the last row is not too narrow, measure the distance between the walls and subtract the two expansion gaps width from it.
Divide it by the width of the plank. Subtract the number of whole planks leaving us with partial width. If the partial width is less than 2
inches, calculate the width of the starting row and last row. Add the width of the plank and partial width. Divide by two to give the width
of the starting and ending rows. Rip saw the planks accordingly. Proceed with installation.
Safety and Health Precautions
Power tools can be dangerous. Operate in strict accordance to manufacturer’s operating instructions and safety precautions. Unsafe and
improper use can cause serious injuries.
Avoid inhalation and exposures to wood dust by mechanical means and by wearing personal protective equipment.
Wear appropriate personal protective equipment (PPE) which include NIOSH or OSHA approve dust masks, safety goggle and work gloves.