
Instructions / Assembly


7
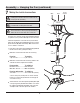
Assembly — Attaching the Fan Blades
1
3
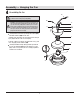
Attaching the fan blades
Preparing the motor
Preparing the canopy
2
Remove the canopy bottom cover (C) from the canopy (B) by
turning the canopy bottom cover (C) counterclockwise.
Remove the mounting bracket (A) from the canopy (B) by
loosening canopy mounting screws (EE) a half turn from the
screw head. Next, turn the canopy (B) counterclockwise to
remove the mounting bracket (A) from the canopy (B).
Please contact 1-877-592-5233 for further assistance.
HOMEDEPOT.COM/HUBSPACE
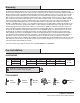
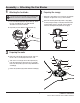
FF
GG
II
D
KK
JJ
LL
HH
Remove the cotter pin (FF) and clevis pin (GG), and loosen
the two collar set screws (HH) from the motor collar.
Take out the set screw (II) located in the hanger ball (JJ),
lower the hanger ball (JJ) and remove the cross pin (KK).
Remove the hanger ball (JJ) from the hanger ball/downrod
assembly (D).
Remove the ground lead (LL) from the downrod assembly (D).
EE
A
B
C
EE
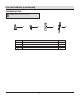
IMPORTANT: Make sure blade screw holes are aligning with
correct holes on the motor assembly. There are alignment lines
between screws holes on the motor assembly for checking.
Attach the blade (G) to the fan motor assembly (F). Align the
holes on the blade support plate (H), the blade (G), and the
fan motor assembly (F) and secure with the blade
attachment screws and lock washers.
Repeat this procedure with the remaining blades (G).
G
F
H