
Installation Guide

HOMEDEPOT.COM/HOMEDECORATORS
Please contact 1-8 for further assistance.
Glue Down Installation
IMPORTANT: ANY EXCESS GLUE WHICH GETS ONTO THE SURFACE OF THE FLOOR MUST BE REMOVED IMMEDIATELY WITH ADHESIVE REMOVER.
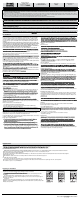
1 ESTABLISHING A STARTING LINE AND SPREADING GLUE 2 INSTALLING THE STARTER ROWS (FIRST TWO ROWS)
a. Establish a starting line by referring to Step 1 in
the Nail Down Installation section above.
b. Spread the glue from the straight edge or chalk
line out, in the direction of the starting wall.
Spread only enough glue to install what can be set
within 45 minutes (15 minutes of OPEN TIME and
an additional 30 minutes for actual installation.
Usually about two rows width coverage). Different
manufacturers may require different open times
and set times.
c. Repeat step b with each succeeding row.
a. Installation begins from the straight edge with
the tongue facing away from the wall. Allow an
expansion gap between the wall and the end
of the board.
b. Install the second starter row. Use a 75 pound
roller or weigh them down while the glue sets.
Allow the glue to set and remove the straight
edge.
2A
2C 2D
3 INSTALLING THE REMAINING ROWS
3A
3D
3G 3H 3I
3E
3F
3B 3C
a. Spread another section of glue. Never spread more that can be covered before the adhesive is set. If
adhesive is set and will not transfer to the back of the plank, scrape off the adhesive and apply fresh
adhesive.
b. Continue to install the next rows. Make sure there is a random staggering at the end joints of at least 6
in. apart.
c. Be attentive to staggering the ends of the boards correctly in adjacent rows to avoid clustering end joints.
d. Ensure that a 3/4 in. expansion gap is maintained around the perimeter of the room.
e.
f.
remover.
g.
h. Tap the planks together until the tongue and groove are fully engaged. Be careful NOT to damage the face
of the planks.
i.
sq. ft. interval during the installation to ensure proper adhesive transfer.
j.
moving during installation. The tape must be left in place for a minimum of 24 hours. Flooring straps can
be used to pull boards together and hold them in place while the glue dries.
k.
adhesive to properly set.
Completing the Installation
Use matching putty where necessary.
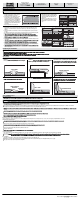
Accessories
Pictures are for general illustrative purposes only. Actual products may differ from picture.
T-Molding:
similar heights or to cover an expansion gap.
T-MOULDING
FLOORING
FLOORING
Stair Nose:
FLOORING STAIR NOSE
RISER
STAIR TREAD
Carpet Reducer (also called Baby Threshold or End Cap):
exterior door jambs.
CARPET REDUCER
FLOORING
CARPET
Hard Surface Reducer: Used to transition to another hard surface
HARD SURFACE
REDUCER
RESILIENT
FLOOR
FLOORING
Wall Base:
be used with or without Quarter Round.
FLOORING
WALL BASE
WALL
Quarter Round: Used to cover the expansion space between the wall
base molding.
FLOORING
QUARTER ROUND
WALL
Care and Maintenance
DAILY MAINTENANCE
CAUTION:
For lightly soiled area, clean with distilled water.
For moderately soiled areas, use a mild solution of isopropyl (rubbing) alcohol and distilled water. Dilute the mixture by mixing one part alcohol and 2 parts distilled water. For tougher spots, use a higher concentration of
isopropyl alcohol and distilled water. For extreme cases, a solution of nail polish remover (acetone) and distilled water can be used.
and spots.
Do NOT use a steam cleaner.
BRANDED OR OFF-THE-SHELF FLOOR CARE PRODUCTS
If none of the above are effective and you choose to use a store bought product, test the product in a non-conspicuous area (i.e., closet, corner, or scrap pieces) for potential adverse side effects.
PREVENTATIVE MAINTENANCE
Place protective pads beneath furniture legs and other heavy objects.
Avoid excessive exposure to water from being tracked in during periods of inclement weather.
Rearrange furniture and rugs periodically to avoid uneven color and shade changes from light exposure.
Use protective mats beneath rolling chairs and keep furniture casters clean.
Keep pets’ nails trimmed.
CLIMATE MAINTENANCE
Care should be taken to control humidity levels within the 35% - 55% range. Flooring, especially hardwood and bamboo, dimensions will be affected by varying levels of humidity.
Dry Climates
Humid, Wet Climates
FLOOR REPAIR
Very light and small surface scratches can be repaired with a staining “touch up” pen of the appropriate color.
Slightly deeper scratches can be repaired by means of colored putty and or stains. Fill the scratches with the putty. Level with putty knife. Wipe off excess putty.
Very deep scratches may require the replacement of the planks.
Installation Instructions
Solid Bamboo Flooring
For Assistance, Call: 1-8
Homedepot.com/homedecorators
Products Description
5/8 in., 9/16 in., 1/2 in., 3/8 in., Thick;
Solid; Tongue and Groove
Grade Levels
On Grade
Above Grade
Installation Methods
Full Spread Glue