
Installation Guide

Installation Instructions
Engineered Bamboo Flooring
For assistance, call: 1-888-369-6888
HomeDepot.com/HomeDecorators
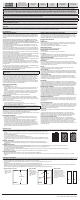
Product Description
Engineered
Tongue and Groove
Grade Levels
Above Grade / On Grade
Below Grade
Installation Methods
Full Spread Glue
Covers 15.494 sq. ft./Case
Item #1003 221 041
Model #AM1735E
HOMEDEPOT.COM/HOMEDECORATORS
Please contact 1-888-369-6888 for further assistance.
Warranty
Limited Lifetime
Residential
Installing Center Column
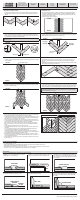
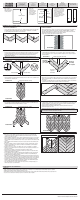
1 INSTALLING THE STARTING V COLUMN 2 SPREADING THE GLUE
□ Position the long side of plank “B” over the short end of plank “A”. Align the edge using the tongue of a
spare plank. Tap the top of plank “B” using a soft-faced hammer to fully lock planks together. This is the
starting V.
A
B
A
B
A
B
□ Spread the glue from the straight edge or chalk line out, in the direction of the starting wall. Spread only
enough glue to install what can be set within 45 minutes (15 minutes of OPEN TIME and an additional
30 minutes for actual installation. Usually about two rows width coverage). Different manufacturers may
require different open times and set times.
□ Repeat the above step with each remaining row.
Start Wall
End Wall
3 POSITION THE STARTING V 4 TAPPING ADDITIONAL PLANKS IN PLACE
□ Slide the starting V against the wall. The working lines should meet up with the plank as shown below.
Plank “A” should be closest to the wall, touching the 1/4 in. spacer. Plank “B” will be offset; this is normal.
The proper alignment of the starting V is critical for installation.
NOTE: Top decor edges should be ush with no high spots. Run your hands over the plank seam, tap
down as necessary.
A
B
Start Wall
1/4 in. (6 mm spacer)
Working LineWorking Line
B
A
Groove
Groove
Tongue
□ Continue to install column A1 and B1 as shown. Do not tap down the last 2 inches of the seam. This spacer
will be tapped and locked as the planks of the next column are added.
A
B
Start Wall
1/4 in. (6 mm spacer)
Do not tap
down fully
Do not tap
down fully
Start tapping
from here
A
B
5 ENSURE POSITION OF STARTING V 6 INSTALLING COLUMNS A2 AND B2
□ Continue to ensure that the starting V is aligned properly (as described in Step 2) throughout the formation
of column A1 and B1.
Start Wall
End Wall
1/4 in. (6 mm spacer)
A1 B1
□ Spread another section of glue. Never spread more that can be covered before the adhesive is set. If
adhesive is set and will not transfer to the back of the plank, scrape off the adhesive and apply fresh
adhesive.
□ Starting with the last full plank at the end wall, continue installing sequential columns (Column A2 and B2).
Lift the untapped edge and slide the new plank under.
A1
B1
A1
B1
A1
B1
A1
B2
1
2
7 CONTINUING WITH COLUMNS A2 AND B2 8 CONTINUING WITH COLUMNS A2 AND B2
□ Position the tongue and groove of the rst plank in column A2 into place with the last plank in column B1.
tap seams to completely lock planks.
Start Wall
End Wall
1/4 in. (6 mm spacer)
A1
A2
B1
B2
A
A
A
B
B
B
B
B
B
A
A
□ Continue forming columns until you have reached the opposite end of the room. Remember to not tap down
the last 2 inches of the seam. These will be tapped and locked as the planks of the next column are added.
□ Check your working lines as you install additional planks to keep the pattern straight. Adjust if necessary.
NOTE: If you need to remove a plank for whatever reason, slowly push down on the plank with the groove
while lifting the plank with the tongue, Be careful not to damage the tongue or groove. Tap down lightly
on the plank with the groove if necessary..
A2 B3A3 B2
Start Wall
End Wall
1/4 in. (6 mm spacer)
A1 B1
9 MEASURE, MARK, AND CUT WALL PIECES
□ Measure, mark, and cut planks that extend to the walls. Allow for 1/4 in. (6 mm) spaces. A T-Bevel (angle
nder) can be used to nd the correct angles. Always measure twice before cutting.
□ To cut planks, simply measure and mark the plank. Then, use a straight edge and utility knife to score and
snap. You will also need to back-cut the under pad on the bottom of the plank. If you have difculty using
this method, you can use a jig saw, circular saw, or miter saw.
□ This is the last column of your installation, so all seams can be tapped to fully lock together at this time.
□ Do not discard planks cut on angles. Save all scrap pieces until the install is complete. They can be used in
other areas of the installation if layout permits. Stack in accordance to A and B planks.
□ Make sure that there is 100% adhesive contact between the underside of the planks and the suboor.
□ Any excess glue which seeps onto the surface of the oor must be removed immediately with adhesive
remover.
□ The glue should not be applied in the groove or the tongue of the ooring.
□ Tap the planks together until the tongue and groove “snap” into place. Be careful NOT to damage the face
of the planks.
□ Use a clean, smooth, 75 pound roller to roll the ooring immediately after installation and after every
150sq. ft. interval during the installation to ensure proper adhesive transfer.
□ The ooring should be taped together during installation using painters tape to keep the planks from
moving during installation. The tape must be left in place for a minimum of 24 hours. Flooring straps can be
used to pull boards together and hold them in place while the glue dries.
□ When nishing the oor with small triangular shaped pieces (see plank X), use a small bead of “instant
glue” (cyanoacrylate adhesive) in the groove before tapping in the plank. Remove any excess adhesive as
soon as possible using mineral spirits.
□ After the installation is completed, keep the oor free from foot trafc for a minimum of 24 hours to allow
the glue and oor to set.
Start Wall
Starting V
Starting V
X
Completing the Installation
□ Clean the oor.
□ Use matching putty where necessary.
□ Install or reinstall all wall trim pieces. Nail them through the wall, but not to the suboor to avoid restricting the expansion gap.
□ Install transition trim pieces. Nail them to the suboor, not the ooring.
□ At doorways, transitions should be used to protect the edges of the oor and to provide a decorative transition from one oor type to another.
□ If the oor is to be covered, use a breathable material such as cardboard. Do not cover with plastic.
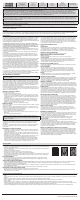
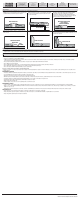
Accessories
Pictures are for general illustrative purposes only. Actual products may differ from picture.
T-Molding: Used to create a transition between oor coverings of
similar heights or to cover an expansion gap.
T-MOULDING
FLOORING
FLOORING
Stair Nose: Used in conjunction with ooring installed on stair steps or
nished edges of a higher level oor like in a sunken living room.
FLOORING STAIR NOSE
RISER
STAIR TREAD
Carpet Reducer (also called Baby Threshold or End Cap):
Used to transition oor coverings of differing heights. This reducer strip
is also commonly used to border a replace, sliding glass door and other
exterior door jambs.
CARPET REDUCER
FLOORING
CARPET
Hard Surface Reducer: Used to transition to another hard surface
ooring of different heights such as tile, vinyl, or concrete.
HARD SURFACE
REDUCER
RESILIENT
FLOOR
FLOORING
Wall Base: Used to give a nished look at the base of the walls. It can
be used with or without Quarter Round.
FLOORING
WALL BASE
WALL
Quarter Round: Used to cover the expansion space between the wall
base and your ooring. It can also be used to make smooth transitions
between the oor and cabinetry. It can be used with or without wall
base molding.
FLOORING
QUARTER ROUND
WALL