
Installation Guide

Page 4
SAFETY
WARNING:
STEP 7 - TOWEL BARS AND KNOBS:
Ÿ Refer to Illustration #7 for typical Euro Towel Bar
installation for an showerhead right enclosure
Ÿ Refer to the instruction sheet that came with your door
for more detailed instructions
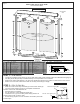
STEP 8 - PANEL ADJUSTMENT:
Ÿ To adjust the sliding panels for out-of-square wall
conditions or to level them, etc., use locate the hex nuts
in the Hanger Brackets (4a) and the Adjustment Wrench
provided in the parts kit. See Illustration #8
-----
NOTE: The panels can be adjusted while still hanging
in the header.
----
Ÿ Loosen the hex nut with the special wrench until roller
can slide along the angled slot on the Hanger Bracket
(4a)
Ÿ Raise or lower each side of the panel by sliding the
roller along the angled slot until desired adjustment is
achieved
Ÿ Be sure to re-tighten the screws.
STEP 9 - HEADER ATTACHMENTS:
Ÿ Secure the Header to the Tub Jambs by drilling
through the holes in the header, from the inside of the
shower, into the Tub Jambs with a 1/8” drill bit.
Ÿ Secure with two #6 X 3/8” PHPHSMS (Item #7) as
shown in illustration #8.
STEP 10 - SEALANT:
Ÿ Apply a bead of sealant along the entire outside of the
enclosure where it meets the wall and base.
Ÿ Pay special attention at the bottom corners where the
Tub Jambs meet the Stay Clean Sill. These joints must
be totally sealed for a leak proof installation.
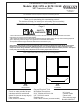
Top view shows towel bar and knob locations for a shower head on right wall.
If the shower head is on the left the panels would be reversed.
ILLUSTRATION #7
Improper screw placement
during STEP 9 could cause
damage to the glass.
5
2
16
16
3
3
5
Cushioned
Knob
Cushioned
Knob
Cushioned
Knob
Blind
Fastener
Towel
Bar
ILLUSTRATION #8
INSIDE
OUTSIDE
Outside Shower
Inside Shower
HANGER
BRACKET
HEX NUTS
HANGER BRKT, 4a
ACTUAL SIZE
TUB HEADER, 1
TUB JAMB, 3
3/4" NYLON
ROLLER, 4b
TOWEL BAR, 12
BACK UP
PLATE, 13
KNOB, 10
CENTER GUIDE, 6
T-FIN, 17
#6 X 3/8
PHPHSMS, 7
STAY CLEAN
SILL, 2
SLIDING
GLASS
PANELS, 16
Anti Jump
Inserts, 19
#6 X 3/8”
PHPHSMS (7)
Installation Instructions
3/8" Frameless Slider
Models: ESE / ETE or ELTE / ELSE