
Installation Guide
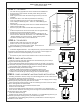

STEP 1 - CENTERLINE:
Ÿ Locate the centerline of the shower or tub rim and mark it with a water soluble marker. See illustration #3 (page 3)
Ÿ The Stay Clean Sill (Item #2) is installed directly over and parallel to the centerline
Ÿ Measure the wall to wall distance, 1/2” above the threshold to allow for any radius or obstructions in the corners
Ÿ Deduct 7/16” f cut the Stay Clean Sill (2) to lengthrom this measurement and
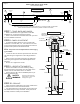
Installation
CENTER GUIDE (6)
#6X3/8” PHPHSMS (7)
STAY CLEAN SILL (2)
T-FIN (17)
STEP 2 - STAY CLEAN SILL:
ILLUSTRATION #2
Ÿ Mark the center of the Stay Clean Sill for the Center Guide
Ÿ Use the Center Guide’s hole for a template and mark the
location onto the sill.
Ÿ Drill hole with a 1/8” drill bit.
Ÿ Do not attach the Center Guide at this time.
Ÿ Install the T-Fin (17) into the Stay Clean Sill with the fin
pointing down. Flush cut at the ends.
Ÿ Set the Sill in place over the centerline and hold in place with
Painters tape.
(2) (6).
(6)
See illustration #2.
(6)
(2)
(2)
Page 2
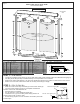
Parts List
Extra screws may be provided for your convenience
ILLUSTRATION #1
1
4d,e
4d,e
16
16
7
7
7
6
2
4a
4a
3
3
5
5
8
8
9
9
HANDLE ASSEMBLIES REMOVED
FOR CLARITY.
PLEASE REFER TO FIG. #2 FOR
Item# Part# Description Qty. Item# Part# Description Qty.
1 1052 TUB
HEADER 1 8 2101 #8 X 1-1/2 FHPHSMS 6
2 1062 STAY CLEAN SILL 1 9 2217 3/16" WALL ANCHORS 6
3 1051 TUB
JAMB 2 10 2384 KNOB 1
4a 3031 HANGER BRACKET 4 11 2385 KNOB W/ BUMPER 2
4b 2214 3/4"
NYLON ROLLER 4 12 XXXX TOWEL BAR 1
4c 2108 #8-32 X 3/8 HWHMS 4 13 XXXX BACK UP PLATE 1
4d XXXX MALE FASTENER 4 14 XXXX GROMMET 3
4e XXXX FEMALE FASTENER 4 15 2386N THREADED STUD 2
5 2223 BUMPER GUIDE 6 16 XXXX GLASS PANELS 2
6 2207 CENTER GUIDE 1 17 4032 TF-3 T-FIN 1
7 2102 #6 X 3/8 PHPHSMS 3 18 2215 ADJUSTMENT WRENCH 1
Anti Jump inserts
3
19
3000
8
9
ACTUAL SIZE
7
Showerhead
Wall
Installation Instructions
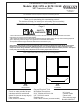
3/8" Frameless Slider
Models: ESE / ETE or ELTE / ELSE